Google Analytics 4 (GA4) is revolutionizing the world of web analytics and marketing. With its advanced features and capabilities, advertisers can now gain a deeper and more comprehensive understanding of their website and app interactions.
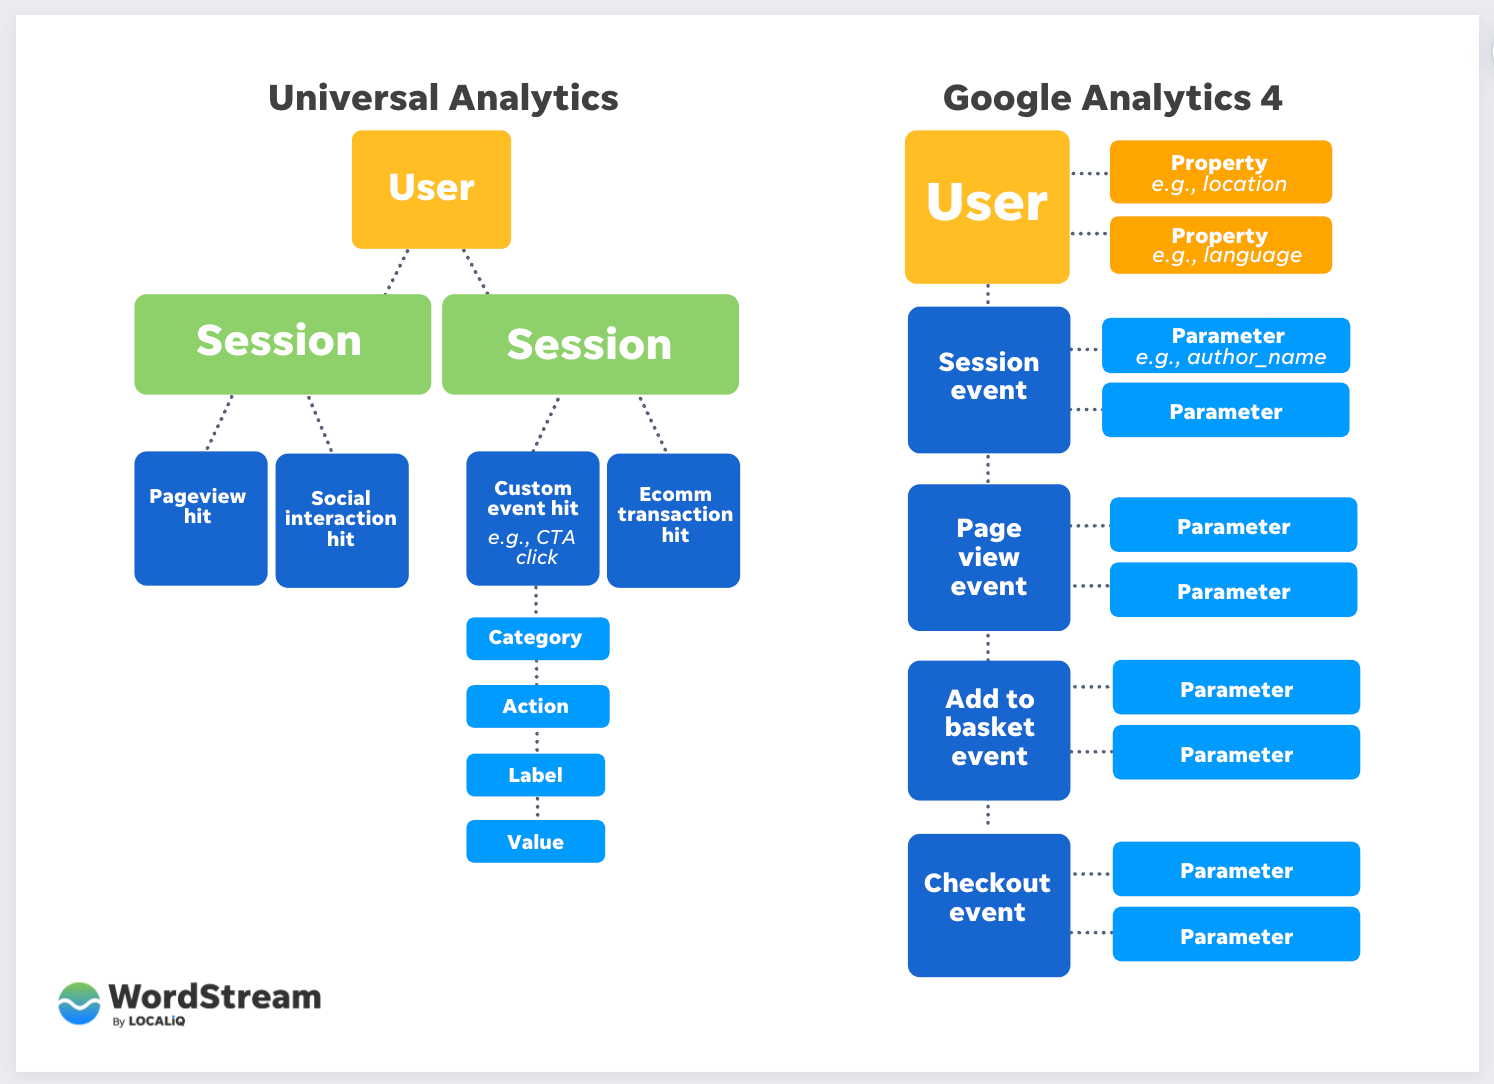
We provide a solid walkthrough of GA4 here, but in this article, I want to dive deeper into three key features that are critical for tracking and analyzing customer behavior:
- Google Signals
- Google Ads account linking
- User-ID
I am going to highlight what makes these features unique to GA4, explain why they are essential for boosting the performance of your marketing campaigns, and provide step-by-step guidance on how to implement them in your GA4 account.
Get ready to unlock the full potential of your web analytics with Google Analytics 4.
GA4 feature #1: Google Signals
Google Signals is an advanced Analytics feature that brings cross-device reporting and remarketing capabilities to the next level. Seamlessly integrated with Google Analytics, Signals provides a comprehensive view of how users interact with your website across multiple devices and sessions. This feature is a major upgrade to Google’s advertising reporting platform.
When you activate Google Signals on the Analytics platform and the user has Ads Personalization turned on, Google is able to gather more information about the user as they navigate your website. This information, which may include the user’s location, search history, YouTube history, and data from sites that partner with Google, is used to provide aggregated and anonymized insights into cross-device behavior (as we know that privacy is a growing marketing trend).
It’s important to note that the cross-device data will only become available from the time the feature is turned on in Google Analytics 4 (GA4) and is not retroactively applied.
How to enable Google Signals
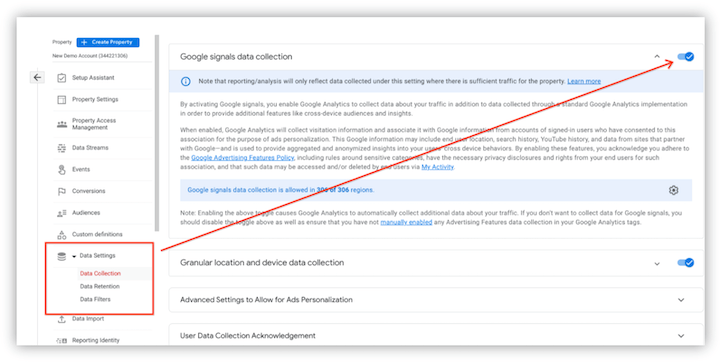
To enable Google Signals, follow these steps:
- Go to the GA4 Admin section.
- In the property settings, click on “Data Settings.”
- Select “Data Collection.”
- You will now be on the Google Signals data collection page.
- Switch the toggle button on the right to “On” to activate Google Signals and location/device data collection.
Imagine you are standing on a cliff, looking at a vast landscape. You can only see a small portion of what’s happening in the area with your naked eye. But with a pair of binoculars, you can see far more and get a much clearer view of what’s happening. Similarly, Google Signals allows you to see far beyond your website and track your audience’s interactions across multiple devices and platforms, including Google Ads and Google Marketing Platform.
With this information, you can make data-driven decisions to optimize your advertising efforts, target specific groups of users with personalized messages, and track the performance of your campaigns.
How to add demographic filters in GA4
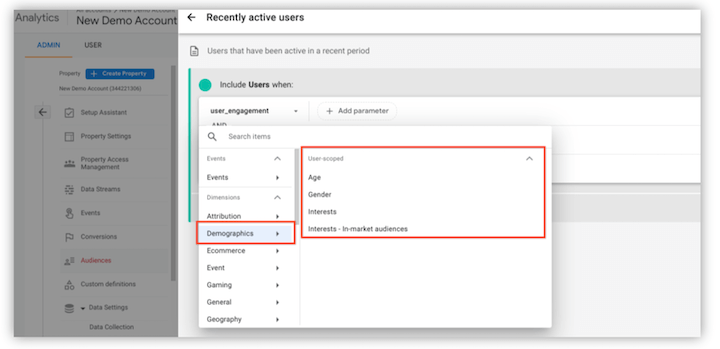
In GA4, when constructing an audience, the “Suggested Audience” section gives you a template to use as a starting point. If Google Signals is enabled and the data within the specified date range meets the minimum requirements, you will have the option to refine the targeting by adding demographic filters to the audience definition. This will allow for more precise audience targeting.
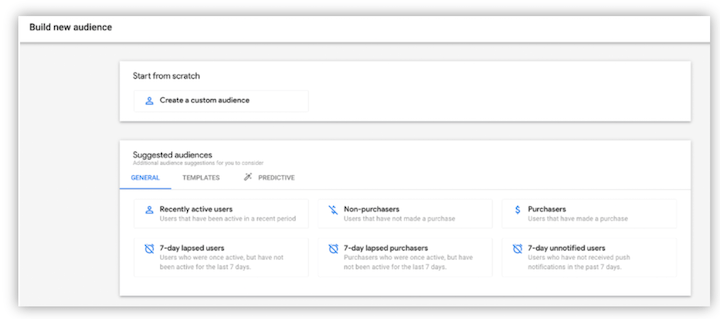
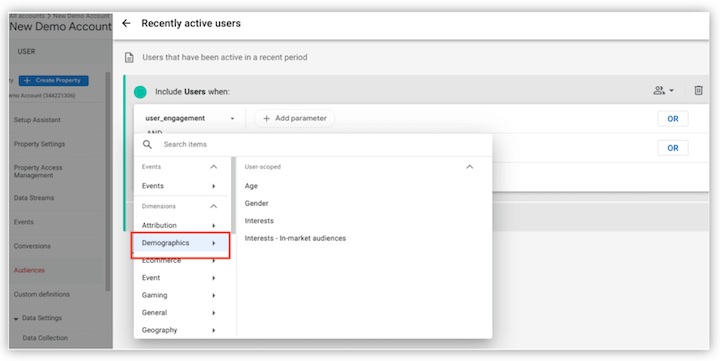
In the screenshot shown above, if you select one of the templates, such as “Recently active users,” you will be given the option to add a new condition.
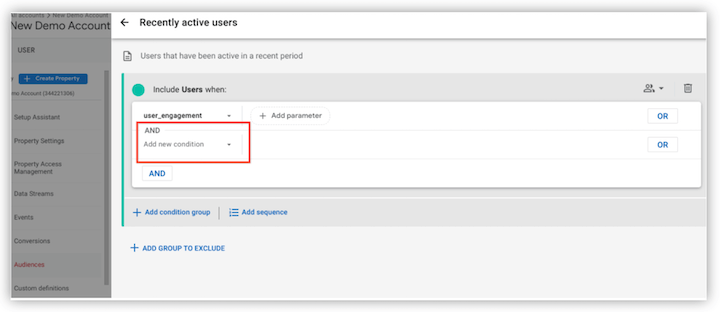
Within the new condition options, you will find user-scoped demographic information to add to the filter for the audience definition. This option is only available if Google Signals is turned on.
How to use predictive audiences in GA4
GA4 offers a significant advantage over Universal Analytics (UA) (which it is replacing) by including predictive audiences. The predictive audience list is generated by incorporating one of the following predictive metrics into the audience definition:
- Likely 7-day purchasers
- Likely first-time 7-day purchasers
- Likely 7-day churning users
- Likely 7-day churning purchasers
- Predicted 28-day top spenders

For instance, you can construct an audience of “Highly Probable 7-Day Purchasers” that encompasses users who have a high likelihood of making a purchase within the next 7 days. This enhances your ability to target users who are more likely to convert and make a purchase.
Google Signals enables you to take your audience targeting to the next level. When you have Google Signals enabled and sufficient data within the designated date range, you’ll have the opportunity to enhance your audience targeting through the use of demographic filters.
This allows you to precisely define your target audience, resulting in a more optimized marketing strategy. With Google Signals, you can achieve a deeper understanding of your audience and create highly targeted, effective advertisements.
GA4 feature #2: Linking Google Ads
As a digital marketer, you know the importance of leveraging data to inform your strategy and optimize your campaigns. By linking Google Analytics and Google Ads, you’ll gain access to a wealth of valuable PPC metrics such as cost, clicks, impressions, and more.
This integration not only provides new insights into your data, but it also simplifies the process of setting up conversion tracking for your Google Ads campaigns by allowing you to import conversion events from Google Analytics.
The process of establishing this integration is simple and quick, and can be achieved in three straightforward steps. Let’s dive in and see how it’s done (be sure to avoid these conversion tracking mistakes, though!).
1. Initiate the integration in the Admin panel
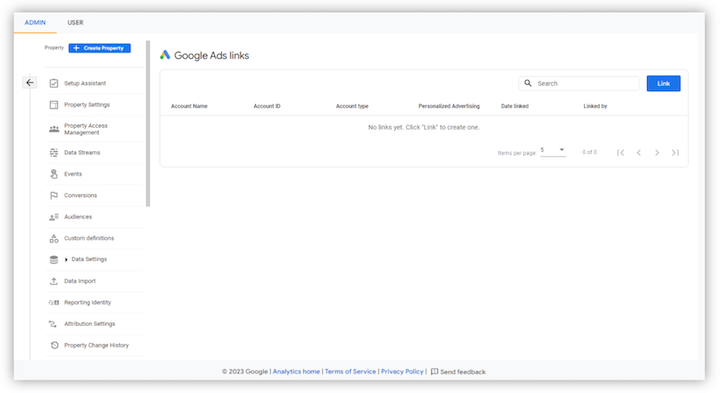
To begin the linking process, access the Google Analytics 4 Admin panel by clicking on the cog in the bottom left of the platform. Within the Property column, navigate to the Product Linking section and select “Google Ads Linking.” In the right panel, click on the blue “Link” button located in the upper right corner to initiate the integration.
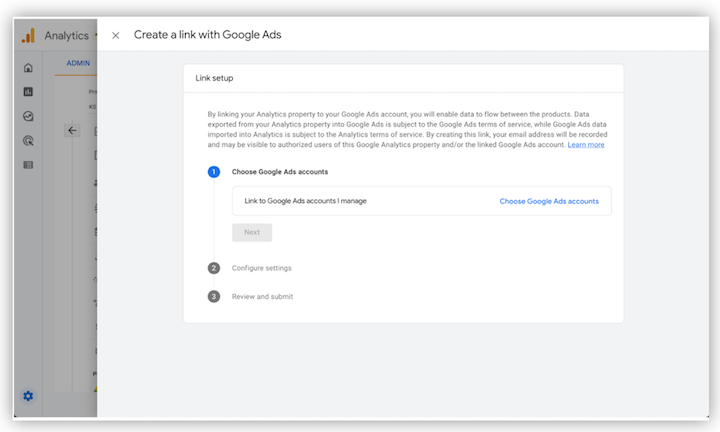
2. Select the Google Ads accounts to link
Click the blue “Choose Google Ads accounts” link, which will open a slide-out window displaying all the Google Ads accounts you have administrative rights over. From here, you can choose the accounts you want to link.
A blue banner at the top of this window reminds you that to link a GA property to a Google Ads account, you must have “edit” permissions on the GA property and admin access on the Google Ads account.
In this final step, you will have the option to select specific settings for your Google Analytics 4 and Google Ads link. Two settings are enabled by default, but you can choose the ones that best suit your business needs.
- Enable personalized advertising: This enables the sharing of audience data and conversion events between Google Analytics 4 and Google Ads. This information is used for targeting and conversion tracking purposes.
- Enable auto-tagging: This allows your Google Ads ads to be automatically tagged with UTM parameters and a gclid. This ensures proper attribution of your ad links. If you prefer to use manual tagging, you may choose to turn this setting off. However, it’s important to remember that UTM tags need to be manually added to each ad link in this case. You can select either option using the drop-down menu.
GA4 feature #3: User-ID
In GA4, User-ID tracking allows you to assign a unique identifier to each user, which can then be used to track their behavior across multiple devices and sessions. This provides a more complete and accurate picture of your users’ behavior, as you can see the full journey they take on your website or app, rather than just isolated sessions.
In UA, tracking user behavior across multiple devices and sessions can be challenging, as it requires session stitching to be done client-side, which can be complex and prone to errors. GA4 eliminates the need for session stitching by using User-ID tracking, which reduces the complexity of tracking user behavior and improves the accuracy of your data.
Additionally, GA4 allows you to create user-based metrics rather than just the traditional SEO metrics, such as lifetime value, which take into account the entire journey of a user across devices and sessions. This provides a more comprehensive view of your users’ behavior and can help you make better decisions about how to engage with your audience.
How to implement User-ID in GA4 using Google Tag Manager
You can use this YouTube video tutorial or follow the steps below.
1. Create a new (or edit your existing) GA4 Configuration Tag in Google Tag Manager.
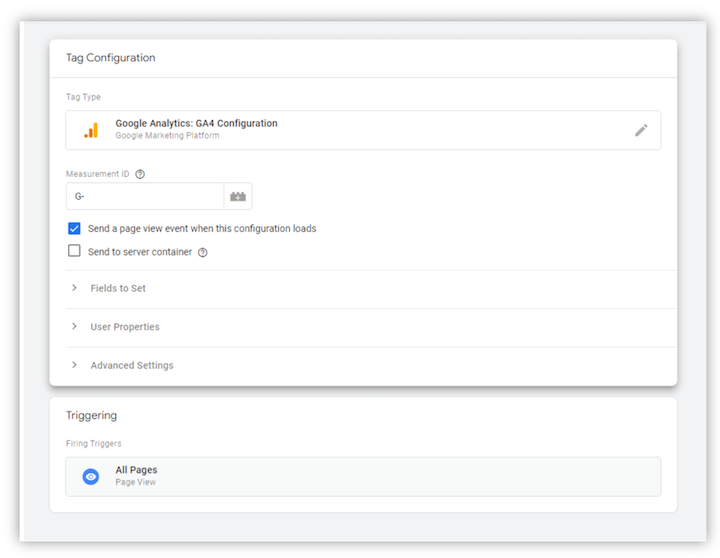
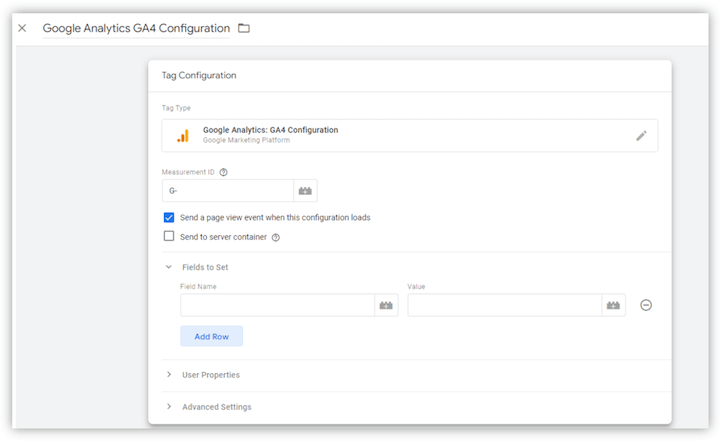
2. In the GA4 Configuration Tag, navigate to the “Fields to Set” section and select “Add Row.”
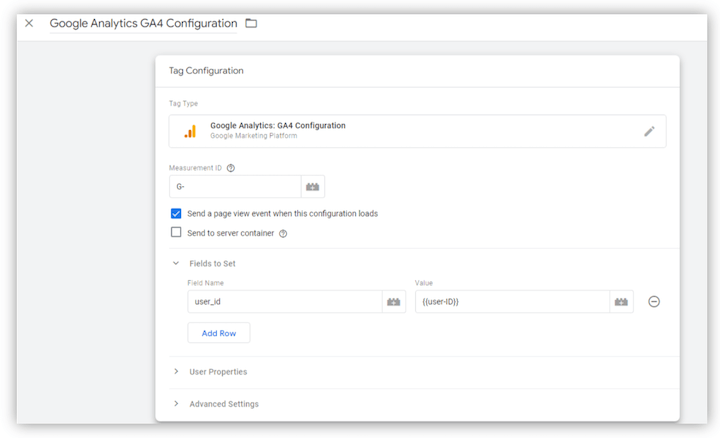
3. In the “Field Name” text box, write “user_id” and in the “Value” text box, enter the value of the User-ID that you assigned to your users (could be a dataLayer variable).
4. Save and publish the GTM container.
5. Verify that the User-ID data is being sent correctly by checking the GA4 Real-Time reports or by using the GA4 Debug mode.
The user ID is important in GA4 because it allows you to track and identify a single user across multiple devices and sessions. With the user ID, you can get a more complete and accurate picture of your users’ behavior, including the number of sessions, pages per session, and conversions.
This is just a basic example of how you can implement User-ID tracking using GTM, and the specifics of your implementation may vary based on your website or app. You should consult the GA4 documentation for more detailed information on how to implement User-ID tracking in your specific scenario.
Start taking advantage of GA4 features
Google Signals, Google Ads account linking, and User-ID provide advertisers with a more complete view of their website and app interactions, enabling them to track and analyze customer behavior in a more effective manner and gain a competitive advantage in the marketplace. Start using them today and harness the power of GA4 to achieve your marketing goals!
The post 3 Key GA4 Features All Advertisers Should Leverage (& How) appeared first on WordStream.




Recent Comments