
Blog post checklist: how to optimize for search engines
So you’ve decided to write a blog post. That’s great! Now let’s make sure your efforts pay off and it turns into an awesome post that also ranks. What do you need to write that post? What steps do you need to take? You can use this blog post checklist to make sure you’ve got all the bases covered. And with the improved publishing flow in our Yoast SEO 14.4 release, this becomes even easier. Let’s have a look!
1. Conduct proper keyword research
You (probably) want to write a blog post about a topic related to you or your business. And that’s definitely something you should do. But, to make sure you reach your audience, you also want your blog post to rank in the search engines. This is where keyword research comes in.
Keyword research helps you determine which words your audience uses when they’re looking for a product, service, or information you offer. Because the words you use might not be the same as the ones your audience uses. By conducting keyword research you can draw up a list of keywords or keyphrases that are relevant to you, but also help you create content that ranks.
This is why keyword research is the first step in your blog post checklist, and one you should not skip. You can find more information in our ultimate guide on keyword research.
2. Preparation is key
Now that you know what keyword or phrase you want to write about, you might want to get started right away. But there’s one more step we need to take before you put your (digital) pen to paper. And that’s preparation. This might feel like an extra step, but it’s important to realize that the right preparation helps your readability and SEO, plus it saves you time in a later stage of your writing!
So take some time to think about what you want to say and to whom you want to say it. What is your goal with this text? Do you want to inform people about a certain topic or persuade them to buy one of your products? By formulating the purpose of your blog post and defining your audience for this post, it’ll become much easier to decide on your angle and writing style.
It also pays off to think about the structure of your piece before you start writing. The structure is the skeleton of your text: it will help the reader and search engines grasp the main idea of your text. Also, it’s easier to start writing when you’ve already decided on your structure beforehand.
Start by writing down a list of topics you want to discuss in your post. After that, you can bundle similar topics together and your structure will begin to take shape. Now you can decide on the order of your topics and it’s up to you if this will be done chronologically, didactically, or any other way that suits your blog post.
Read more: Blog post structure: How to set up an easy-to-read text »
3. Start writing
When you’ve completed the first two steps of your blog post checklist, it’s time to start writing. And I know that this part can be hard, especially writing those first few sentences. My advice is to just start writing while keeping the structure you’ve created in mind. Don’t mind awkward sentences or typos too much in this phase, as this can take you out of the writing flow. We’ll fix them later on.
Also, don’t get hung up on your first paragraph or introduction too much. It’s always easier to write a beginning (and ending for that matter) once you’ve written the main body of your text. Just write down a few words or phrases you want to discuss in your first paragraph and start with your second paragraph if this comes easier.
In our ultimate guide to SEO Copywriting you can find more tips on how to start writing and boost your writing style.
4. Check your readability bullets
Once you have written your first draft, it is time to correct all of those typos and awkward sentences. You should take the time to carefully read and re-read your blog post and make adjustments where needed.
Your blog post should be well readable. A great tool to help you with this is the readability score provided by Yoast SEO. Our content analysis will give you feedback on how easy to read your content is. For example, it allows you to detect whether you use too many long sentences or whether you use too much passive voice in your text.
With the release of Yoast SEO 14.4, we’ve added the possibility to check on how your content scores straight from the Document sidebar in the block editor. This makes it easy to keep an eye on the readability of your text while you’re editing it.
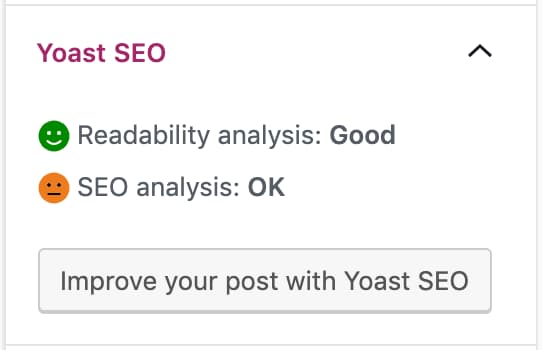
And if you’re wondering why your readability or SEO bullet is red or orange, just click on the button below these bullets to ‘Improve your post with Yoast SEO’. This will give you feedback straight in the Document sidebar and allows you to process this feedback without taking you out of your writing flow.
5. Check your SEO bullets
When you’ve written a great and readable blog post, you want it to rank in the search engines. This is where the Yoast SEO analysis comes in. Assuming you haven’t skipped the first step in this blog post checklist, your blog post will be focused on a keyword that is beneficial to your SEO strategy. Fill in your keyword in the focus keyphrase field and our SEO analysis will give you feedback on how SEO-friendly your article is.
As with the readability analysis, you are now able to check your SEO score in the Document sidebar in the block editor. This makes it possible to work on the SEO of your content while editing. And if your bullet is red or orange, simply click the button ‘Improve your post with Yoast SEO’ to get feedback on how to optimize your text!
Keep reading: Our must-read articles about Content SEO »
6. Hit publish!
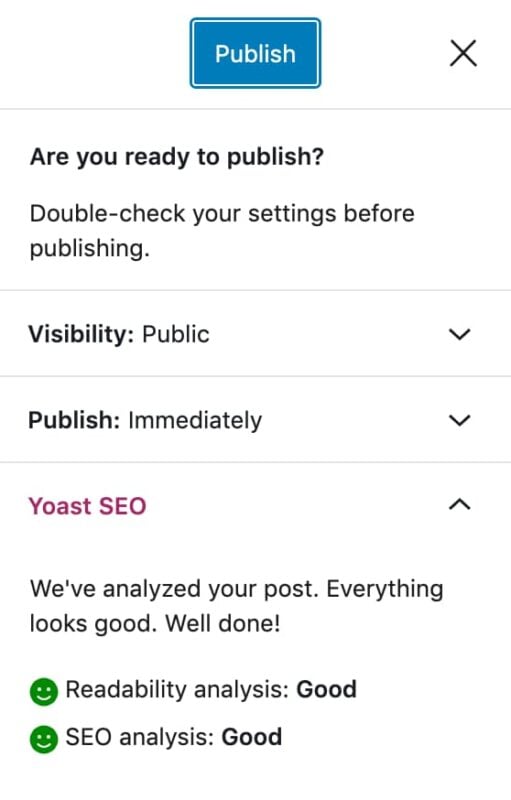
You’ve made it to the final step in this blog post checklist! And that’s to finally hit that publish button. If you’re feeling a bit hesitant about making your post public, don’t worry. Since Yoast SEO 14.4, we’ve built in a feature to give you the reassurance you need to send your new content into the world. After clicking the Publish button, we’ll give you a final overview of your scores on readability and SEO. This gives you the possibility to make some final adjustments if needed and happily press that button.
After publishing your post, you’ll be greeted with a screen that gives you the link to your freshly published blog post. And to make this a part of your publishing work flow, we’ve added the possibility to share your post on social media right away.
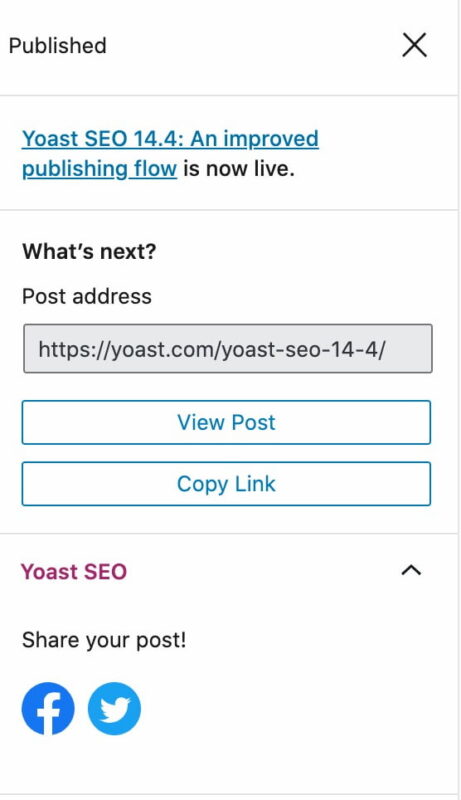
Why? Social media are a necessity for the growth and marketing of your website. By sharing your new blog post right away, you’re drawing attention to it and increasing the traffic to your site. This gives your new blog post a kickstart in getting exposure and will help your rankings.
The blog post checklist in short

In this article, I’ve talked you through the blog post checklist to optimize your post for the search engines. First of all, every blog post should start by executing keyword research. Secondly, make sure you take the time to prepare your blog post carefully. And after you have written the post, use Yoast SEO to check the readability and SEO of your content.
This brings you to the final step in this checklist: publishing your awesome blog post and sharing it with your audience right away. Which brings me to my final step in this article: wishing you lots of luck with your writing!
The post Blog post checklist: how to optimize for search engines appeared first on Yoast.


Recent Comments