Authenticity is key on social media. But it can also be elusive. Knowing how to get verified on Facebook is critical for both individuals and brands looking to show that they are the real deal on the world’s largest social platform.
Key takeaways
- Facebook verification is a process that confirms an account’s authenticity, i.e. indicates that the account genuinely represents a given person, brand, or organization. It’s marked by a blue checkmark badge.
- There are two types of Facebook verification. Traditional verification is free, but it’s only available to notable accounts and has a restrictive application process. Meta Verified is a paid program available to most users, offering perks like impersonation protection and enhanced support.
- A verified badge boosts credibility, improves search visibility, may enhance ad performance, and helps maintain consistent business data across platforms.
What is Facebook verification?
Facebook verification is the process of getting an account or Page verified to show other users that it represents your authentic presence on the platform. A blue checkmark verified badge appears next to a verified Facebook account’s name:

Source: @paramount on Facebook
Twitter kicked off the idea of verifying social media accounts in 2009 to indicate the genuine accounts of public figures or notable organizations. Facebook followed suit with its own blue verification badge in 2013.
There are two types of Facebook verification:
- Traditional verification. This is the original (and free) verification plan for notable accounts launched in 2013. It is still available, but it may be difficult to get approved now that Facebook offers a paid verification plan.
- Meta Verified. A paid subscription plan ranging from $14.99/month for creators and standard business plans all the way up to $4999.99/month for the Business Max plan, which offers additional benefits — including impersonation protection for employees.
Who can get verified on Facebook?
The original Facebook verification program was intended specifically for large brands and well-known people.
Starting in 2023, with the launch of the Meta Verified program, Facebook verification has become available to just about any legitimate person or brand on Facebook that is willing to go through an authentication process and pay a monthly fee.
Who qualifies for traditional Facebook verification?
Meta lists the following eligibility requirements to apply for traditional Facebook verification.
- Represent a real person, registered business or entity
- Be the only Facebook presence of this person or business (with exceptions for language-specific accounts)
- Have an about section, profile photo and at least one recent post
- Represent a well-known person, brand or entity that people often search for on Facebook
- Agree to Meta’s Terms of Service and follow the Facebook Terms of Service and Facebook’s Community Standards.
You’ll also need documentation to prove your authenticity:
- For a person (such as an influencer), you need government-issued photo ID such as a driver’s license or passport
- For an organization, you need something that identifies your business, such as a certificate of formation, articles of incorporation, or tax exemption documents. In a pinch, you can use a phone or utility bill in your business name
Facebook doesn’t explicitly define what “well-known” means, so there is no real way to know for sure if you will qualify.
Who qualifies for Meta Verified?
You can apply for Meta Verified for either a profile or a page. The qualifications are slightly different because different documents are needed to confirm authenticity.
For a profile, you must:
- Be at least 18 years old (or the age of majority where you live)
- Be located in a country where Meta Verified is available
- Have a government-issued photo ID.
- Not change your account name, profile picture, etc. too often in the time leading up to your application
- Agree to Meta’s Terms of Service and follow the Facebook Terms of Service and Community Standards.
- Have two-factor authentication enabled on your account.
For a business page, you need to meet all the same eligibility criteria, as well as the following:
- Have full control of a business portfolio within Meta Business Suite that contains a Facebook business Page.
- Meet minimum activity requirements
- Have a complete profile with a profile picture, cover photo, and category
- Have advanced protection enabled
Why verify your Facebook Page?
The verified blue check lets your audience know you’re authentic and helps reduce the impact of fake accounts. It can also help your Facebook Page appear higher in search results, as the Facebook algorithm favors verified accounts. This makes it easier for potential customers to find your business in the first place, and ensures they trust you when they do.
The Meta Verified program offers additional benefits, depending on the level of plan you choose, including:
- Impersonation monitoring and protection
- Access to Meta Verified support for help with account issues
- Ability to add links in Reels
We asked some social marketing pros about the main benefits they’ve seen from Facebook verification. They consistently agreed that the blue tick delivers on the promises of improved credibility and enhanced reach.
They also shared some unexpected benefits of taking the time to verify Facebook Pages.
Improved ad performance
“The verification badge helped us cut our cost per qualified lead in half,” said Aaron Whittaker, VP of demand generation & marketing at Thrive Digital Marketing Agency. “We notice prospects click through our service pages more frequently and spend more time exploring our case studies. When potential clients message us through Facebook, they often mention seeing the verified badge as a reason they chose to reach out.”
Reduced time required for customer service
Tristan Harris, senior VP of marketing at Next Net Media, also said that sales prospects mention the verified badge on initial calls. But one of the greatest benefits was seeing a 28% drop in customer service messages.
“A single blue checkmark eliminated the daily barrage of ‘is this your real page? messages,” Harris said. “At the same time, engagement on our announcements soared because customers knew they were getting official information.”
Improved data consistency (even beyond Meta platforms)
“Facebook verification significantly improved our business listing consistency across the web,” said Matt Harrison, VP of global operations & marketing at Authority Builders. “For example, directories automatically pulled our verified Facebook information when we opened a new office location. During a recent analysis, we found our business information was consistent across 90% of local directories, largely because they referenced our verified Facebook data.”
How to get verified on Facebook
Method 1: Apply for traditional Facebook verification (free)
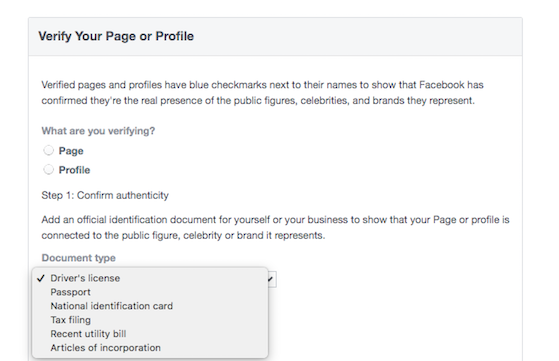
1. Head to the verification request form.
2. Choose the page or profile you want to verify and upload the documents to confirm your authenticity.
Source: Facebook
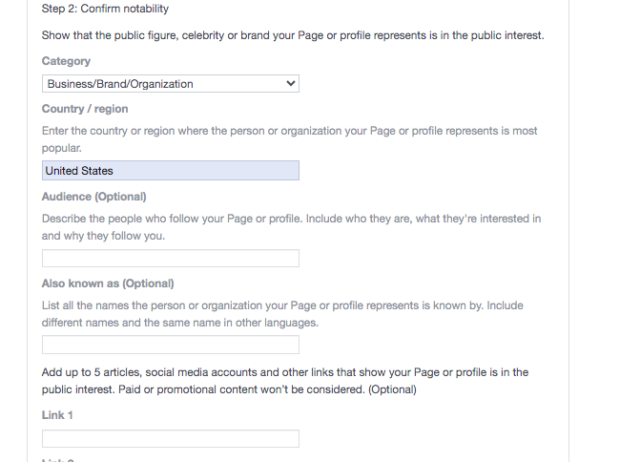
3. Confirm your “notability.” Facebook wants to know that there’s a public interest in verifying your account. This includes providing some information about your brand, as well as optional links to up to five sources to help prove your claim. Consider listing your official website and any news sources that mention your brand.
Source: Facebook
When you’ve completed the form, click the blue Send button.
Then, it’s a waiting game—although you may not have to wait very long. Facebook has automated verification processes in place, and if you don’t meet all the verification criteria you’ll get notified right away. You can try again in 30 days.
If you don’t get an immediate rejection message, cross your fingers and wait for news!
Method 2: Pay for a Meta Verified subscription
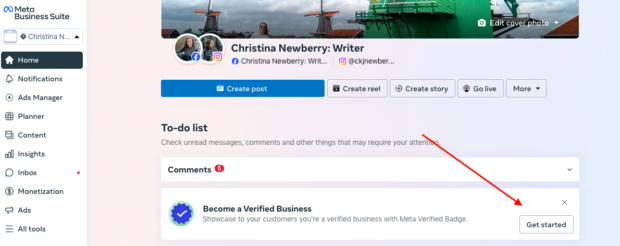
1. Head to Meta Business Suite and scroll down to the Become a Verified Business box and click Get Started. Or, go directly to the Meta Verified sign-up link.
Source: Meta Business Suite
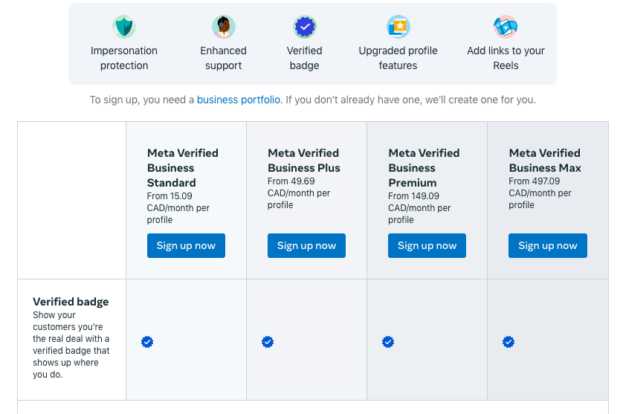
2. Make sure you are signed into the right profile, and choose the plan that best suits your needs. You’ll see pricing in your local currency based on the standard U.S. dollar amounts.
Source: Meta Business Suite
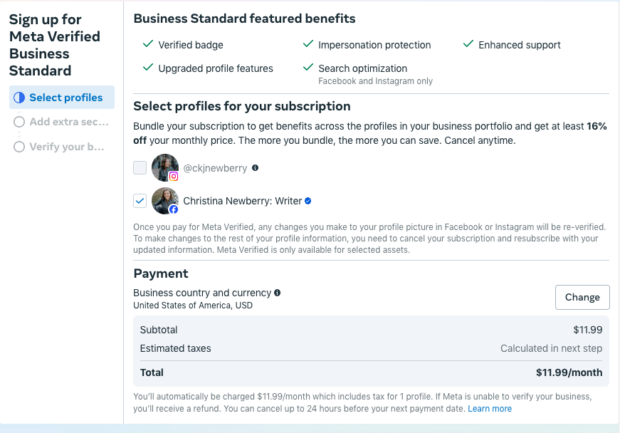
3. Choose the Facebook Page(s) you want to verify. You can also choose to verify your connected Instagram account for a bundled price. Then click Next.
Source: Meta Business Suite
4. Enter your business address and other details for invoicing in the pop-up, then click Save. Review your subscription details and click Next.
5. Add your payment details and click Next. Confirm and then click Next one more time.
6. Set up two-factor authentication if you have not done so already.
7. Follow the onscreen instructions to complete the verification details for your business.
4 ways to increase your chances of getting verified on Facebook
1. Get your account details settled before you apply
It’s hard to confirm that your account is authentic when you keep changing the details of your account. That’s why Facebook will not verify accounts, even through the paid Meta Verified plans, that have made too many recent changes to key account details.
In the lead-up to applying for verification, don’t make any changes to your:
- Profile name
- Profile picture
- Username
- Location
- Account type
Most of these details should remain consistent over time anyway to maintain an effective Facebook marketing strategy. Just don’t be tempted to do any profile picture testing or swapping it up for a seasonal campaign when you’re about to apply for verification!
2. Make sure your profile is complete
Whether you’re applying to verify a Facebook profile or a Page, you need to have a complete profile. That includes:
- Profile picture
- Cover photo
- Category
For traditional verification (rather than Meta Verified), you also must have a complete About section.
Need more details on how to create an effective and complete Facebook profile? Check out our blog post on optimizing social profiles, or get help with the bio section using our free AI Facebook bio creation tool.
3. Check that your Page follows Facebook’s Page Naming Guidelines
In general, the best Page name is your brand name or the most common way people will search for your brand on Facebook.
As Facebook puts it, “Page names must accurately reflect the Page.”
Seems pretty simple, right?
But there are some specific things you need to avoid in your Page name to qualify for Facebook verification. Before you apply, make sure that your Page name does NOT:
- Include abusive terms or phrases
- Use the word “official” if it is not, in fact, the official Page of the relevant brand, person, or entity
- Use all capital letters (except for acronyms) or improper capitalization (e.g., hOoTsuiTe)
- Include symbols or any unnecessary punctuation. You may have to push back against your brand team here, as the ® and
 are not allowed
 - Include a description in the page name – this should go in the About section
- Include any variation of “Facebook” or “Meta”
- Consist of a single general interest word that is not a brand name (such as “software”)
- Consist solely of a place name. Destination marketing organizations should use their official names (e.g., Destination Vancouver), and city governments and departments should specify which entity the Page represents (e.g., City of Vancouver – Local Government or City of Vancouver – Cultural Services). After all, it’s hard to authenticate “Vancouver”
4. Understand and follow the Community Standards and Terms of Service
As part of the verification application, you promise to uphold these standards. So, it’s a good idea to know what they are.
It’s impossible to summarize these lengthy documents here, so you’ll likely want to read through them in full yourself. (Yes, we know, it’s easier to just click the “Accept” checkbox.)
Some key highlights:
- Don’t lie about who you are
- Don’t post anything illegal
- Don’t post content that doesn’t belong to you
- Don’t make threats
Can you get verified on Facebook and Instagram at the same time?
You can get verified for Facebook and Instagram at the same time using Meta Verified. As shown above, all you need to do is select both your Facebook and Instagram accounts when setting up your Meta Verified subscription.
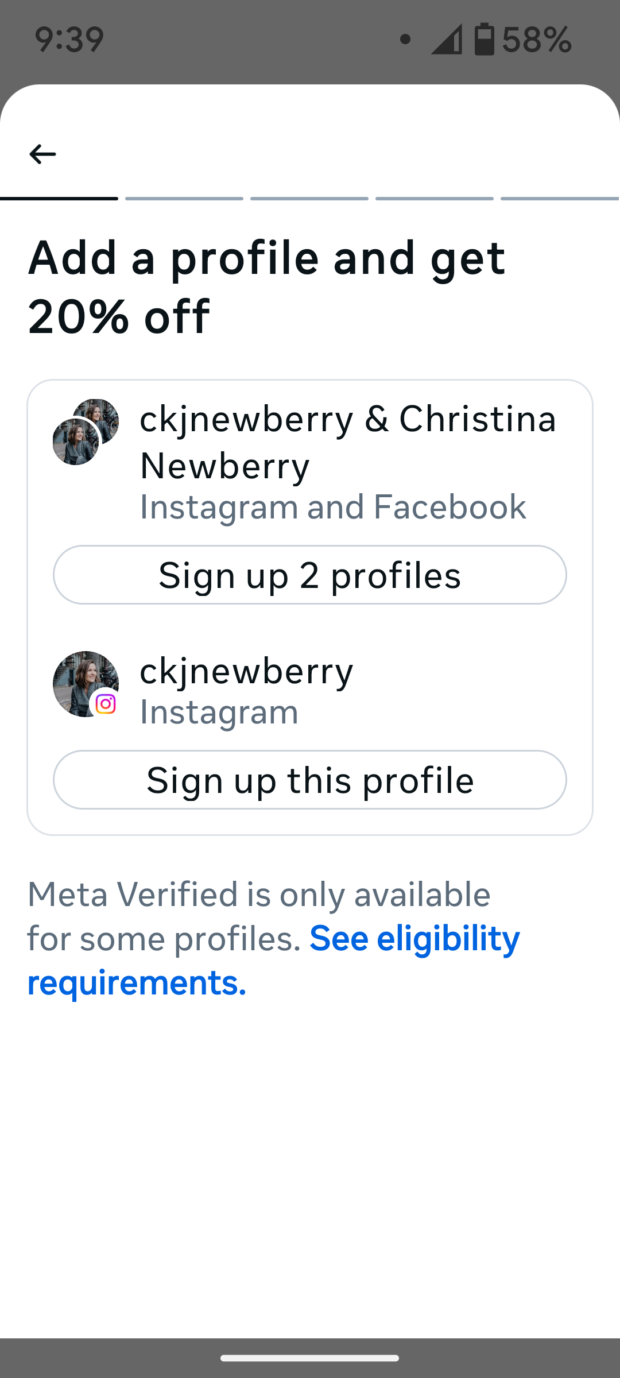
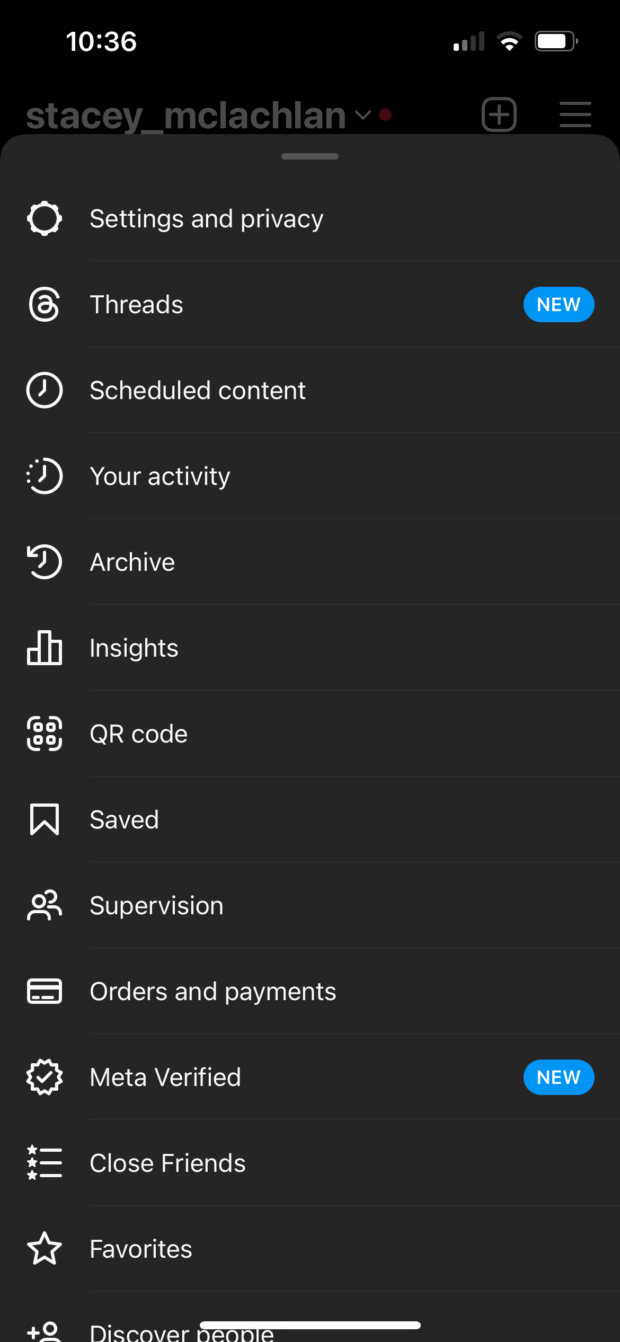
Alternatively, you can verify your Facebook profile and Instagram account at the same time through the Instagram app. From your profile, go to Settings, then tap Meta Verified. Tap Unlock Benefits and select the option to Sign up 2 profiles.
Source: Instagram
If you have the same name and profile photo on both profiles, and your profile name matches your ID, you can bundle your verifications and get a discount on both plans.
For more details, see our post on how to get verified on Instagram.
Make social media marketing easier by managing all your social accounts with Hootsuite. Schedule posts, monitor trends, gain valuable insights, analyze data, run ads, track ROI, and more – all in one place. Try it today.
The post How to get verified on Facebook: Updated 2025 guide appeared first on Social Media Marketing & Management Dashboard.


Recent Comments