
A tutorial to higher rankings for WordPress sites
WordPress is one of the best content management systems when it comes to SEO. But even though it gets a lot right “out of the box,” there’s much more that you can do to improve your performance.
Optimizing your site using the tactics and best practices outlined in this article will help you improve your rankings, gain more subscribers or sales, and have a better website in general.
Because you should ingrain proper SEO in all aspects of your online marketing and PR, this guide covers quite a lot of ground! It’s a long read, so feel free to use the table of contents below to jump around.
Before we start…
This article assumes that you’re using our Yoast SEO plugin, which adds significantly more features and SEO tools to WordPress. If you’re not already using it, you can set it up right away with our beginner’s guide to Yoast SEO.
Read more: How much does Yoast SEO cost? »
If you’re using another SEO plugin, most of the principles will still apply. Of course, we’d prefer you to switch over and make use of our potent WordPress SEO plugin, which is why we’ve written a migration guide for you. It’s a straightforward process!
Table of contents
1. Get your basic WordPress SEO right
Out of the box, WordPress is a pretty well-optimized content management system. A basic setup can provide a strong foundation without extensive customization, theme optimization, and plugins. That said, there are a few things you should do to increase your chances of ranking, refine your workflow, and make sure your website is perfectly optimized.
By putting the right basic settings in place and applying a few simple techniques, you can ensure that you have a strong foundation to build upon!
1.1. Check your site health
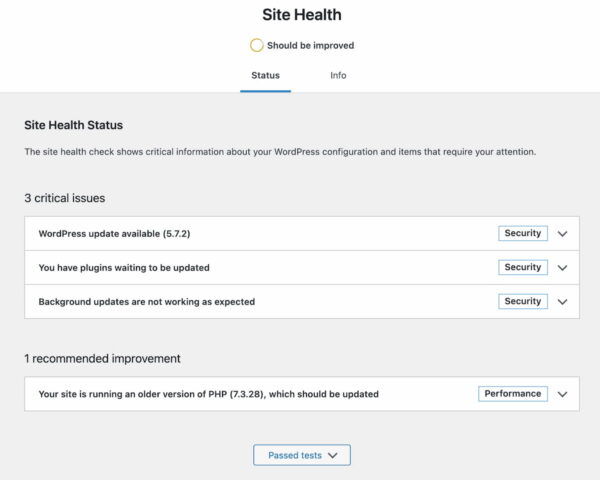
Before you make any changes to your site, it is good to see where you are now. There’s a lot to gain from getting it right: running your website on a server with updated software at a web host that offers excellent performance. So ask yourself: on what hardware and software are your sites running? What is your hosting plan? Are you using a budget shared hosting provider, or have you invested in a dedicated hosting plan at a well-known web host that fine-tuned its servers for use with WordPress?
To find out what’s going on behind the scenes of your site, you can visit the Site Health section in WordPress. Also, you could choose to install the Health Check plugin. This plugin gives you loads of technical insights and helps you get information that outside parties can use to help you improve your site. Eventually, all features of the Health Check plugin will move to WordPress core.
1.1.1 Check you’re using suitable hosting
According to WordPress’s technical requirements page, the recommended hosting plan to run WordPress should include a modern version of PHP, MySQL or MariaDB, and HTTPS support. It is possible to work with older server software, but that is not recommended. If you check your Site Health, you can see the technical details of your installation. In addition, if you open the dashboard of your hosting provider, you should be able to see what type of plan you are on.
Remember, paying for good WordPress hosting pays dividends. Upgrading your hosting plan is one of the easiest improvements you can make.
1.1.2. Upgrade to PHP 7.0 or higher
While the numbers are going down quickly, many WordPress sites still run on outdated versions of PHP. One look at the WordPress stats reveals that around 15% of the sites still run on a PHP version in the five series, while PHP 7.0 and up have been available for years.
Backward compatibility is cool and all, but it’s holding back WordPress as a technology and site owners from getting the most out of their sites. These old PHP versions don’t receive any more security fixes and are thus increasingly vulnerable to attacks.
Luckily, the WordPress team has dropped support for anything older than PHP 5.6. Today, the project recommends running WordPress on at least PHP 7.3.
So, one of the most important things you can do to improve the performance and security of your site is upgrading your hosting environment to a modern version of PHP. There are a lot of benefits to this:
- PHP 7 offers an incredible speed boost.
- It runs a lot more efficiently, meaning less stress on your server.
- Bring loads of modern development features.
- It’s a much safer and more secure environment.
- It’s future-proof.
Now, this is something we all want. If you’ve checked your current hosting set-up in the previous section, you have an idea of what your site runs on now. If this shows outdated server software like PHP 5.5, it is good to update this, if possible.
However, take special care before doing so. Ask for help if you’re not sure what you are doing.
Here are some steps to take:
- (Always!) Back up your website.
- Make a local staging environment based on a modern version of PHP.
- Install the backup of your site on that server.
- Test thoroughly to see if everything works properly.
- Upgrade your live site — most of the time, your hosting provider can do this for you.
We have a post that shows you how to set up a test environment for your WordPress site. WordPress.org has a post on the advantages of updating your PHP version and what to take into consideration when doing that.
1.1.3. Make sure you’re using SSL and HTTPS
Historically, adopting SSL (getting an HTTPS URL and a green padlock icon in the browser URL bar) was an optional tactic. Many sites, arguably, didn’t need the extra level of security that SSL provides.
Today, having a valid SSL certificate installed is mandatory — search engines may ‘penalize’ sites without valid SSL certificates and setups (and/or show warnings next to their search results). Google has mentioned that HTTPS is a ranking signal. In addition, it’s generally good practice for all websites to use SSL to prevent hackers and third parties from intercepting requests and data.
Additionally, many modern site speed and performance techniques require a valid SSL/HTTPS setup. To take advantage of new, faster web technologies like HTTP/2 and the upcoming HTTP/3, browsers like Google Chrome and Firefox need the website to have a valid SSL certificate.
If you want to move to SSL and ensure that your site is served correctly over HTTPS, we have a handy guide with tips & tricks for moving to HTTPS. Since version 5.7, WordPress comes with a basic tool to make the detection of and move to HTTPS easier.
1.2. Check your site settings
It’s worth spending some time clicking through all of the sections in the WordPress Settings menu, as many of the options there can impact the SEO of your WordPress site.
In particular, it’s worth double-checking your visibility settings in Settings → Reading, to make sure that you’re not accidentally preventing search engines from indexing your website. That’d definitely hurt your visibility!
You should also make sure that your Writing and Reading settings are all set correctly, these control your default categories, and what should be displayed on your homepage. Don’t forget to give your site a strong tagline in Settings → General, too!
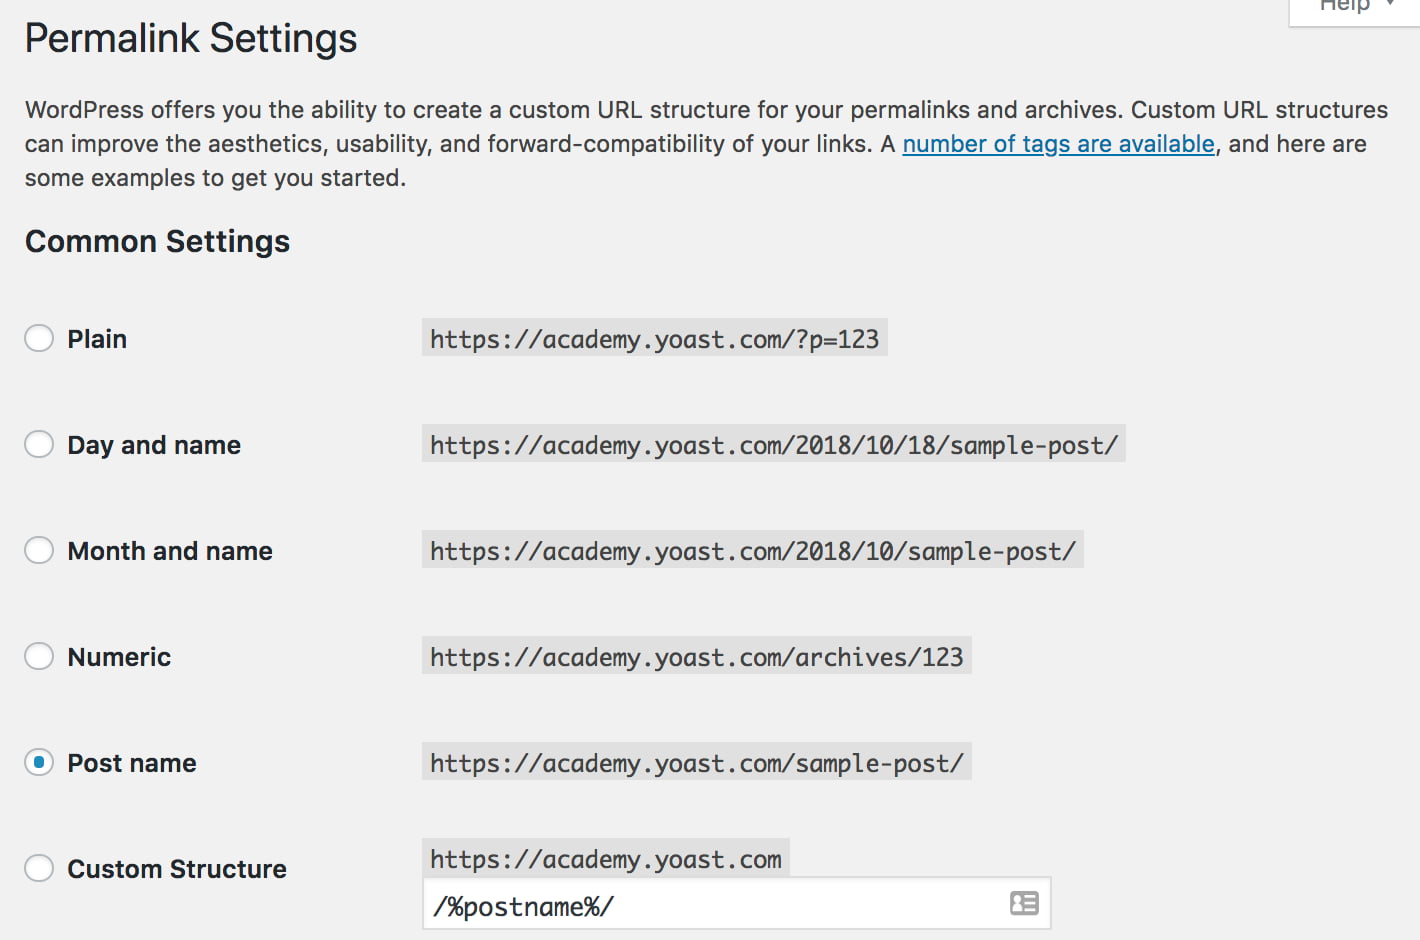
1.3. Pick the right permalink structure
Your permalink settings define what format your page and post URLs will take, which can have a big impact on SEO. So if you’re creating a new site, one of the first things you should do is change your permalink settings, which you can find in Settings → Permalinks.
If you don’t change your settings from the default, all of your pages and posts will have URLs that look like example.com/?p=123. Whilst this is perfectly okay, it’s not particularly nice, and it might impact how users and search engines perceive the quality and relevance of your pages.
Changing the permalink structure alters the components, ordering, and structure of your website’s URLs. Therefore, it’s important to select the right structure when setting up your website, as changing it later can cause SEO issues.
We usually recommend that people use a structure that creates URLs that look like example.com/post-name/, or example.com/category/post-name/, depending on how much importance they anticipate placing on the categorization of their content. For most WordPress sites, choosing either of these options will be perfectly suitable.
For the first option, you can just change the permalink setting to /%postname%/, like so:
To include the category, you can select “Custom Structure” and change the value to /%category%/%postname%/.
If you previously had ?p=<postid> as your permalink, WordPress will take care of all the redirects for you. This is also true if you change from /%postname%/ to /%category%/%postname%/.
If you have an established site and change from any other permalink structure, you might want to consult our article on changing your WordPress permalink structure and the tool that you’ll find within it.
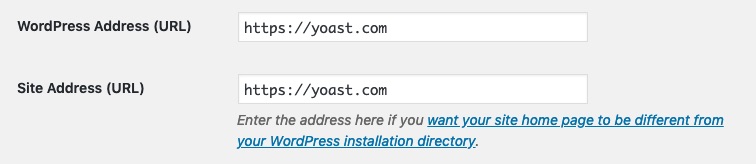
1.3.1. Choose WWW or non-WWW
You need to think about what you want your site to show up as www.example.com, or simply example.com. Make sure that in your general settings, in Settings → General, the version you want to show up is properly reflected:
From an SEO perspective, there’s little difference either way. Additionally, most hosting and server setups will automatically redirect requests for the ‘wrong’ version to the version you’ve selected. That makes this primarily a branding consideration — which approach feels best for your site?
From a technical perspective, there’s not a huge amount of difference, either. Some setups might have some minor headaches if they omit the ‘www’ component, but these are increasingly rare.
2. Optimize your content
Your site should provide the best content on your chosen subject — period. People are looking for engaging, authoritative articles and trustworthy answers to their questions. Writing high-quality content for your WordPress site begins with your unique ideas or distinctive take on a particular topic. But it also means presenting these ideas in a well-structured and accessible manner. Together, this will help you attract the audience you’re looking for and keep them engaged.
2.1. Research what your users want and need
Before writing your content, you should think about what search terms you want to be found for. Then, you should optimize every page or post for a specific keyphrase.
But how can you determine what keyphrase you want to be found for? To find out, you need to do keyword research. In this process, you should ask yourself questions: what terms do I want to rank for? How realistic is it that I can rank for these terms?
Imagine you have a baking blog, and you’re passionate about sharing your favorite recipes and baking techniques. Optimizing a post for a term such as [best cake recipe] isn’t a realistic goal because it’s a very general term. There’s a lot of competition for such general terms. Instead, it would help if you thought about finding your own niche. This niche could be [healthy, low-sugar cake recipes] or [French patisserie you can make at home].
Within a niche, you can become an expert. Your expertise enables you to create content that goes beyond that of your competitors. You can go deeper than others or shed light on different angles of the same topic. For this, you’ll want to focus on long-tail keyphrases. For example, a long-tail keyphrase might be [how to make a low-calorie vegan blueberry cheesecake]. A keyphrase like this is more specific, and therefore easier to rank for. Also, it’ll be more suitable for your particular niche topic.
It’s also essential to think about what your audience wants to achieve by searching for a specific term. This is called search intent. For example, they could be looking for the answer to a particular question, and you can provide the necessary information. Or they might want to buy a specific product that you can offer them. Think about the needs of your visitors and address them by creating content accordingly.
Need a hand doing keyword research properly? Our Keyword research training can help. This course is part of our Yoast SEO academy. You’ll automatically get access to Academy for free once you sign up for Yoast SEO Premium — two essential products for one low price.
2.2. Write great content for your users
After you’ve done your keyword research and know the topics you want to write about, you need to get to the actual writing. Most of the time, that’s easier said than done. To get from an idea to a great piece of content, most likely, you’ll have to follow a cycle of drafting, writing, editing, and rewriting.
Your first draft can be an outline of your structure. You don’t have to write out everything in perfect prose at this point, but make sure that you follow a logical structure. Most pieces will include an introduction, your main points of argument, and a conclusion. Of course, this will vary per genre – a recipe will have a completely different structure.
You can further flesh out the points in the writing phase, where you try to develop a first complete version of your text. Finally, you should check whether your piece is engaging and easy to read in the editing phase. You might be an expert on your topic, but your audience probably isn’t (yet). So try to make your writing as accessible as possible. Readability is essential. The readability analysis in Yoast SEO helps you improve your writing.
When in doubt, it’s always best to ask a friend or colleague for some feedback. Another helpful trick is to read your text out loud to yourself. You can even let your computer speak it. It will give you a better idea of whether everything flows nicely.
2.3. Optimize your individual posts & pages
When writing or editing your post, you need to pay special attention to some elements to make it SEO-friendly. These elements include your subheadings, your title, and your meta description — all of these need to reflect the topic of the specific post.
Don’t forget, SEO-friendly doesn’t just mean that it’s easy for a search engine to grasp a page’s topic. More importantly, it means that your visitors can get the gist of your page at a single glance.
Your meta description and your title might be a deciding factor for whether visitors click on your page in the search results in the first place. And once they’ve visited your site, elements like subheadings can be critical for visitors to decide whether they want to stay on your site.
2.3.1. Set your focus keyphrase(s)
One important rule is not to use a focus keyphrase on more than one page. Otherwise, you might end up cannibalizing yourself. Most of the time, you don’t want to rank for multiple pages on the same keyphrase because it means that you’re setting yourself up as your own competition.
It’s also essential to include the focus keyphrase in crucial elements of your post, such as the title, the introduction, your subheadings, and your meta description. All of these elements are signals for what your post is about. Since your focus keyphrase is, in fact, the main topic of your page, it’s a logical consequence that you should make sure this topic is reflected in all of these elements.
The same logic holds for your text overall: you need to make sure that you don’t stray off-topic; if you stay on-topic, it should follow naturally that you use your keyphrase multiple times throughout your text. But avoid stuffing your writing with your keyphrase just for the sake of it. If you find it hard to include your keyphrase in your text a sufficient number of times, it might be a sign that you should take a different approach to the topic.
To avoid repetition, you can use synonyms. Synonyms are words that mean the same or more or less the same as your keyphrase. An example of this is the words film and movie. Search engines will recognize that they have the same meaning, which you can also check by having a look at the search results: if you search for movie, film will also be highlighted in the results, and vice versa.
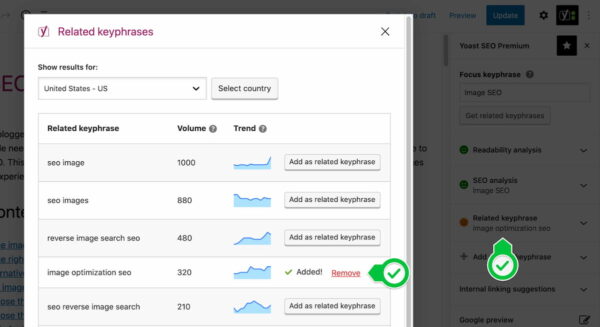
You can also make use of related keyphrases to optimize a single page for similar, related terms. You can use these to give context to your keyphrase. For example, if your keyphrase is [pumpkin soup], your related keyphrase might be [winter weeknight dinners]. This second, broader term gives additional information about your topic. It can also create coherence by establishing a link to similar pages on your post.
The Yoast SEO Premium analysis makes it easier to optimize your post thanks to word forms, synonyms, and related keyphrases. Not only that, but Yoast SEO also comes with a Semrush integration that helps you find related keyphrases — including volume and trend data.
2.3.2. Optimize your permalink
In most cases, your post’s URL should probably contain your focus keyphrase, so that it’s obvious what your page is about from the link. That said, you should always try and keep your permalinks short, descriptive, and clean — don’t put unnecessary words in for the sake of it!
Before you publish new posts or pages, you may also wish to consider removing ‘function words‘ from your permalink. These are words like “a”, “and”, and “the”. When done carefully, this may make your permalinks more readable, and easier to use or link to. Posts with especially long titles may benefit from this approach.
For posts that you have already published, we’d recommend being careful when changing permalinks. If people have already linked to your pages, changing the URLs may make a mess. Even though WordPress will sometimes redirect users to the new location (the redirect manager in Yoast SEO Premium handles this automatically and more reliably), changing URLs can impact performance.
2.3.3. Optimize your page title
Each page’s title — the contents of the HTML <title> tag — can be one of the most important factors for ranking well in search results. Not only is it the literal title of the tab or browser window, but it’s also the first line people see in the search results. It describes what your page is or is about and acts as an advert that encourages users to click.
On many websites, the default structure for posts and pages isn’t necessarily the most optimal approach for SEO. A title like “My blog » Cooking » Carbonara recipe” isn’t as compelling as “My 20-minute delicious carbonara recipe | My Blog”.
You must think about the structure of your titles, as well as the content of the title on each page. Typically, it’s worth considering that:
- Search engines may put more weight on the early words — so trying to get your keywords near the start of the title might make you more likely to rank well.
- People scanning result pages see the early words first. If your keywords are at the start of your listing, your page is more likely to get clicked on.
For more info on how to create enticing titles for your posts, read our article on crafting good titles for SEO.
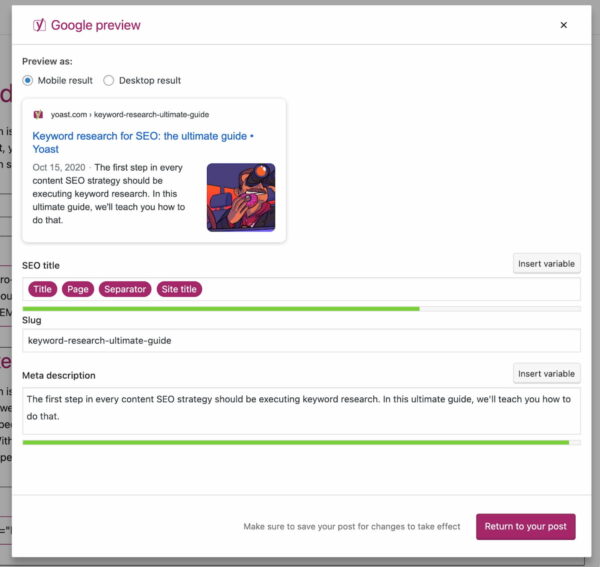
Did you know? You can use Yoast SEO to structure your titles! You can control the default structure of your page titles and descriptions in your Yoast SEO plugin. There are two parts of the plugin that control these. First of all, as soon as you install and activate the plugin, you get an ‘SEO’ section in your WordPress admin.
Navigate to SEO → Search Appearance, and you’ll see a bunch of tabs for different types of pages on your site. For each post type and taxonomy, you can set a so-called Title Template — as well as meta description templates. For example, for posts on our site, this looks like this:
This allows you to use components and variables to control how your page titles should behave by default. Of course, these can be overridden on a page-by-page basis. For example, in the image above, you can see how we’re automatically grabbing elements like the page’s title to stop us from having to write titles from scratch for every page manually.
There are all sorts of variables you can use in the titles and meta description, and they’re all listed and explained in the help tab on the page.
For advanced users, there are some additional cool features. For instance, you can use cf_<custom field name> to drop in any custom field — either from a post meta value or a user meta value.
NOTE: When you use these templates, be sure to check that your title tags behave as expected when viewed on the site. If they don’t, you may have a problem with the way your theme is built, and you might need to check the “Force rewrite” checkbox in our options. You can also follow these instructions to modify your templates.
2.3.4. Use headings correctly
Headings are great for structuring your content and helping readers process information in bite-sized chunks. They can also help describe a page’s layout and focus on search engines.
WordPress transforms the headings you put in your content into their respective HTML tags (<h1>, <h2>, <h3> and so on). That makes it important to think about which type of headings you use, and in which order. Getting that wrong can make your content harder to understand.
Although most themes for WordPress get the basics right, it’s worth making sure that your template sets your post title is an <h1> tag, and that you’re not using <h1> tags anywhere else on your page or in your post content. Your post content should then ‘flow’ naturally; for example, large, significant headings should use <h2> tags, subsections should use <h3> tags, and then subsequent new sections should use <h2>.
To learn more about why proper headings are important, please read this article on headings and SEO. In addition, you can read our article about the heading structure for your blog — from which a lot applies to non-blog WordPress sites too. For an explanation on how to use them read the post on how to use headers on your site.
2.3.5. Optimize your meta description
Search engines primarily use a meta description to describe your page in the search engine results, usually below your page title. Tailoring and writing a descriptive meta description can encourage users to click your results in the search engine, even if you’re not necessarily ranking in the top position. It’s an advert, and your opportunity to impress.
Writing compelling, informative descriptions of your page content for every page on your site is best practice and allows you to attract more visits. Whilst it might feel like a lot of work to craft descriptions for every single page and post, it’s worth the effort.
If you don’t provide a meta description, the search engine will generally try to find the keyword searched for in your page and automatically pick a string around that — and highlight the searched phrase in bold on the results page. In some cases, Google will generate its own meta description for you.
Automatically generated snippets (whether by plugins or search engines) are rarely as descriptive or as compelling as hand-written ones. So, we recommend that you use the meta description field you find in the Yoast SEO plugin to write a meta description. Make sure it entices the reader to click through and make sure that it contains the focus keyword of your post or page at least once.
2.3.6. Optimize your images and media
An often overlooked part of WordPress SEO is handling your images, videos, and media content. To ensure that search engines can understand your images, you need to think about how you name and format your files. Make sure to pick the correct format and optimize every image. Also, try to see if you can use next-gen image formats like WebP. Writing descriptive accessible text descriptions helps to make your images more understandable and can improve your performance significantly. As an added benefit, you’re also helping out readers who rely on assistive technologies like screen readers.
Using the proper alt attributes for images, and transcripts of videos are also something that we check in the content analysis functionality of our Yoast SEO plugin. We have a longer article on image SEO and one writing alt tags, which can give you more tips to fine-tune your image optimization!
2.4. Maintain your content quality
2.4.1 Keep your content fresh and up to date
As Google strives to show its users the best and up-to-date information, you should keep track of your content and revise it regularly. Even more so, because you don’t want to show the visitors of your website outdated, redundant or incorrect information.
If you publish regularly and have hundreds or thousands of blog posts, this is easier said than done. That’s why we’d advise focusing on two specific areas when it comes to content maintenance: updating cornerstone content and preventing keyword cannibalization.
2.4.2. Update your cornerstone content
Some pages on your site are more important than others. The most valuable content of your site is called cornerstone content. We’ve written extensively about cornerstone articles and how they can improve your rankings.
In short, these posts or pages:
- contain essential information for your audience;
- are complete, up-to-date, and well-written;
- show authority;
- get the most links from related posts within your own site;
- rank higher than your other articles on the same topic;
- get the most organic traffic to your site.
When you’re in doubt where to start with updating your site’s content, always give priority to your cornerstone content. Your business relies on them, and they should never go stale!
2.4.3. No outdated cornerstones with Yoast SEO
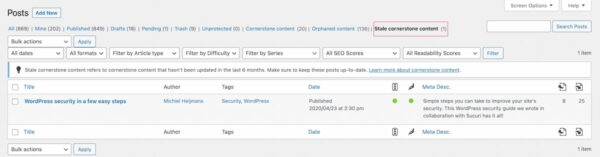
Yoast SEO makes it a little easier to keep your cornerstones up to date at all times. If you use Yoast SEO on your site, you can mark a post as a cornerstone article. In doing so, these articles will undergo a more rigorous SEO analysis. In addition, they’ll appear in a separate list in your post overview, which makes it easy to browse through them and check if they’re still up to scratch.
If you’re on Yoast SEO Premium, keeping track of them is even easier. The Stale cornerstone content filter only shows your cornerstone articles that haven’t been updated in the last six months. You’ll find this filter in your post overview. If it doesn’t show any posts you’re good, and if there are one or more posts in it, make sure you check and update them!
2.4.4. Keyword cannibalization
Keyword cannibalization means you’re eating away your own rankings by creating too many articles for the same or similar keywords. For example, if you have a dozen articles on the same topic, search engines don’t know which one they should rank highest. As a result, you’ll be competing with your own articles for a high position in the search engines.
If you frequently publish, as we do at Yoast, you’re bound to run into keyword cannibalization issues someday. That’s why we’ve created a framework on how to deal with keyword cannibalism. In short, you’ll have to:
- Find out for which keywords it’s happening;
- Analyze which content performs best for those keywords;
- Keep the best performing posts;
- Decide if you should merge the other posts into the better performing one;
- Or delete and redirect them.
Check out this detailed guide on how to fix keyword cannibilization issues on your site to learn how to go about this.
2.5. Avoid accidental duplicate content
2.5.1. What is duplicate content?
Duplicate content issues arise when search engines encounter multiple URLs with the same or very similar content. As a result, search engines don’t know which URLs to rank higher, resulting in lower rankings for all of them.
In the previous section, we’ve already addressed keyword cannibalization caused by writing about the same topic too often. But most of the time, the root of duplicate content is technical and can happen without you even noticing. For instance, some content management systems add session IDs or parameters for tracking URLs. Or, you might have www and non-www versions of a certain page indexed. Accordingly, you’ll have multiple URLs showing the exact same content.
Besides the technical reasons, your articles can get scraped or copied by other parties. So, there are many different causes for duplicate content, as you can read in this extensive article on duplicate content.
If you want to find out if your site suffers from duplicate content, you can use these duplicate content tools to check your site for issues.
2.5.2. Solutions for duplicate content
How you should solve your duplicate content issue depends on the cause of the issue. In general, there are three ways to go about this — in order of preference:
- Whenever possible, avoid creating duplicate content. If your system creates session IDs in the URL, try to turn that off, for instance.
- Can’t avoid creating them? Redirect those URLs with a 301 to the original version.
- Really need to keep a duplicate article? Make sure to add a canonical link to the original version in the
<head>section of the duplicate article. It will show search engines what the original version of the article is, so they can pass the link juice on to the original version. In the next section, you’ll find out how easy this is with Yoast SEO.
If you want to learn how to solve specific duplicate content issues, check out Joost’s ultimate guide on causes and solutions for duplicate content.
2.5.3. Set a canonical link with Yoast SEO
With Yoast SEO, it’s very easy to add a canonical link to a post or page. No need for a developer! Just go to the Advanced tab in the Yoast SEO metabox below your post or page or in the sidebar of the block editor. There, you’ll find the Canonical URL field where you can enter the URL of the original article — the one you want to point search engines to:
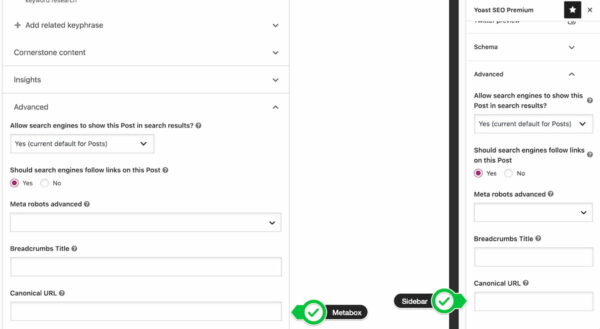
If you don’t set a canonical, Yoast SEO will set a self-referencing canonical for you. This means that the article will point to itself. Learn why self-referencing canonicals are beneficial for SEO.
2.6. Support international audiences
To optimize your site for audiences in several countries or language regions, you’ll need to optimize both your content and your technical setup. Let’s start with the content aspects of international SEO.
Doing targeted keyword research and writing fresh content for each audience is crucial. Take items of clothing, for example. An American vest is a completely different garment from a British vest, or a Dutch vest, or a French vest, or a Spanish vest… you get the point. We don’t recommend using automated translations. Invest time and resources in proper research and translations with which to optimize your keywords and copy.
Another important aspect of international SEO is picking the right domain structure. Generally, a different ccTLD (e.g. www.yoast.de) for every variation is only a good option for very large companies with big budgets. In most cases, subdirectories (e.g. www.yoast.com/de) are the way to go.
Search engines want to display the right language version of your site to each visitor, whatever country they’re from. To help them, you need to implement hreflang. hreflang is code that tells the search engines what language variations of a page are available and helps prevent duplicate content problems. It’s quite a complex piece of code, but our hreflang guide helps you along the way — or, you can take our Multilingual SEO training. This course is part of our Yoast SEO academy that’s free with a Yoast SEO Premium subscription.
2.7. Add Schema.org structured data
Structured data is kind of like a dictionary for search engines. By describing your content in code, you can make it instantly clear what that particular piece of content is about. Plus, you can describe who wrote it, on what site it was published, and when. Also, if this article featured recipe, FAQ, or how-to content, for instance, you could let search engines know about this. This way, search engines get a better understanding of your site. In return, they can use this to help your site get rich results.
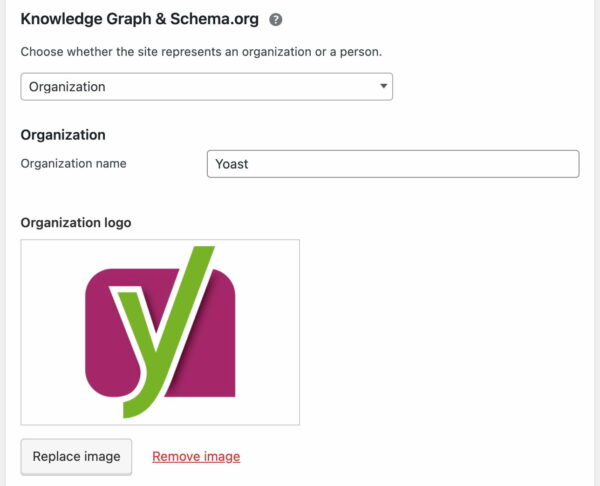
Structured data is essential in this day and age. It used to be hard to add structured data to your site, but with structured data in Yoast SEO, we set out to make it easy. Today, we generate the code search engines need to make sense of your site and its connections automatically. You only need to make a couple of choices in SEO > Search Appearance. Select Person if your site is a personal site or Organization if it is a business or professional site. Don’t forget to pick or upload the correct logo or avatar.
That’s not all: you can also quickly build specific types of content pages with our structured data blocks. These blocks work in the block editor and at the moment, we have two types: for FAQs and how-tos. These blocks help you visually build the content while generating valid structured data in the background. Plus, the Schema controls help you specify what type of page the one you’re working on is. So, you can quickly add structured data to your contact page by picking that specific type.
3. Optimize your site structure
A solid site structure helps your users and the search engines navigate your site. On top of that, it will make clear what pages on your website are most important. There are two pillars to a good site structure: organizing your site and contextual internal linking.
3.1. Organize your site
Organizing your site will help you set up a navigation path from your homepage to your individual posts and pages and back. Adding categories and subcategories will bring order to chaos. Ideally, your site should be organized as such:
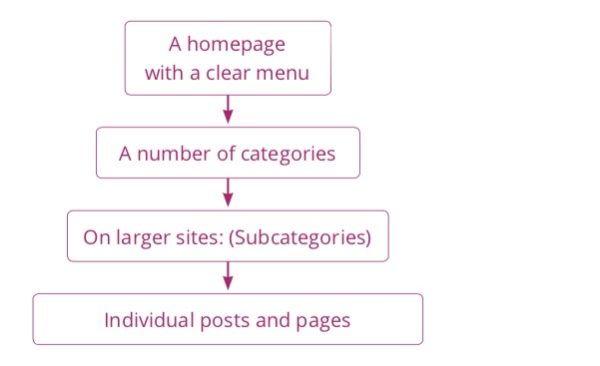
You should always make sure your homepage is clear and easy to navigate. Cluttering the homepage with too many options will make your site more difficult to understand. Adding a clear menu and breadcrumbs helps your user navigate your site wherever they are.
3.2. Connect your content with contextual internal linking
Besides organizing your site, you need to link up your content within your copy. We call this contextual internal linking because these links always appear within the context of a text.
Contextual internal links set up a network of pages, which points your users to related content. For example, in a post on keyword research, linking to an article on SEO copywriting makes a lot of sense. For search engines, these links provide insight into how pages are related to each other as well.
Always make sure that the number of links to a page reflects the importance of that page. Our ultimate guides get a lot of links from individual posts about related topics. This helps users and search engines understand that these guides are crucial pillars of our site.
When adding a contextual internal link, make sure the link makes sense within the current page’s context. Moreover, always use anchor texts which accurately describe the page you’re linking to. This provides users and search engines with the context they need to assess whether the link is useful. The internal linking tool in Yoast SEO Premium helps you connect your content by automatically suggesting relevant links.
3.3. Manage your categories and tags
WordPress has two default ways of structuring your content: categories and tags. Categories add hierarchy to your content and group topics broadly. On a website about cooking, pasta could be a category. Tags are non-hierarchical and can be used to describe your post in more detail. Dinner party themes, for example, could be a tag.
When setting up your site structure, pick a number of main categories. Adding them to your menu can be a good idea, especially if you only have a blog. If you have a blog and several products, a different setup might make more sense. Make sure your categories are roughly the same size. If your categories become too big, make subcategories. Your category pages can be great landing pages, especially for eCommerce sites.
Tags are useful for users exploring topics, but they are often misapplied. It’s important not to use too many tags, and to use them more than once or twice. Remember, you want to group your content, not just give it a description.
If you want to structure your content differently, WordPress also allows you to create custom taxonomies. Always consider carefully whether your custom taxonomy groups content in a way that makes sense and helps your visitors.
3.4. Manage your archive pages
If you use categories and tags, you will automatically create archive pages. These pages contain a list of the posts and pages within a certain category or tag. Besides categories and tags, there are date-based archive pages and author archives. These archive pages need managing because they cause SEO problems if you don’t.
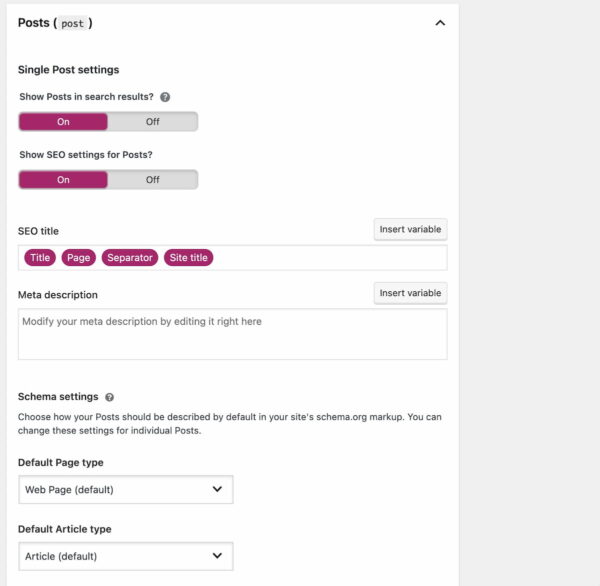
First of all, you want to prevent search engines from indexing archive pages that don’t make sense on your site. You can use the Yoast SEO plugin for this. You do this under SEO → Search Appearance, where you’ll find the following options on the “Archives” tab:
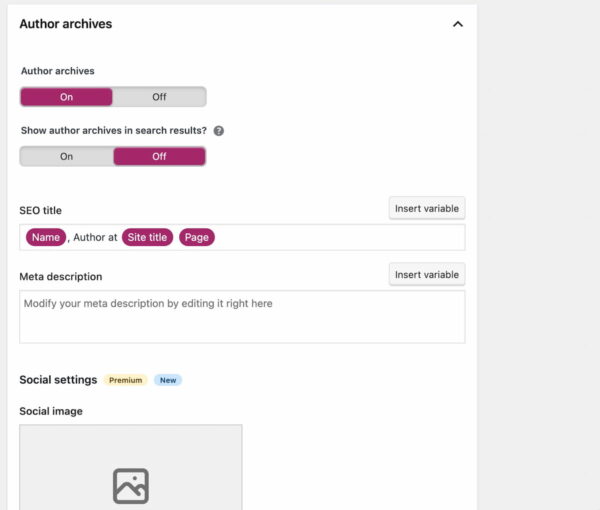
The settings above are the settings for our site. We’ve disabled the date-based archives, as we don’t use those. Any date-based link will redirect to our homepage because of this setting. We’ve left the author archives untouched, but we have set the subpages of those archives to be noindex, follow by default. This way, you’ll never land on page two of an archive on our site from the search engines.
If your blog is a one author blog, or you don’t think you need author archives, use Yoast SEO to disable the author archives. Also, if you don’t think you need a date-based archive: disable it as we have. Even if you’re not using these archives in your template, someone might link to them and thus break your WordPress SEO…
There is one type of archive that is noindex,follow by default in the Yoast SEO plugin: your own internal search function result pages. This is a best practice from Google.
3.4.1. Pagination
If you have many posts on your WordPress site, you might want to think about how your pagination looks and works. Otherwise, you might find that your best content is ‘buried’ deep in your site, and users and search engines may struggle to find it. It would help if you also considered customizing how your pagination looks and works to be a bit more helpful for users and search engines.
3.5. Configure your breadcrumbs
You’ll probably want to add breadcrumbs to your posts and pages. Breadcrumbs are the links, usually above the title post, that looks like “Home > SEO blog > WordPress SEO“. Breadcrumbs are good for two things:
- They allow your users to easily navigate your site.
- They allow search engines to determine the structure of your site more easily.
These breadcrumbs should link back to the homepage, and the category the post is in. If the post is in multiple categories it should pick one.
To get breadcrumb navigation to show you on your pages, you may need to adapt your single.php and page.php files in your theme, and include the code for breadcrumbs from the Yoast SEO plugin. You find the settings and instructions on how to do that in the SEO → Search Appearance section. Also, we have a special breadcrumbs block for the block editor that makes it easy to drop in breadcrumbs on any page — without writing code.
3.6. Manage your XML sitemaps
You can use XML sitemaps to tell Google and the other search engines that your site has been updated. While WordPress finally has native XML sitemaps, our solution is more powerful. Our WordPress SEO plugin automatically configures your XML sitemaps, so you don’t have to worry about anything. We generate sitemaps for your different post types, including your images, and make sure that it generates and loads really quickly.
We intelligently split your sitemaps up into smaller bits, so Google only has to fetch one new XML “sub”-sitemap when a post is published.
You can check and manage which types of your content, archives, and templates should be included in your XML sitemaps in your SEO → Search Appearance settings. Content types that are set to not show in search results will be automatically excluded from your XML sitemaps.
Lastly, our XML sitemaps support has a pretty complete API, allowing developers to add or change functionality through their plugins and themes. Our own Local SEO, News SEO and Video SEO extensions (which generate their own, specific sitemaps) are built on this API, and, other plugins frequently build their own solutions on top of our system.
4. Speed up your WordPress website
If your website is slow, you risk frustrating your users. That makes them less likely to engage, browse, convert, or visit again. That, in turn, can make them less likely to share your content, link to your pages, or recommend your brand. In short, speed is an important part of WordPress SEO, and a huge part of the overall user experience. That means that it’s critical to measure and manage your performance — especially for users on mobile or slower connections!
With Googles Page Experience update, page speed and user experience are front and center once again. Offering great performance will continue to become more important by the day.
4.1. Measure your site speed
Measuring the speed of your site can be confusing. Different tools give different scores and results, and sometimes even give conflicting information. That’s why we’ve put together this helpful guide on how to measure your speed — it’ll walk you through the basics of picking the right metrics, to using the right tools for the job when it comes to monitoring and diagnosing issues.
4.2. Improve your site speed
Once you’ve identified what and where your bottlenecks are, the next challenge is to make hosting, theme, plugin and performance tweaks to speed things up.
Page speed optimization is a discipline in its own right and spans well-beyond WordPress SEO. That means that the biggest opportunities will vary from site to site, and situation to situation. For some sites, the easiest wins might come from changing hosting or utilizing a CDN; for others, it might mean re-assessing their use of plugins, or, altering how they load CSS and JavaScript.
That doesn’t mean that you can’t get started, though. We’ve put together a guide on some page speed tools and easy wins that you can use to get the ball rolling.
5. Secure your WordPress website
WordPress is the most-used platform for website management in the world. It powers almost 42% of the web (June 2021). While that is awesome, it also means that WordPress is the most targeted platform for hackers. When running a WordPress website, basic security is dealt with by the platform, but there are things you can do yourselves to make your website more secure.
That starts with your own login. The default username in WordPress is admin, so change that first. Otherwise, a hacker’s first guess for your username is just too easy. The same goes for your password. Passwords like 123456 and welcome01 are just not enough. Use a password manager like 1Password or LastPass and pick a 20+ character password instead. WordPress also has a number of plugins for two-factor verification, so adding that to your website is easy as pie as well. Do it.
There is more you can do, of course, please read our article detailing WordPress security in a few easy steps. We’ll highlight some of the recommendations below.
5.1. Make regular backups
The next thing we’d like you to do is create regular backups. In case your site gets hacked, or something else goes wrong — for instance, when updating a plugin or theme —, it’s important that you revert that change in a heartbeat. Regular backups make sure that this can be done.
In WordPress, there is a wide range of backup options to choose from. Several plugin developers have created nice software solutions for you, so you don’t have the technical hassle of that backup.
5.2. Harden your setup
Hardening your setup starts with picking the right hosting company for your WordPress website. That’s just the start, as every host will do its best to help you out, but it’ll still be your responsibility to harden your setup. Also, tools like Cloudflare are good friends for any company/website in this.
An easy first step is to limit login attempts. By limiting the number of times people can try to log in to your website — closing your login form after five false logins, for example — you are hardening your install against brute force attacks and other malicious acts targeting that form.
The next thing you need to do is to make sure that your WordPress install, including plugins and themes, is always up-to-date. Updates might fix security issues as well. Make sure to check for updates and keep your WordPress installation up-to-date regularly.
Another important thing to realize is that you deal with security every time you add a new user or writer to your WordPress install. There’s an article in the WordPress Codex regarding Roles and Capabilities you should read. It comes down to giving permissions only to those that need it when they need it and only for the time they need it. No need to give a guest blogger administrative rights to your website, right?
Authentication Keys and Salts work in conjunction with each other to protect your cookies and passwords in transit between the browser and web server. Make sure to change these keys when installing a new WordPress instance.
Another easy fix that we’d like to mention is to make sure your template files can’t be edited from the WordPress backend. You can do this in Appearance → Editor. When a hacker managed to get past your login form, this is really the easiest way to add evil code to your website. Hardening this involves changing your wp-config file.
5.3. Use monitoring and logging
Security is an ongoing process. You need to keep a keen eye on any breaches and keep your website as secure as possible. You could put part of your WordPress security in the hands of, for instance, a company like Sucuri. In case of a hack, they’ll fix this asap. For your own monitoring, you could check your site regularly with their Sitecheck tool. A couple of plugins can help you secure your WordPress site by, for instance, monitoring files on your server, like WordFence, iThemes or Sucuri. Pick your plugin of choice as long as you make sure that security is monitored.
It can also be useful to just keep track of everything that’s happening on your websites like file changes and logged-in users. There are several plugins and tools for that as well, like WP Security Audit Log. Keeping track of these things makes sure that you can find irregularities in your install and act on these, or find what happened when in case of a security issue.
6. Cater to your mobile visitors
Take one look around, and you’ll notice that our mobile devices are becoming the de facto way of browsing the web, even when we’re at home, lying on our couch. But we don’t visit mobile websites — we visit websites. See your mobile and desktop site as one entity. You, as a website owner, need to cater to your visitors.
According to Statcounter, mobile market share surpassed desktop market share almost all of 2018. This means that if you are only optimizing for desktop visitors, you are not optimizing for most of your visitors. Of course, it depends on your specific niche since those numbers could be different. Google Analytics can give you the exact numbers for your site.
With a market share like this, there is no way you can consider your mobile website an ‘extra’. It’s time for mobile SEO.
6.1. Make sure your theme is mobile-friendly
After making sure that your site is fast, make sure your website, or rather your theme, is mobile-friendly. Making your website mobile-friendly starts with making sure the links are not too close together, and buttons are easily clickable. Your font should be consistent and shouldn’t be too small and your images not too big, both in file size and dimensions.
We’d like to highlight two specific mobile theme optimizations below.
6.1.1. Use a responsive design
Responsive design means that the design of your website adapts to the screen size your visitor is using. You can do this by using specific CSS media queries. We wrote about responsive design way back when, but in the basis, things are still the same. You have to address certain ranges of screen widths and design for those. Most WordPress themes are now responsive.
Depending on the part of the world you are targeting, no, depending on how fast their mobile internet is (2G? Already at 5G?), you might want to change a couple of things. Think about how you use images on your site. Are you using any text enhancements or font variations that might hinder a good performance of the mobile website? Responsive design helps you build a more focused website. That brings us to the second optimization.
6.1.2. Prioritize what’s important to mobile users
Take a step back and look at your website: what do your users want to do here? Define the four to six main tasks your user performs on your website and focus on these. Maybe even give the most important task a big fat call-to-action button.
Here’s an example: If you have a local business, the two main tasks might be calling you or finding the directions to your business. That means you could add these as a special mobile menu, for instance — some bar that is visible all the time. Focus on your visitor’s main tasks and make their life as easy as possible. How to find these top tasks? Ask your visitors! Also, check Google Analytics for the most visited pages on your mobile website. More about Analytics further down this article.
6.2. Consider using AMP
If you are using WordPress, you could serve Accelerated Mobile Pages (AMP) as well. AMP is a 2015 initiative by Google and some major publishers. It allows for fast mobile pages and does so by stripping some of the design. AMP these days is used for both static content and dynamic content like news articles. AMP has pretty strict code requirements, so be sure to validate your AMP pages frequently.
One of the challenges you as a website owner might have is to make sure the AMP version of your website aligns with your branding. Make sure your visitor — used to visiting your desktop/responsive website — still clearly understands that he or she is visiting your pages. Luckily, the difference between designs on all these platforms can be minimalized.
If you are looking to kick-start the AMP version of your WordPress website, be sure to check the official AMP plugin. This will add an AMP version of your website after installing the plugin.
7. Analyze and improve your performance
A good SEO campaign relies not only on implementing changes but also measuring the impact of those changes, seeing what works and doing more of that. Google has developed two amazing tools to analyze the results of your website and to identify new opportunities where you could focus on in the future.
The first one, for analyzing results, is Google Analytics. By adding Google Analytics to your website, you make sure all user data will be stored in your own account. You can, for instance, check how many visits your pages get, how many of your visitors convert, how many visitors immediately leave your website after landing on a certain page and much more. Within Google Analytics, you can see how visitors behave on your website. Here’s how to track your SEO with Google Analytics.
The second tool is meant to analyze how your website performs and to see how visitors find you in the search engine. That tool is Google Search Console. By exporting and sorting through your search queries and impression data, it’s easy to identify opportunities where you could focus on improving clickthrough rates, content, and/or rankings.
7.1. Set up and integrate Google Analytics
To start with Google Analytics, you need to create an account. Click the ‘Start for free’ button to start. To set up your account, you need to add an Account Name first. This could be your company name. However, when you add other websites to your account, we recommend choosing a more generic Account Name. Also, you can always change your Account Name later when you want to.
After setting up your account, it’s time to add a property: the website you want to add. Insert the Website Name and the Website URL. Make sure you add the precise URL: http:// or https:// and with or without www for collecting the right data.
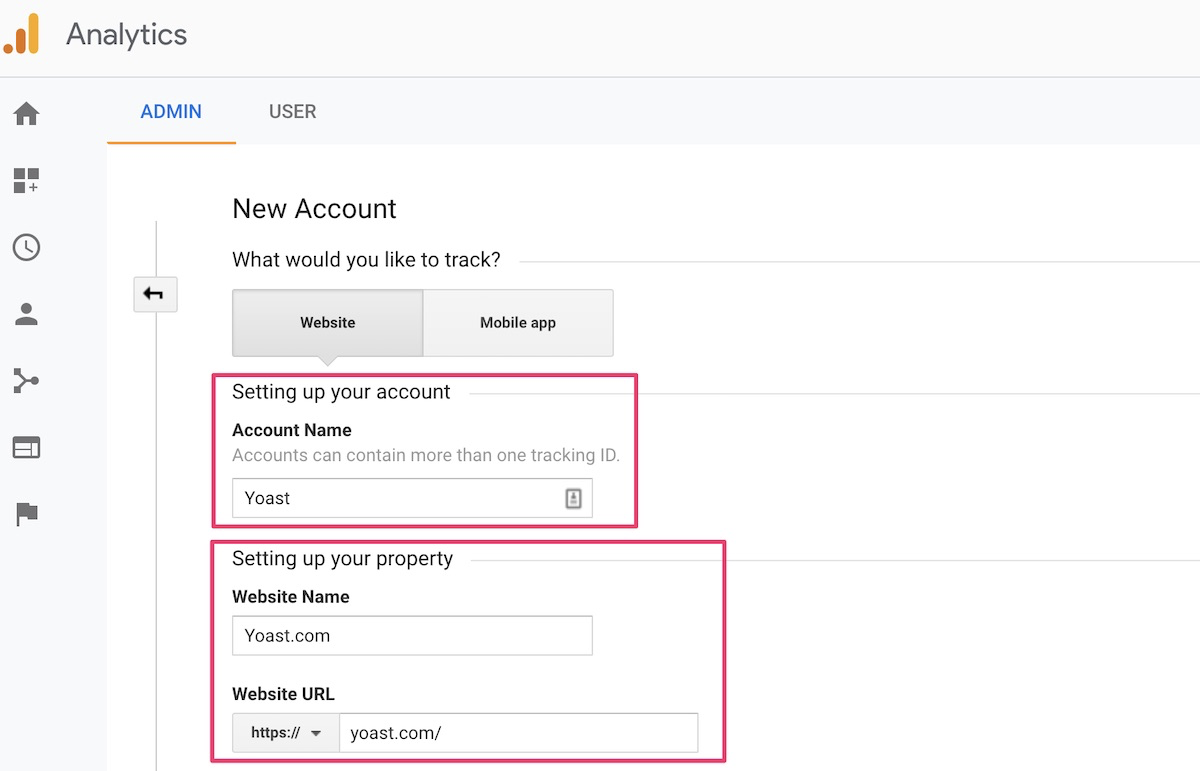
After setting up your property, you can choose for yourself to enable some of the data sharing settings. Each data sharing option gives you a clear explanation of what you will be sharing, enabling it.
Now you’re almost ready to go! The last step to connect your website to your new Google Analytics account is adding the tracking code to your website. After successfully creating your account and adding a new property, you’ll see this screen with your Google Analytics tracking code on top:
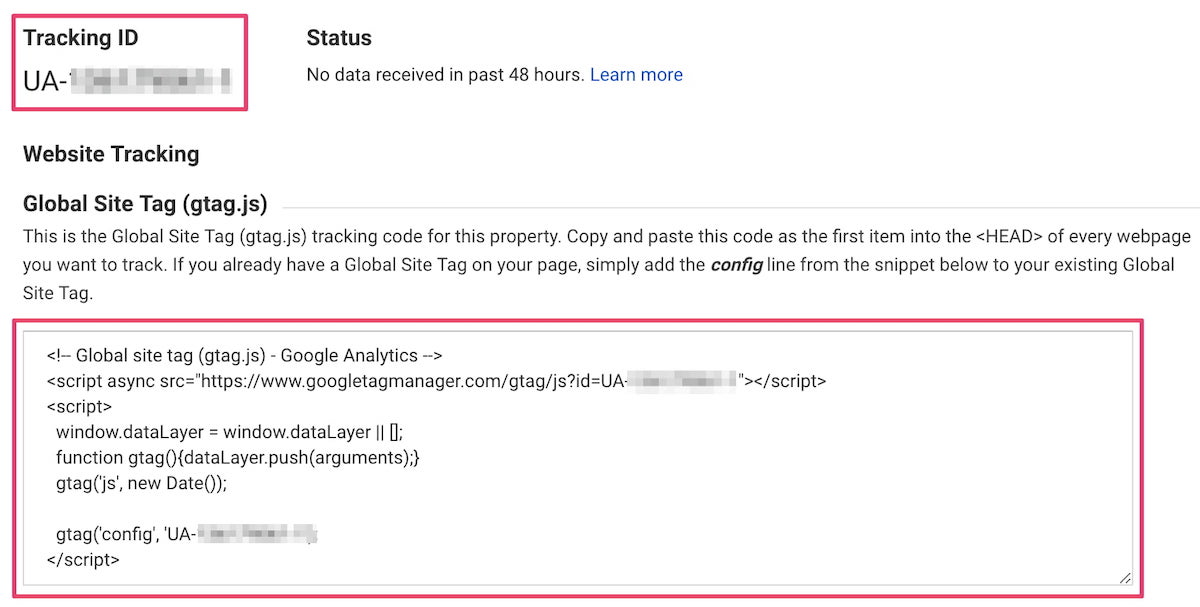
This tag needs to be added to your website. The easiest way to do this within WordPress is by installing a Google Analytics plugin such as the MonsterInsights Plugin for WordPress. Installing this plugin, you don’t need to touch the actual code of your website to connect with Google Analytics. You simply install and activate the plugin, insert your tracking ID, and you’re set! You can also use Google’s Site Kit WordPress plugin to get data from Analytics and Search Console in your backend.
For more technical readers, it’s also possible to add the tag manually to the head of every webpage or to add the tag to Google Tag Manager.
Now your website is connected to Google Analytics, it will start collecting data of your users. Start clicking around to see what all can be found within the data or start reading one of our blog posts about Google Analytics for helpful tips.
7.2. Set up your Google Search Console account
The second tool we think is important to set up is Google Search Console. We recommend going through all steps and you will be all set! In brief, these are the steps you’ll need to follow:
- Create or sign in to your Google Search Console account.
- Click ‘Add a property’ under the search drop-down.
- Enter your website URL in the box and click ‘Continue’.
- Verify your website — within the Yoast SEO plugin, you can easily copy and paste the meta tag to make it work.
After connecting your website to Google Search Console, it will start collecting data about the performance of your website.
7.3. Other useful tools
Of course, there are plenty of other useful tools to get valuable insights into your website and find SEO opportunities. Everyone has their own favorite tools, so it’s important to start playing with different tools to find out what tool brings you what you need most.
There are all-in-one SEO tools that give you a complete overview of your performance, and there are more in-depth tools that give you more specific data. Think about site speed tools, duplicate content tools, site analysis tools, keyword research tools, and much more.
Some tools we use besides Google Analytics and Google Search Console:
Microsoft Clarity
Microsoft Clarity is another tool that provides valuable insights into the behavior of your website’s visitors. Its features, such as the session replays or the heat map, can help you understand how your audience interacts with your website. That kind of information is precious if you want to improve your site’s user experience! On the Microsoft Clarity dashboard, you’ll also find information on session counts, total users, page view details, etc.
Microsoft Bing Webmaster Tools
Within the Source/Medium section of Google Analytics, you can see what percentage of your traffic is coming from Bing. When this is a sufficient amount of traffic, you might want to create a Bing Webmaster Tools account as well. Microsoft Bing Webmaster Tools is the Google Search Console variant for Microsoft Bing. It shows you your site’s health and performance in the Bing search results.
Ryte
Ryte is one of the all-in-one SEO suites you could use to analyze on-page SEO. The tool crawls your website to give you a bunch of data on indexing, errors, links, speed, and much more. You can try Ryte for free to see what it has in it for you. Ryte even integrates with Yoast SEO.
Semrush
Semrush is another internet marketing and SEO suite that does an incredible amount of stuff. In addition, Semrush powers the related keyphrase feature in Yoast SEO. Thanks to this feature, you can easily find powerful keyphrases to can rank for.
Google Lighthouse
Google Lighthouse is a Chrome extension which you can download for free. With the Lighthouse tool, you can easily generate a report with scores for Performance, Progressive Web App, Accessibility, Best Practices, and SEO. This report will give you a quick overview of how your site is doing. Plus you can immediately start working on the areas that need the most attention. You can also use the web-based version on web.dev/measure. Very helpful if you are working to improve your Page Experience scores.
Hotjar
To get insights on how your visitors actually move, scroll and click on your webpages, you could use a tool like Hotjar. This user research tool also has options to add polls or surveys to your site to start doing research. You can try it for free, and the paid packages have competitive prices.
Interested in more valuable tools? Check our list of favorite SEO tools here!
8. Promote your site
You put a lot of time and effort into your site’s content and make sure that readers can find it via search engines, thanks to SEO. But there are other ways to get people to visit your WordPress site and read your posts. But how do you get and grow such an audience? Simply writing posts and putting these out there won’t do the trick: you need to promote your site!
8.1. Encourage engagement
It’s always fun to interact with your readers, but how do you get them to engage? With engagement, we mean all the different ways people can interact with your post. It could be leaving a comment, sharing it on social media, or taking action on the topic in general.
But how do you get people to engage? You can always ask them! Write engagingly, and then ask your readers for their opinion. Then respond to these comments to keep the conversation going and build a relationship with your readers.
Engagement also benefits SEO, as it shows that your site is alive and active. If you want to dive deeper into blog engagement, you can read our post on how you can increase blog engagement.
8.2. Grow your reach
Using social media is the best way to reach and grow the audience of your blog. You should be active on the social media channels where your (potential) audience is present. Facebook, Instagram, Pinterest, and Twitter are examples of popular social media. It might be a lot to decide on, so you can find out more in our blog post on social media strategy: where to begin?
8.3. Build a mailing list
In addition to using social media to promote your blog, it’s often a good idea to invest in a digital newsletter. Let people sign up for it and send out emails with your latest blog posts and other fun facts.
Ensure that you offer a subscribe field beneath your posts and on other visible places on your website. Make sure that your newsletter is mobile-friendly. But, most of all, make sure your newsletter is truly something special!
8.4. Amplify your content
The number of blog posts published every day is enormous, which is why it’s becoming much harder to stand out. Your articles have a big chance of getting lost in the vast sea of content. To help your content reach its full potential you need to amplify it.
If your content is original and well-structured, you’re probably able to reach new audiences. Take a look at how you can reach new audiences, beyond your organic reach.
Maybe advertising on Facebook or Instagram might be a good way to reach new audiences for your content? Analyze what channels you already use and decide where you can do more to broaden your audience.
9. Conclusions
This guide gives you a lot of stuff you can do on your WordPress site. It goes from technical SEO tips to conversion tips, to content tips, to conversation tips, and a whole lot in between. There’s a catch, though: if you want to rank for highly competitive terms, you’ll have to actually do most of it and create great and compelling content in the process.
You’re competing with every other website and business on the planet for attention, visitors, and outcomes. That means you have to put in a lot of hard work!
But don’t worry — we’re here to help.
So if you want to keep updated on the latest news about WordPress, SEO, and our plugins, then you can subscribe to our newsletter and stay one step ahead of the competition!
Keep reading: How to use WordPress: Answering 12 common WordPress questions »
The post WordPress SEO: the definitive guide appeared first on Yoast.


Recent Comments