
Learning to schedule Instagram posts in advance is the easiest way to save time on the platform so that you can focus on what matters.
Whether you’re the owner of your own business or the manager of a global team, the more complex your Instagram marketing efforts are, the more helpful a scheduling tool becomes. That’s because consistent, high-quality content is easier to plan, craft and share when some of the grunt work has been automated.
Of course, there is lots to consider when choosing an Instagram scheduler. Do you use a business or creator profile? Do you need to schedule Instagram Stories? What about video, and IGTV? And what level of detail do you need from your analytics?
In this article, we’ll go through the best Instagram scheduling tools for business, creator and personal accounts, so that you can spend more time focusing on your greater goals.
If you haven’t already decided, choose to convert your account to an Instagram creator profile or Instagram business profile before we get started. And if you’d rather stick with a personal account, scroll down to the third section of this to find out how to schedule Instagram feed posts.
Bonus: 14 Time-Saving Hacks for Instagram Power Users. Get the list of secret shortcuts Hootsuite’s own social media team uses to create thumb-stopping content.
Can you schedule Instagram posts?
Yes. Here are all the types of Instagram posts you can schedule in 2021, plus the tools you can use to schedule them with:
- Instagram feed posts (image and video): Hootsuite, Creator Studio
- Instagram Stories: Hootsuite
- Instagram Carousels: Hootsuite, Creator Studio
- IGTV videos: Creator Studio
How to schedule Instagram posts with Creator Studio
If you have a business or creator profile on Instagram, you can use Facebook’s native Creator Studio to craft and schedule Instagram posts from your computer desktop.
For influencers with creator accounts, Creator Studio is actually the only place you can schedule your Instagram posts. Instagram designed this tool with influencers in mind, which means that its free, no-frills features are focused on ease of use for growth-oriented pros.
On the other hand, if you’re a brand with a business account — or simply a power user looking for some extra time-saving “frills” — you can choose between Creator Studio and any number of third-party tools with more robust, long-range features. (If this is you, skip to the next section.)
Here’s a quick overview of how to schedule Instagram posts with Creator Studio:
- Link your Instagram account to Creator Studio
- Click Create Post
- Upload your visuals
- Craft your post (write your caption, add mentions and hashtags)
- Click the arrow beside the blue Publish button, and select Schedule
Keep reading for a more detailed explanation of each step of the process below.
1. Link your Instagram account to Creator Studio
Head over to Creator Studio and follow the prompts (or use Facebook’s instructions) to link your Instagram to Creator Studio.
The steps will differ if your Instagram account is already linked to a Facebook page or not.
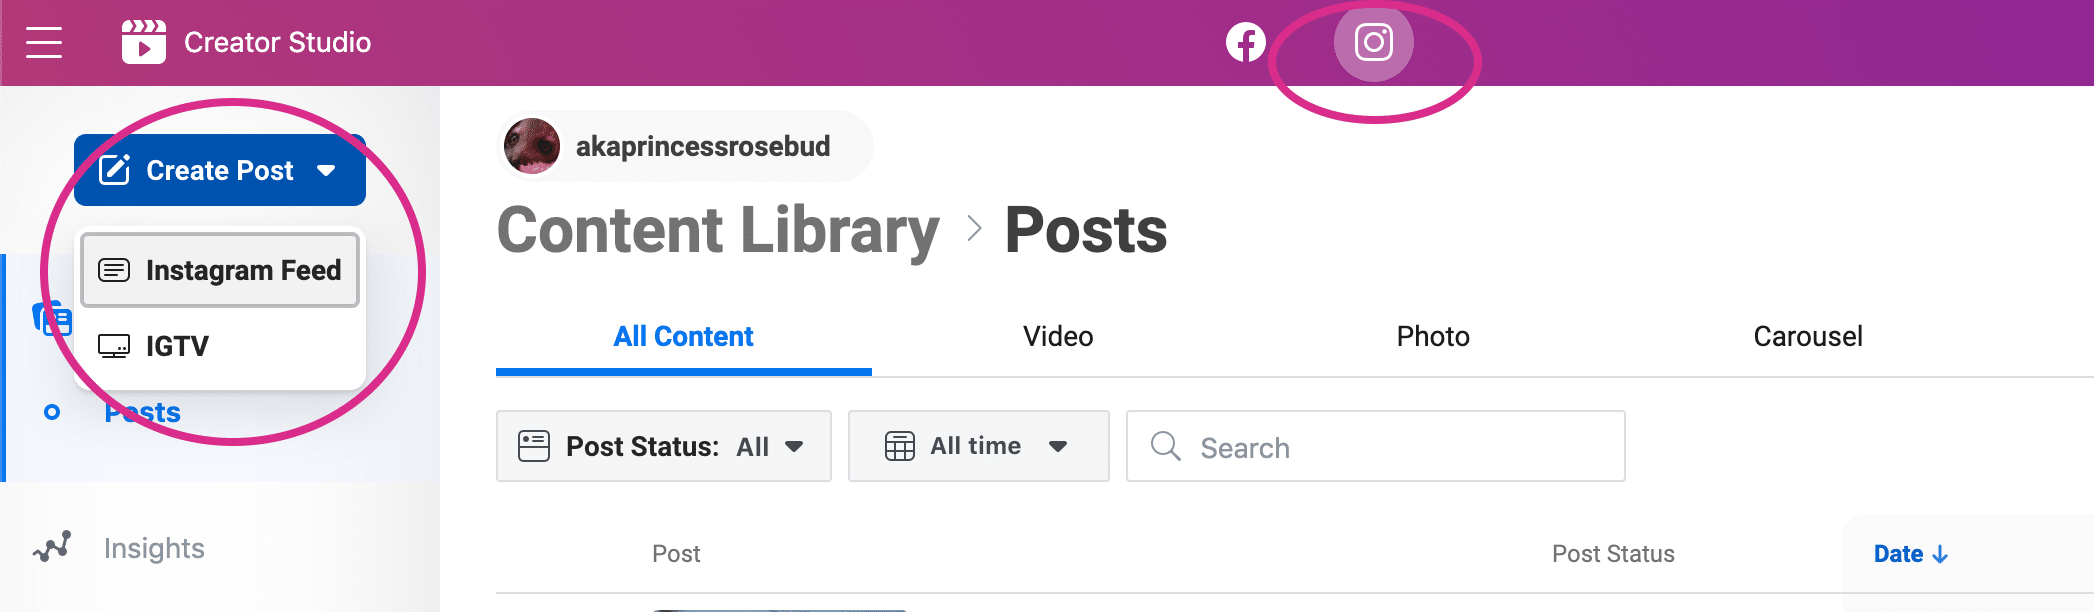
2. Click Create Post
Once you’re all set up, click the Instagram icon in the top bar, then click create post. Then click Instagram Feed.
Note that you also have the option to post to IGTV: here’s a separate guide on how to schedule your IGTV videos.
Pro Tip: Alas, it’s not possible to post or schedule an Instagram Story from Creator Studio. To do that, you’ll want to check out how to schedule Instagram Stories. It’s also not possible to schedule Reels yet.
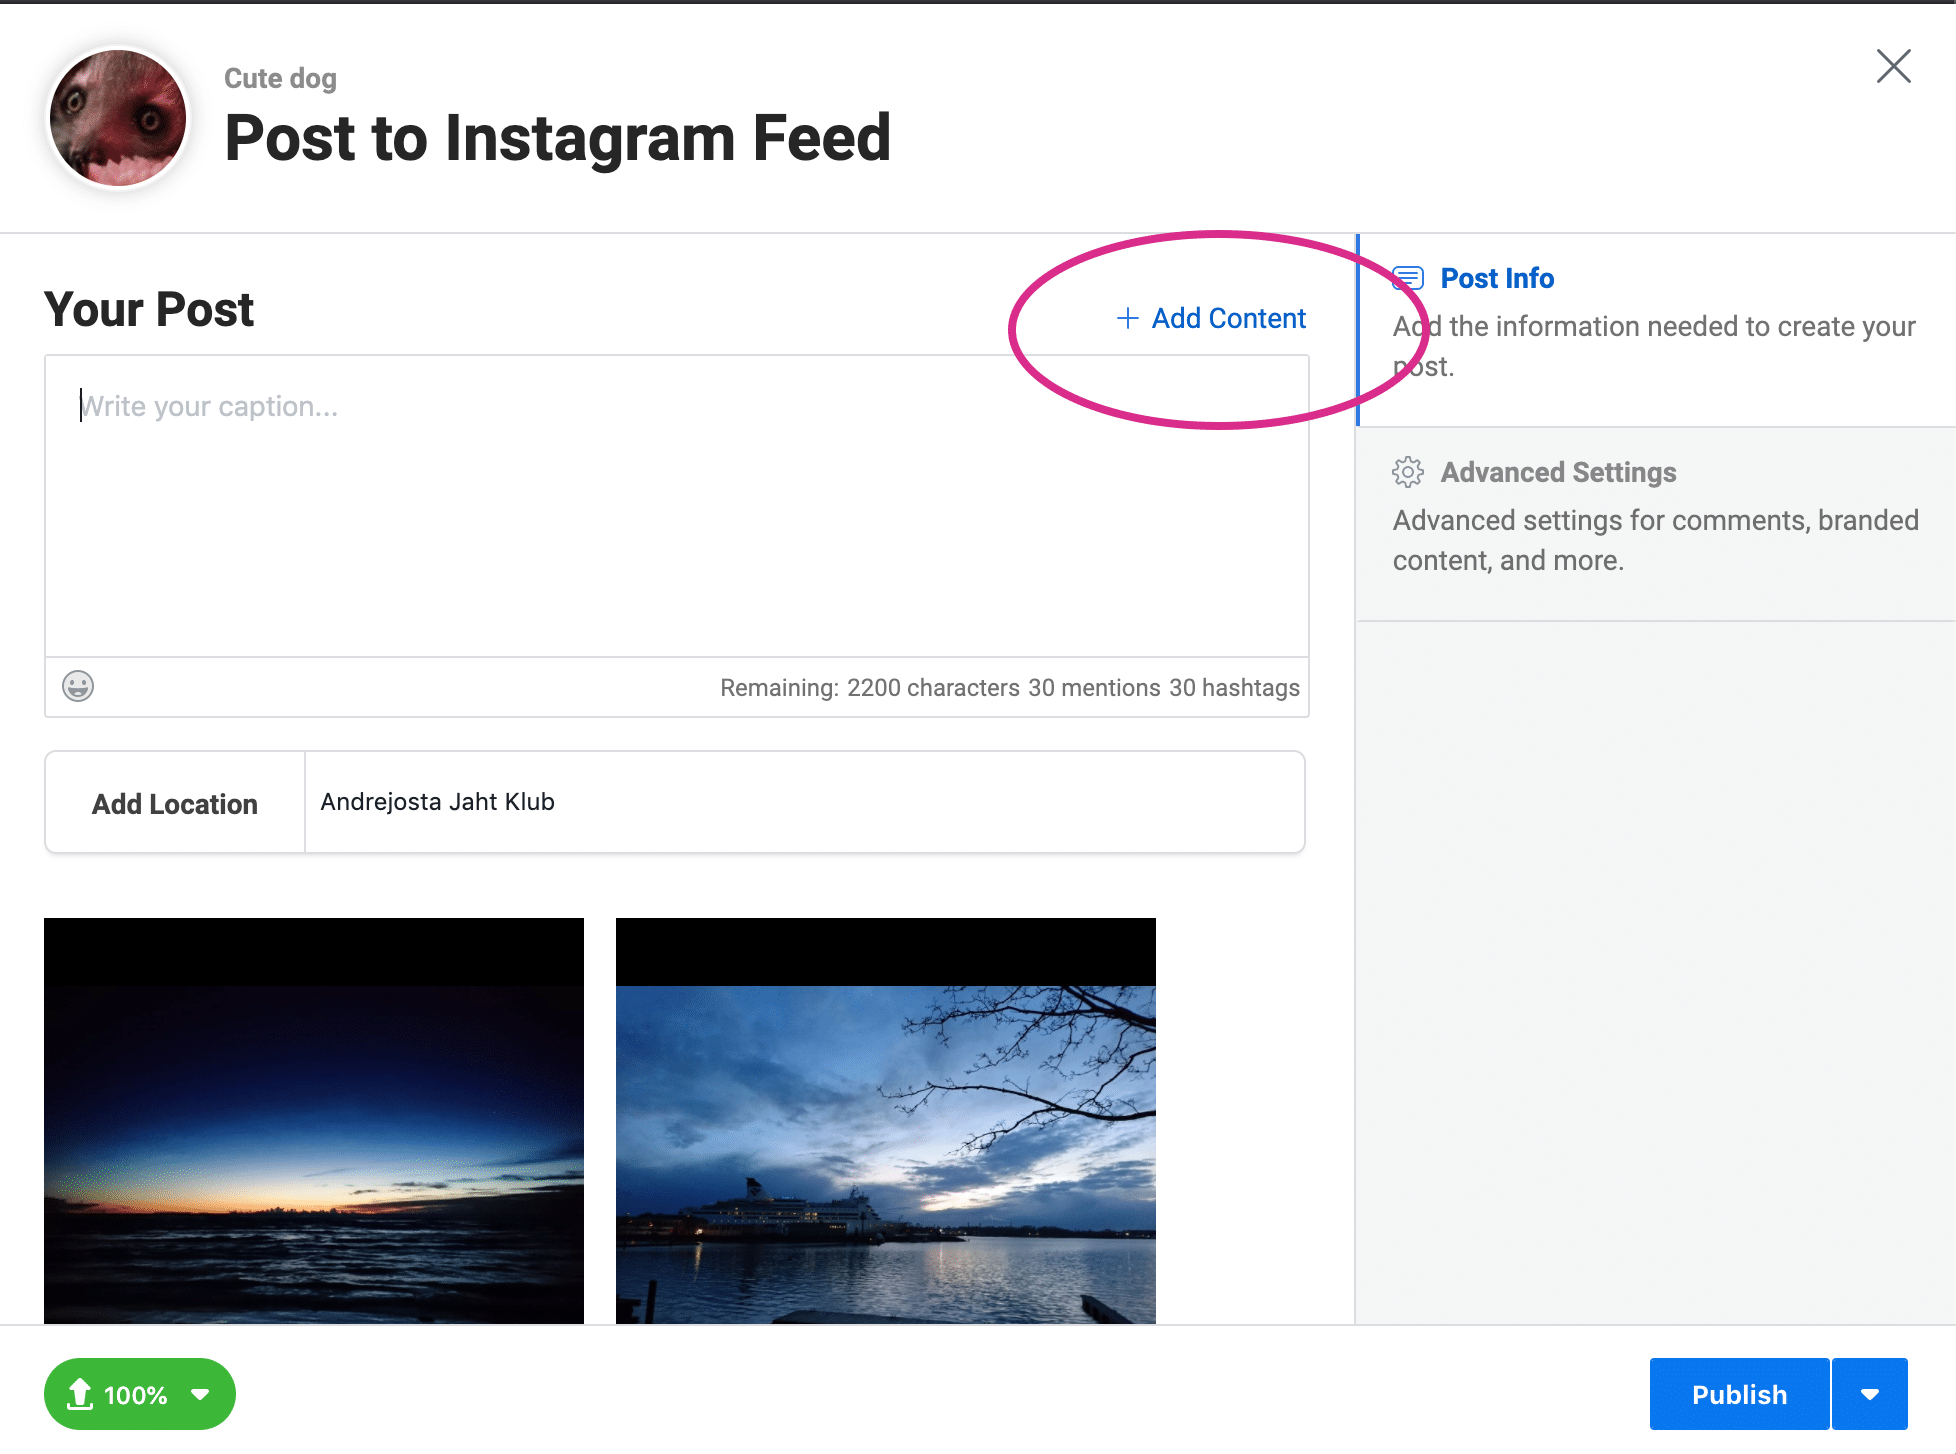
3. Upload your visuals
Now that you’re building your post, you can select a photo to upload as a post to your feed. (You can upload many and make a carousel post, and you can also upload video).
To do so, click the blue Add Content link in the grey box, and choose a file to upload (or else select a photo from Facebook to share.)
This is a good place for us to mention that there’s no content library in Creator Studio, so you won’t be able to store or manage your visual assets or templates here. (Depending on your workflow, this could be a massive inconvenience or a negligible one.)

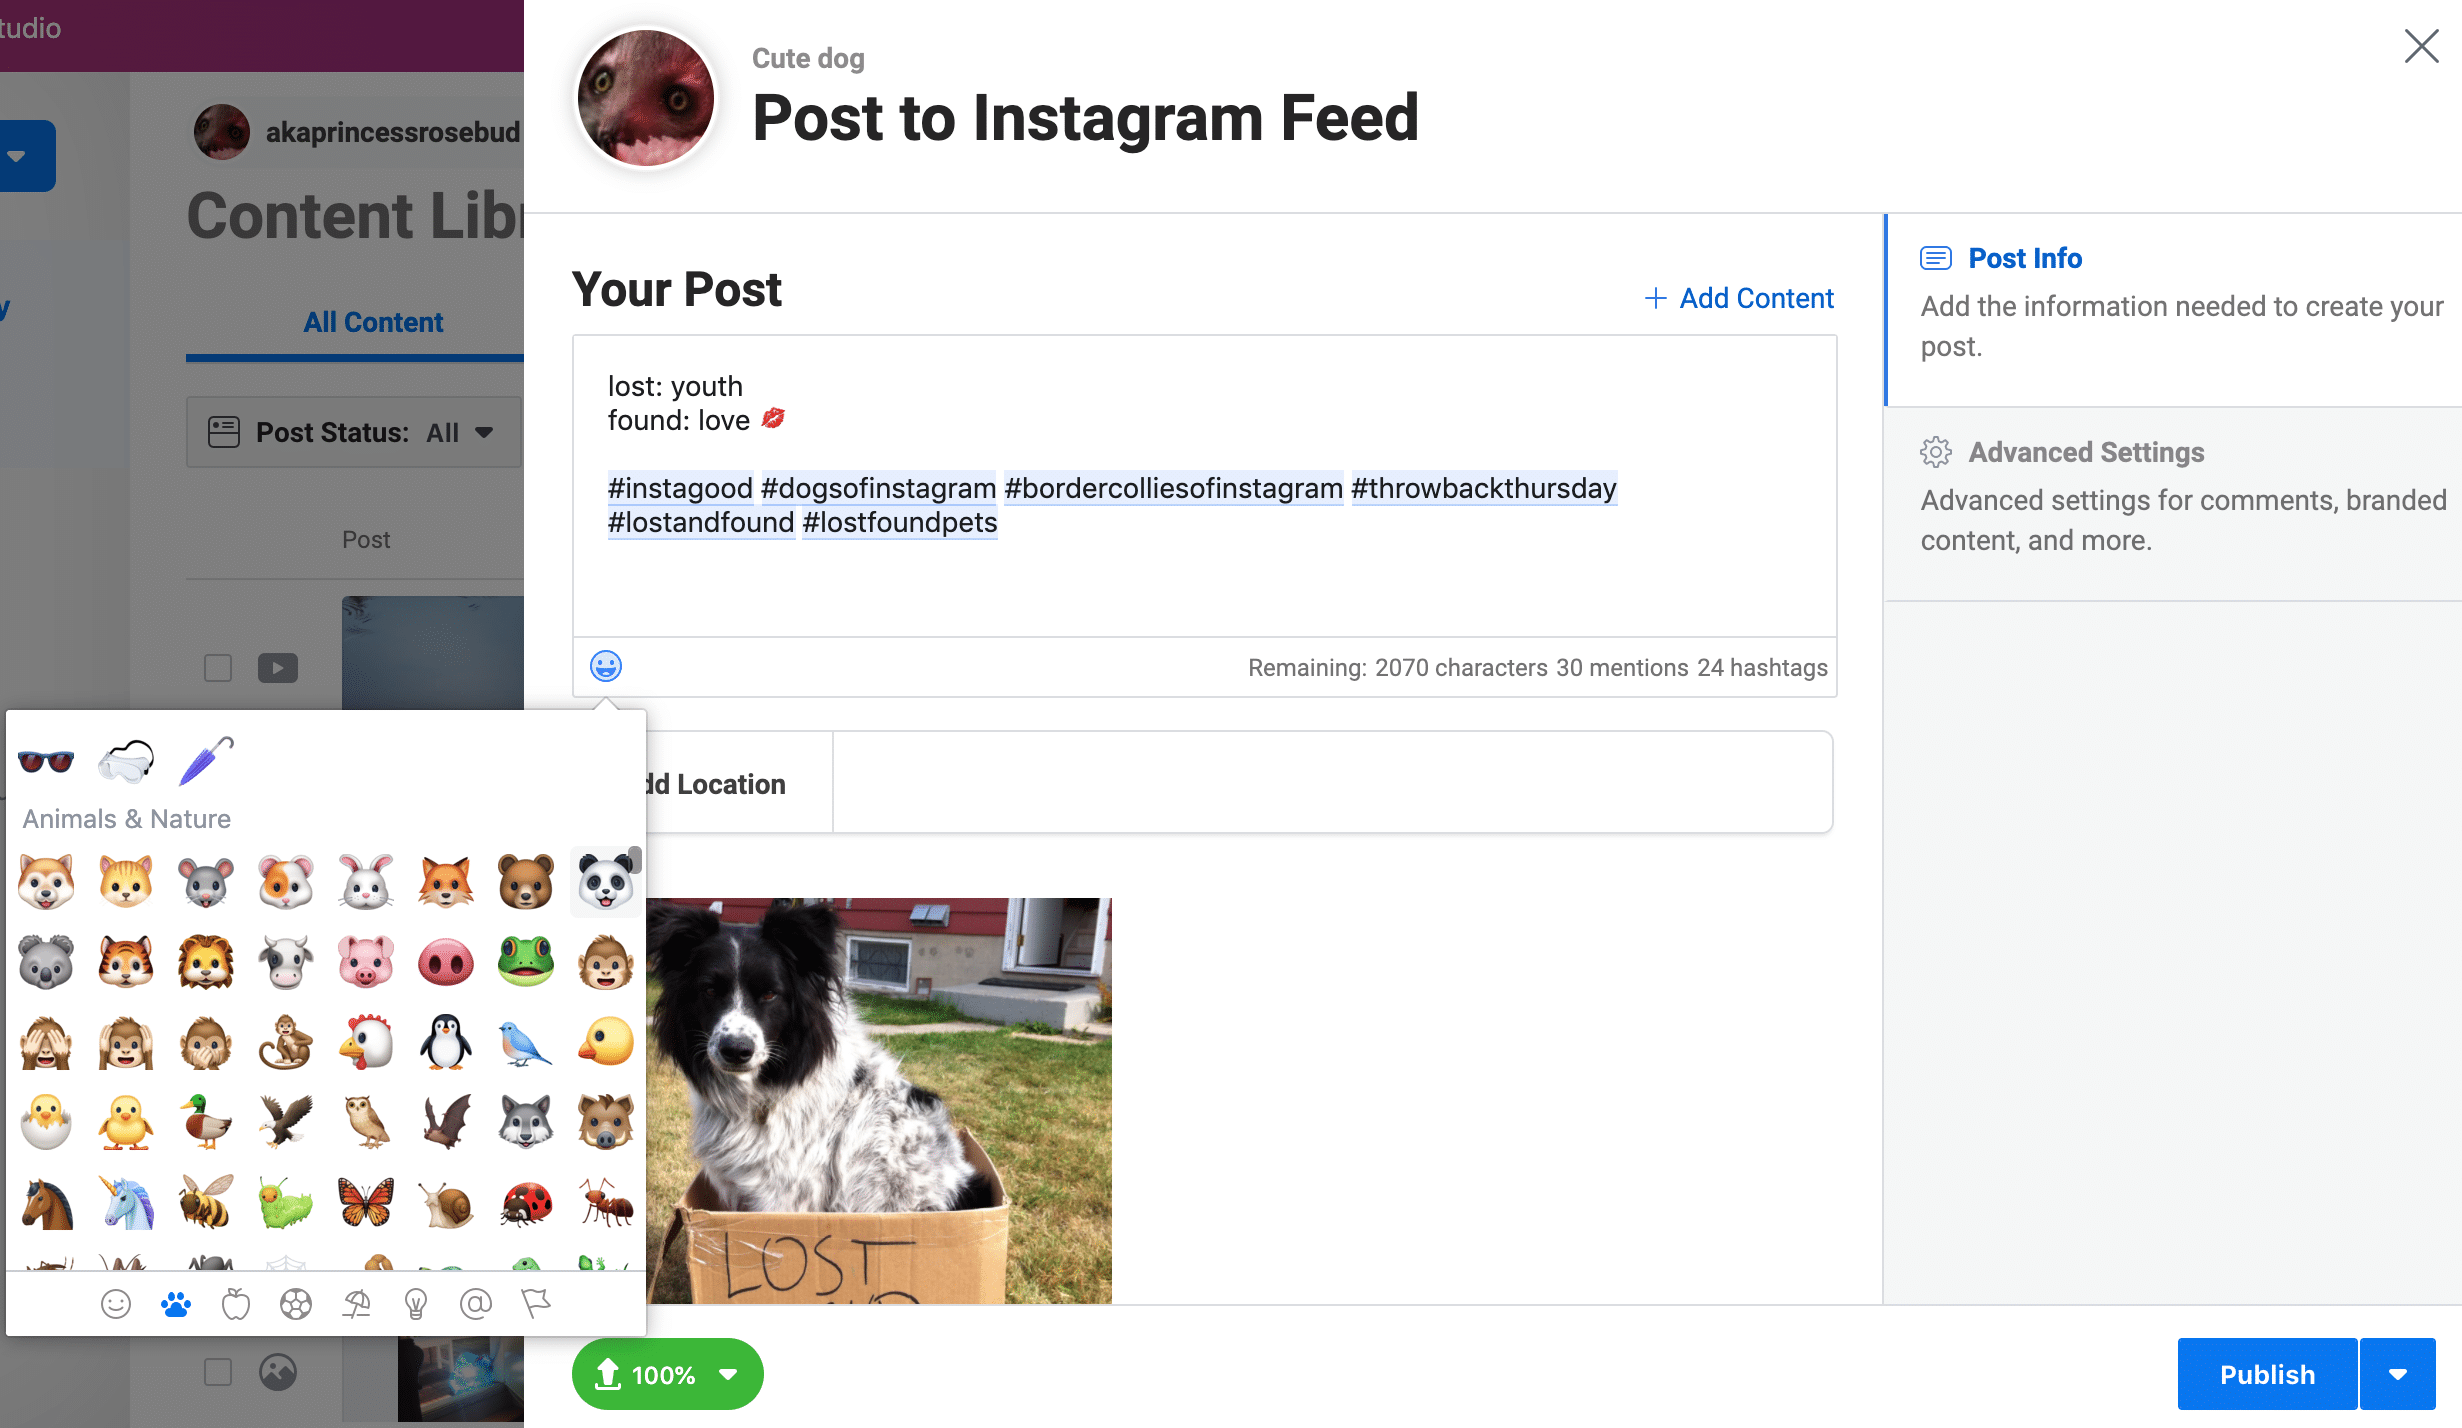
Also, if you want to add multiple photos or videos to make a carousel post, note that once you’ve uploaded one photo, the Add Content button moves to the upper right corner. Like this:
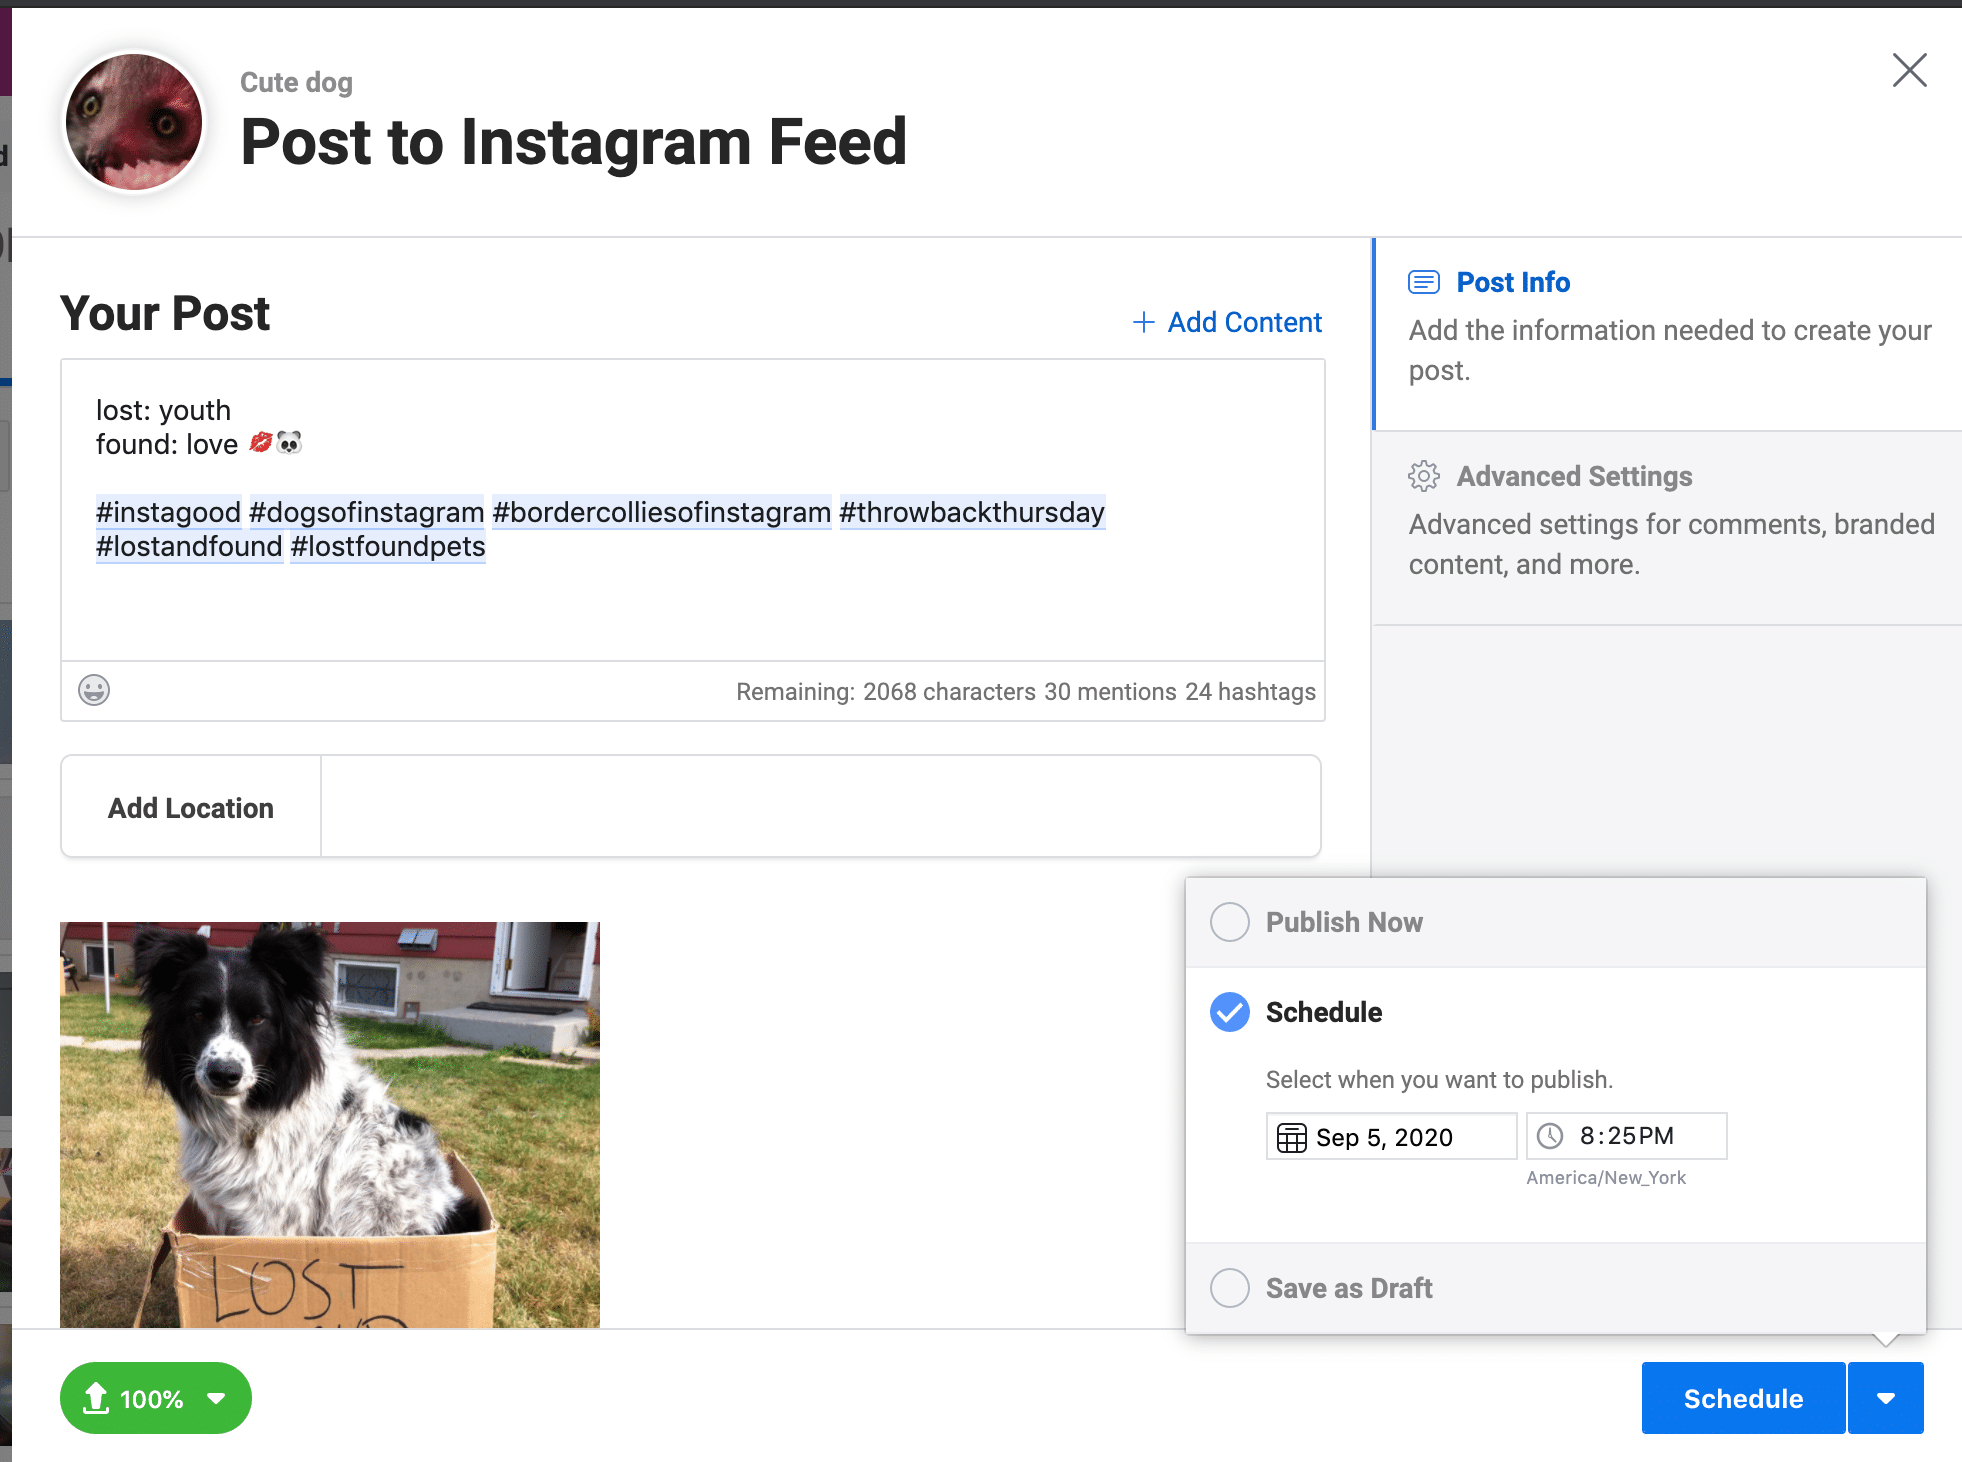
4. Craft your post
Now do your usual magic: write a good caption, use the right hashtags (up to 24 of them), tag relevant accounts (up to 30), and add your location (optional)
Note: Instagram captions must be a max of 2,200 characters, including emojis.
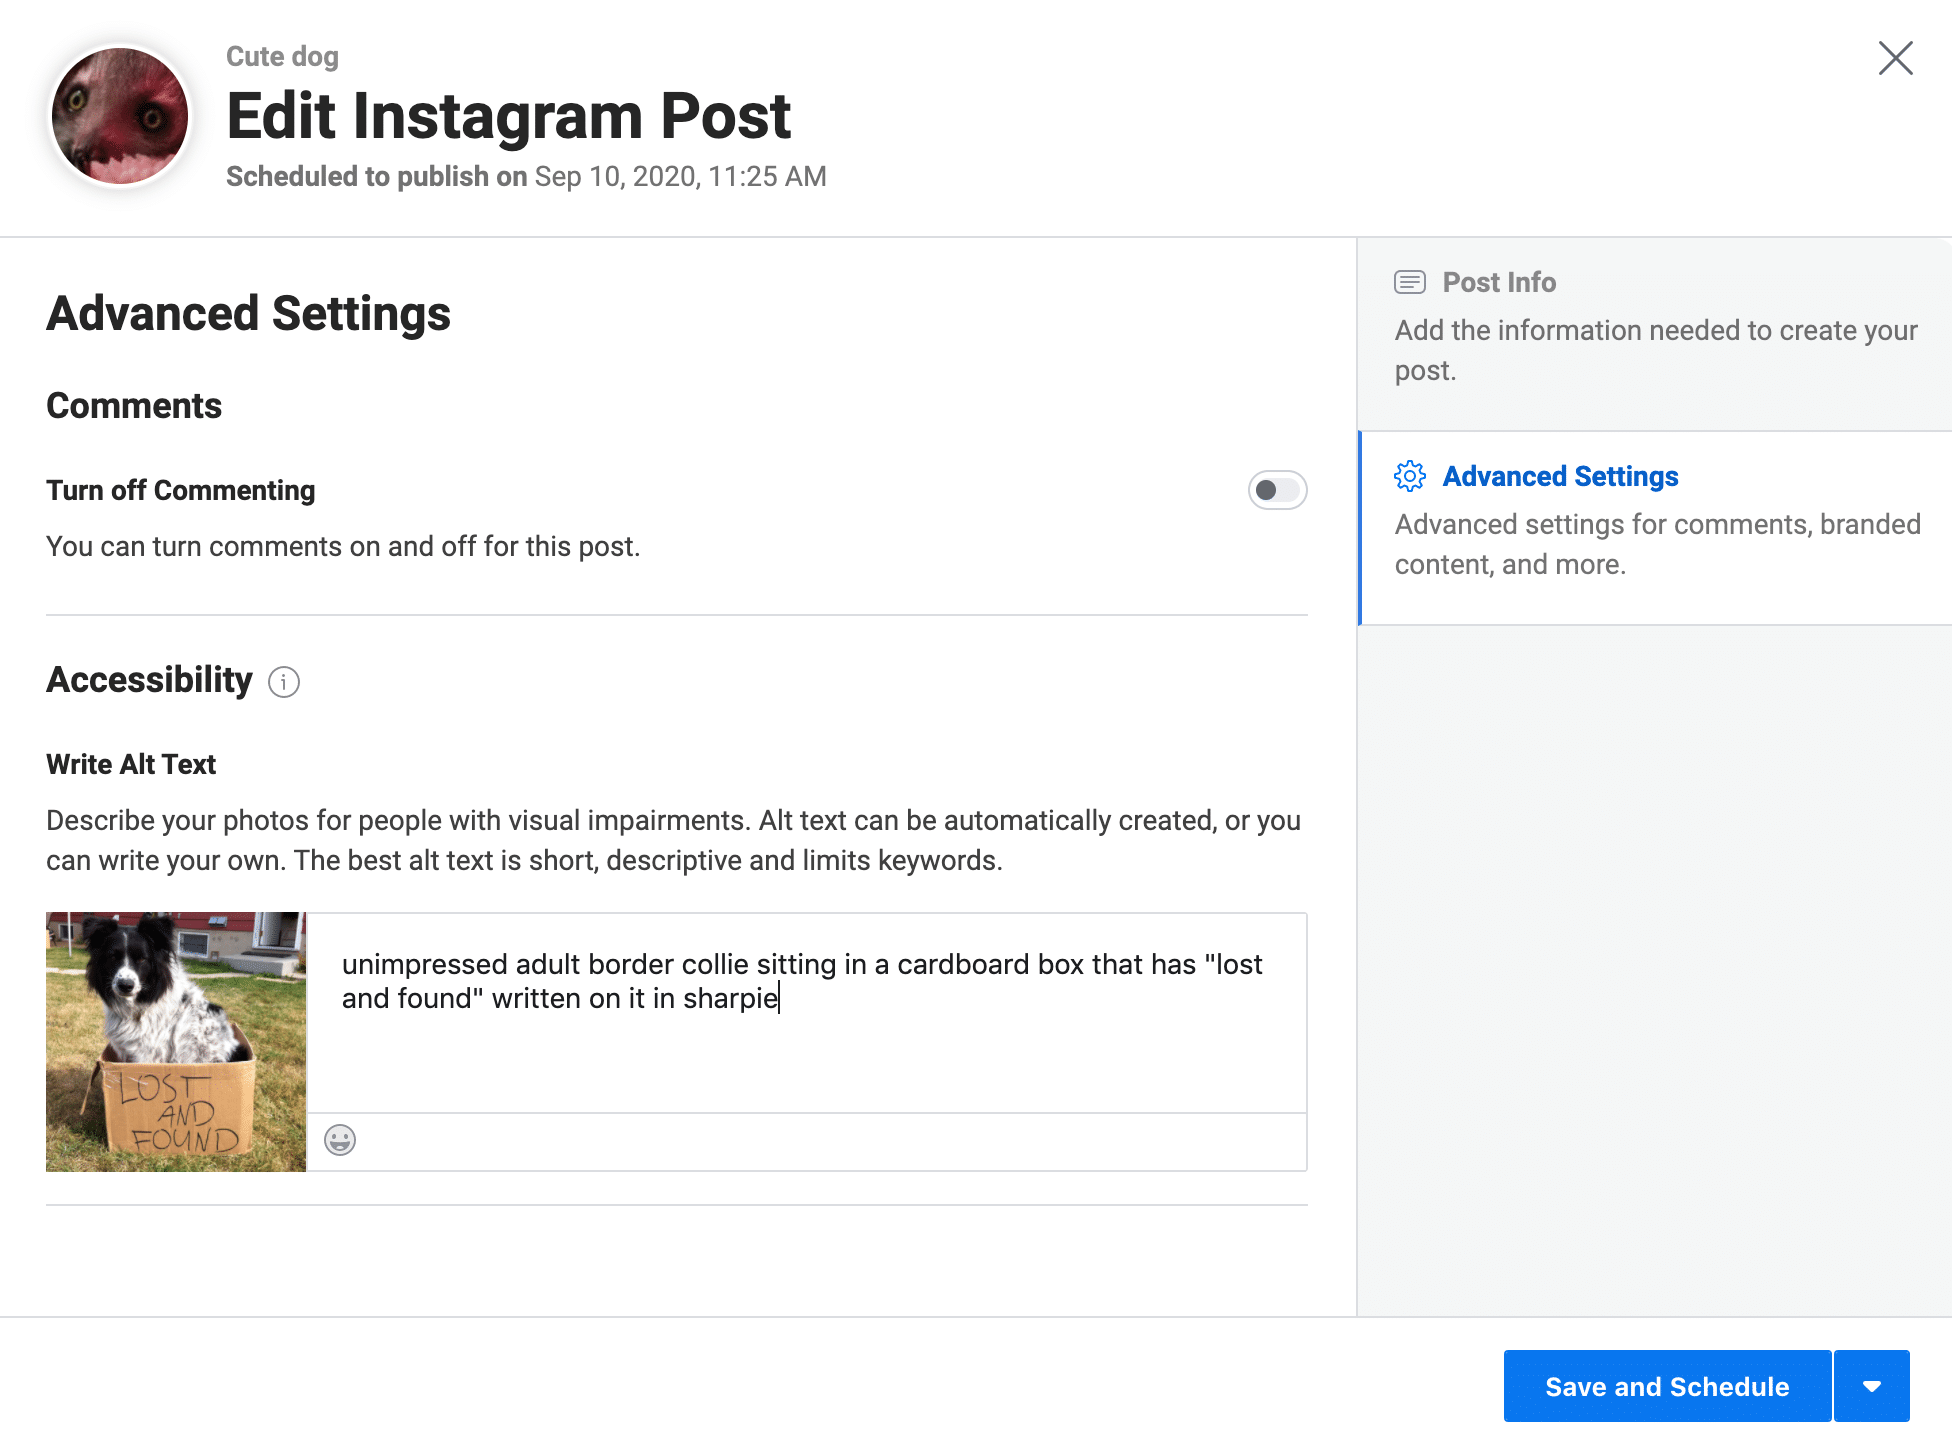
You can also click over to Advanced Settings to turn off comments and/or add some alt text for people with visual impairments:
5. Schedule your post
Now it’s time to schedule. In the lower right corner, click the arrow beside the blue Publish button, and select Schedule. (You can also click Publish Now or Save as Draft.)
Be warned that Creator Studio won’t give you much guidance as to the best time to post. You’ll want to check your own Instagram analytics to see when your audience is online, or use Hootsuite’s Best Time to Publish suggestions.
That’s it! Now you can lean back and check your DMs.
How to schedule Instagram Posts (business profiles)
Next up, we’re going to look at how brands with business profiles can use third-party apps like Hootsuite to schedule Instagram posts.
Aside from being able to use a tool that schedules content in advance, the advantages of a business profile over a regular profile include advanced analytics (not just Instagram Insights, but also access to third-party analytics, which have their own advantages) as well as the ability to run ads, add links to your Stories, et cetera.
1. Convert your account to a business profile
Instagram makes this pretty simple:
- In the Instagram app on your phone, go to your profile
- Tap the so-called “hamburger” icon (three stacked lines) in the upper right corner
- Tap Settings
- Tap Account
- Tap Switch to Professional Account
- Choose Business
- You’ll want to take the extra step and connect your Facebook business page to Hootsuite as well: even if you aren’t planning on posting to Facebook, doing so will allow you to access all the useful business features: analytics, ads, and scheduling.
- Add your business’s public contact information
- Tap Done.
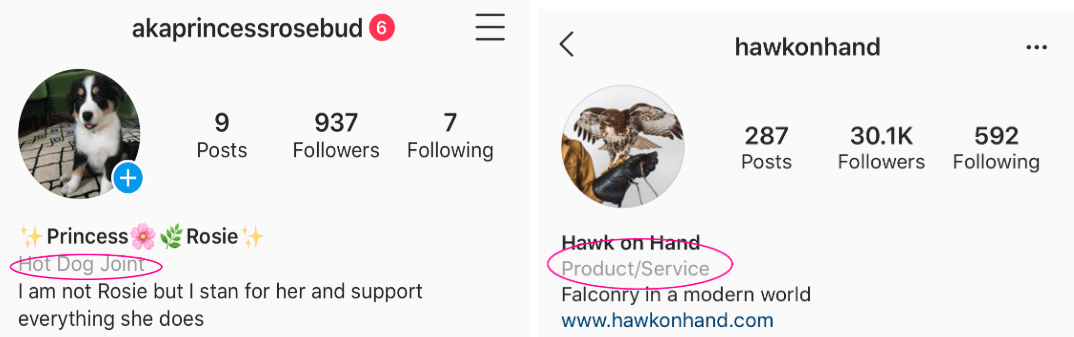
Pro Tip: The business category you select (i.e., Personal Blog, Art, Grocery Store, etc.) will be public and visible on your profile, so don’t get too snarky.
2. Add your Instagram business profile to your social media management platform
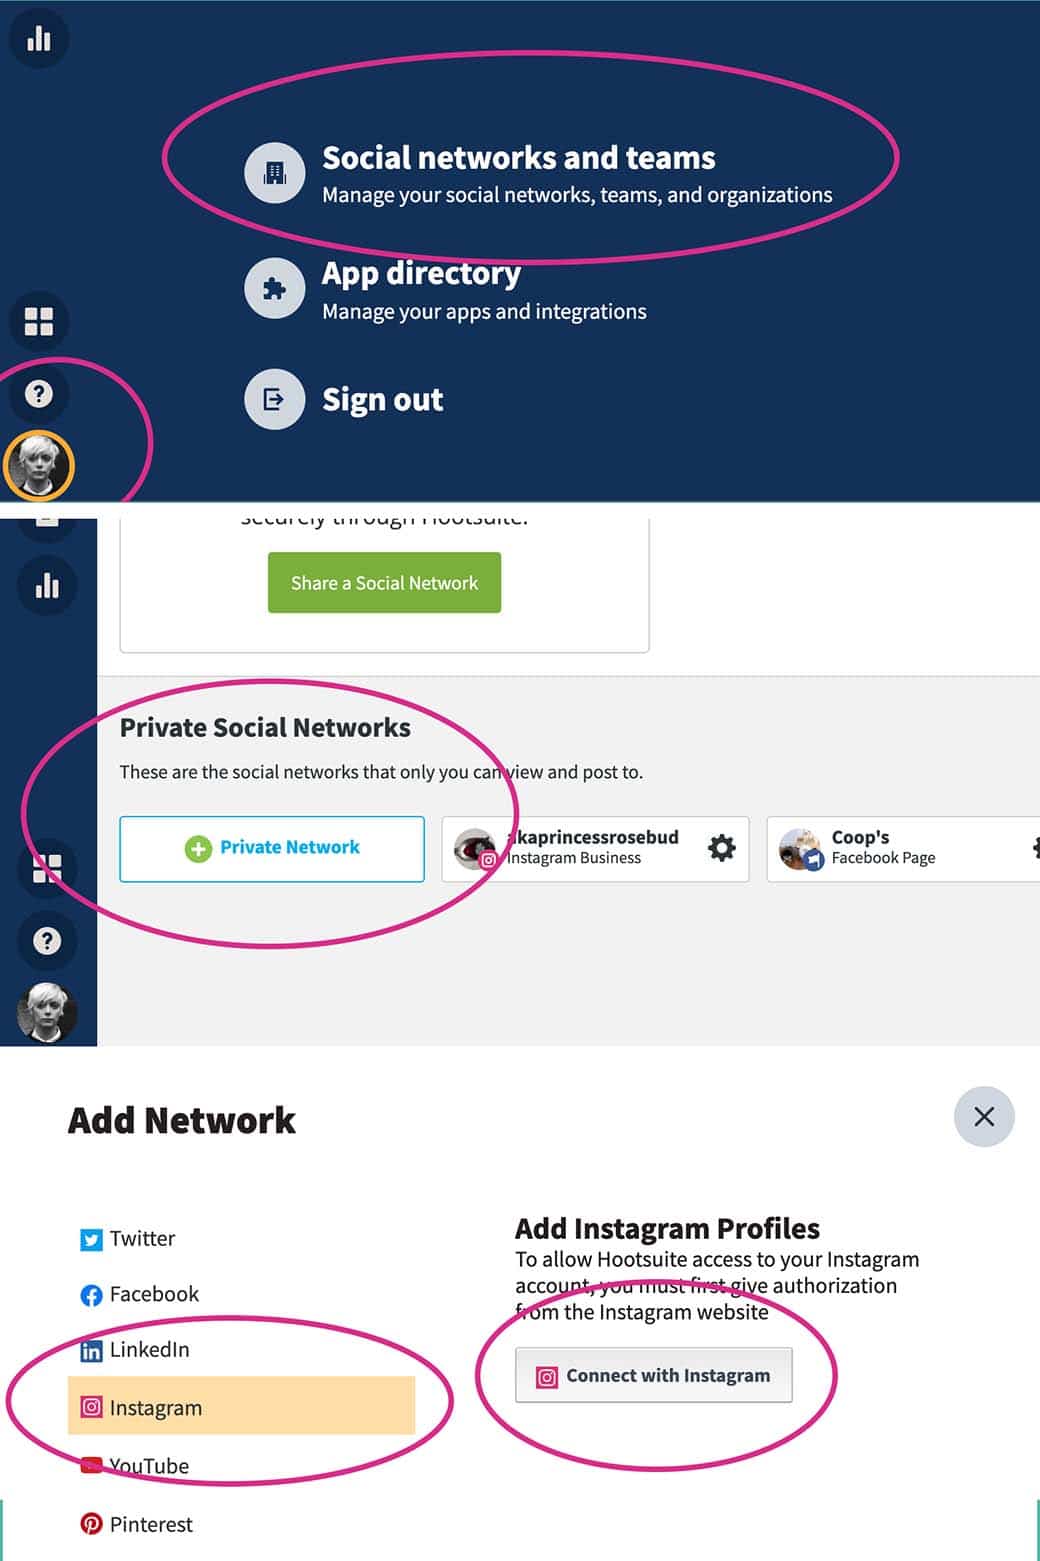
If you’re using Hootsuite, it’s easy to link your Instagram account. From the Hootsuite dashboard:
- Click your profile icon in the bottom left corner
- Click Social Networks and Teams
- Click + Private Network in the bottom-left corner
- Choose Instagram from the list of networks, and then click Connect with Instagram
- Input your account credentials
For more details on this process, check out our very thorough help article.
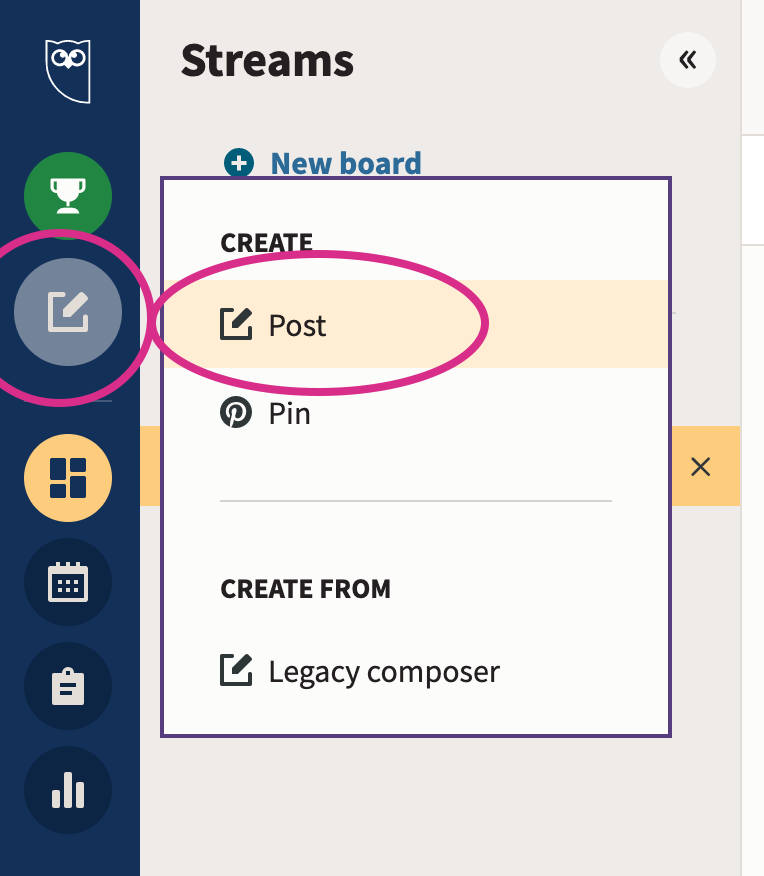
3. Compose your Instagram post
In your Hootsuite dashboard, click the Create icon, then select Post.
In the Post To field, choose your preferred Instagram account from the list.
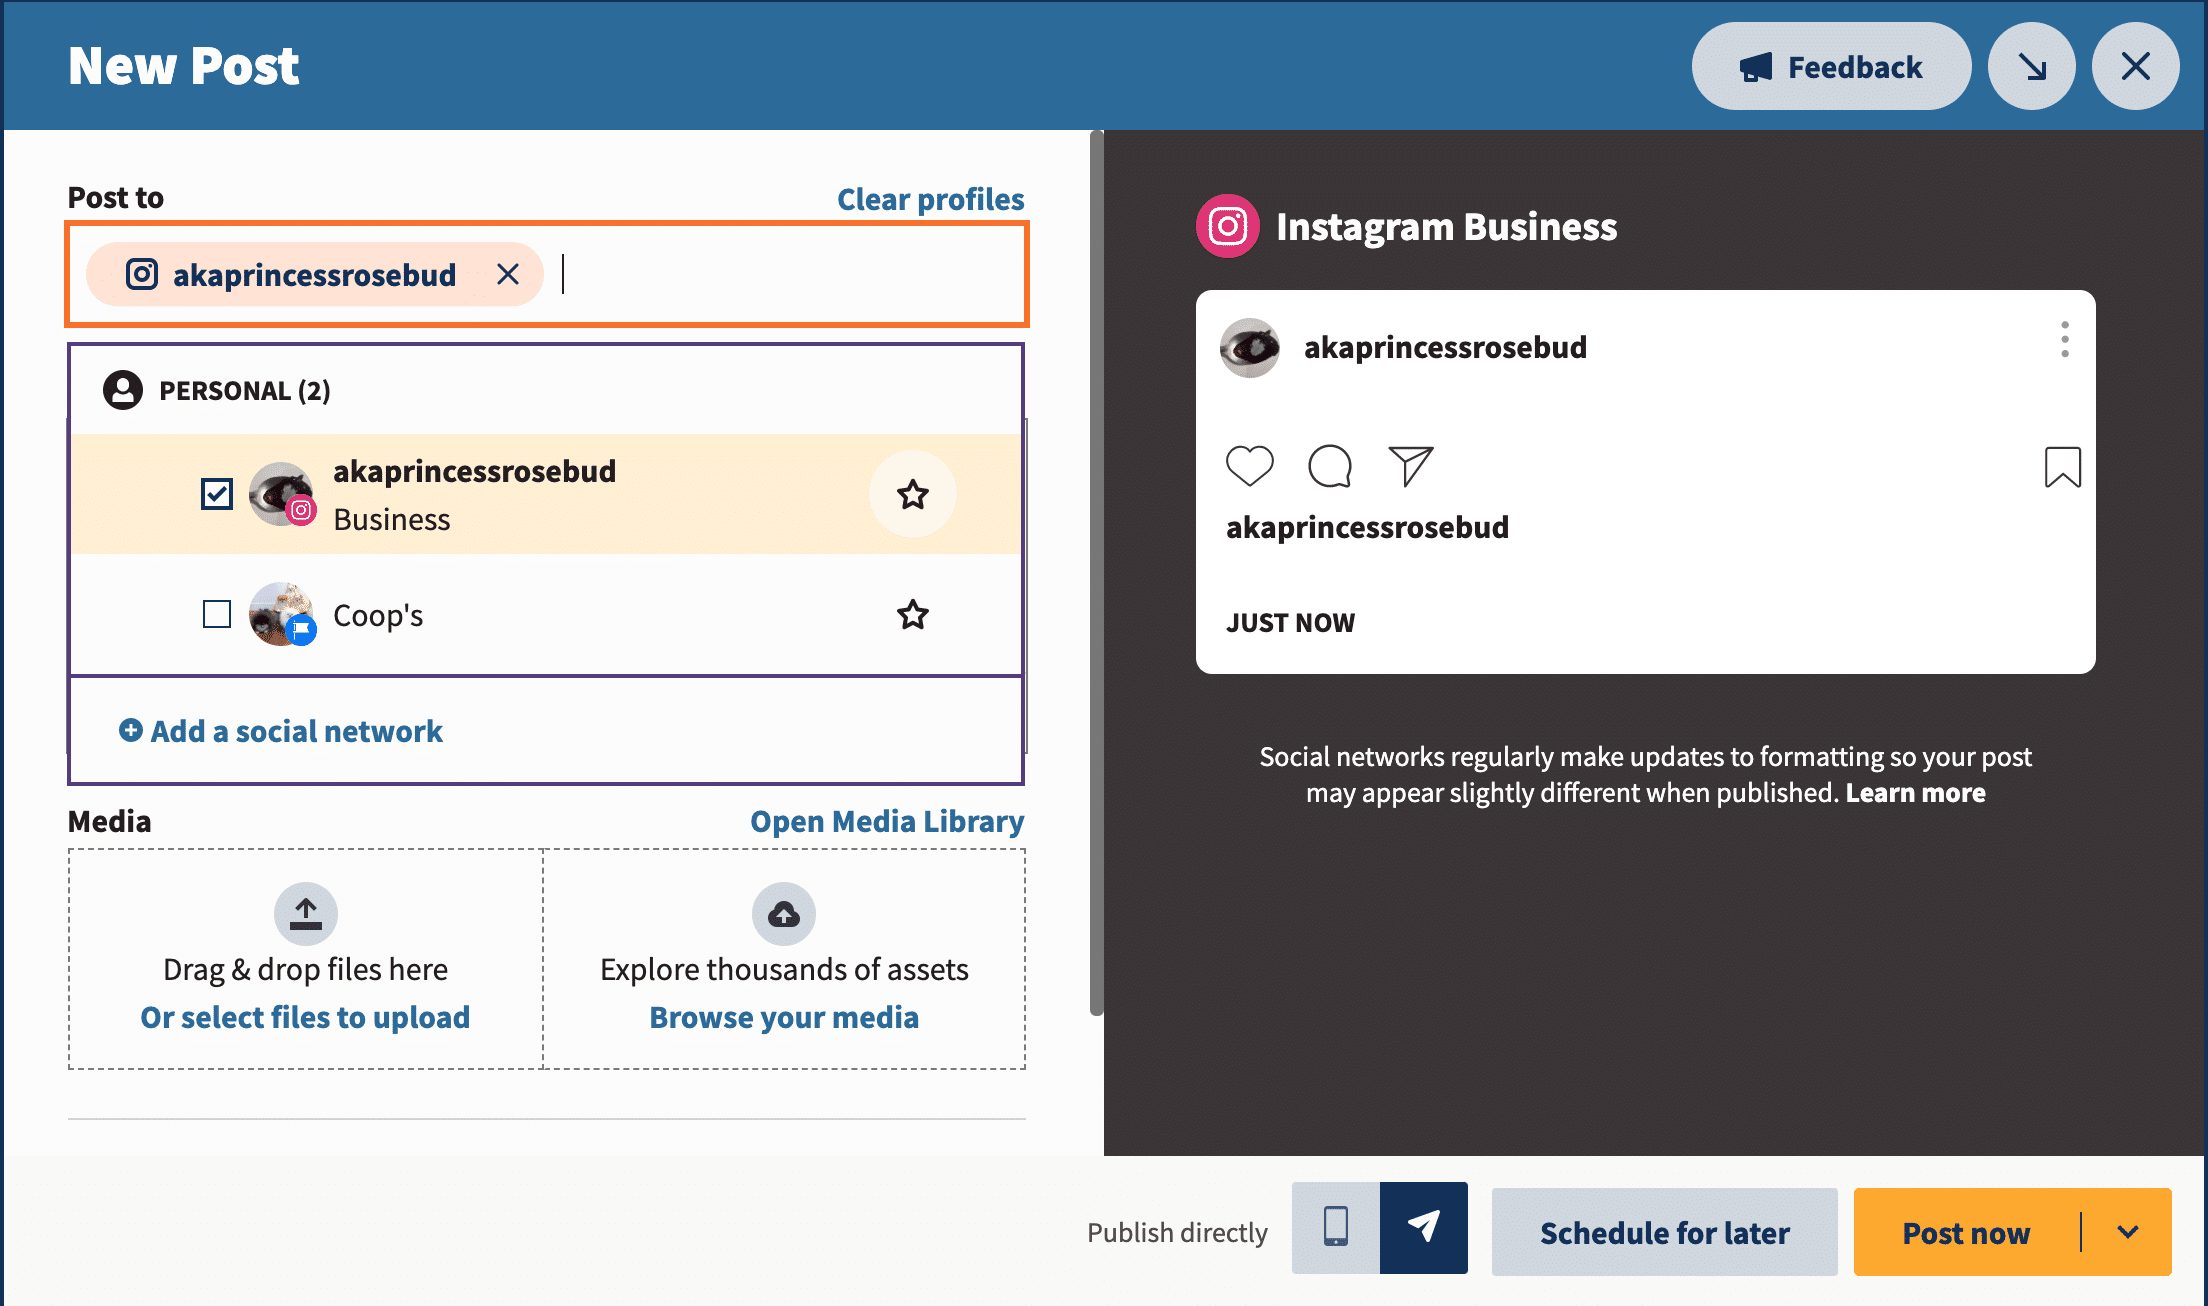
Now go ahead and upload your visuals (or select them from your content library). You’ll also want to write an engagement-driving caption, add your hashtags, tag relevant accounts, and add your location.
Your draft will show up as a preview on the right.
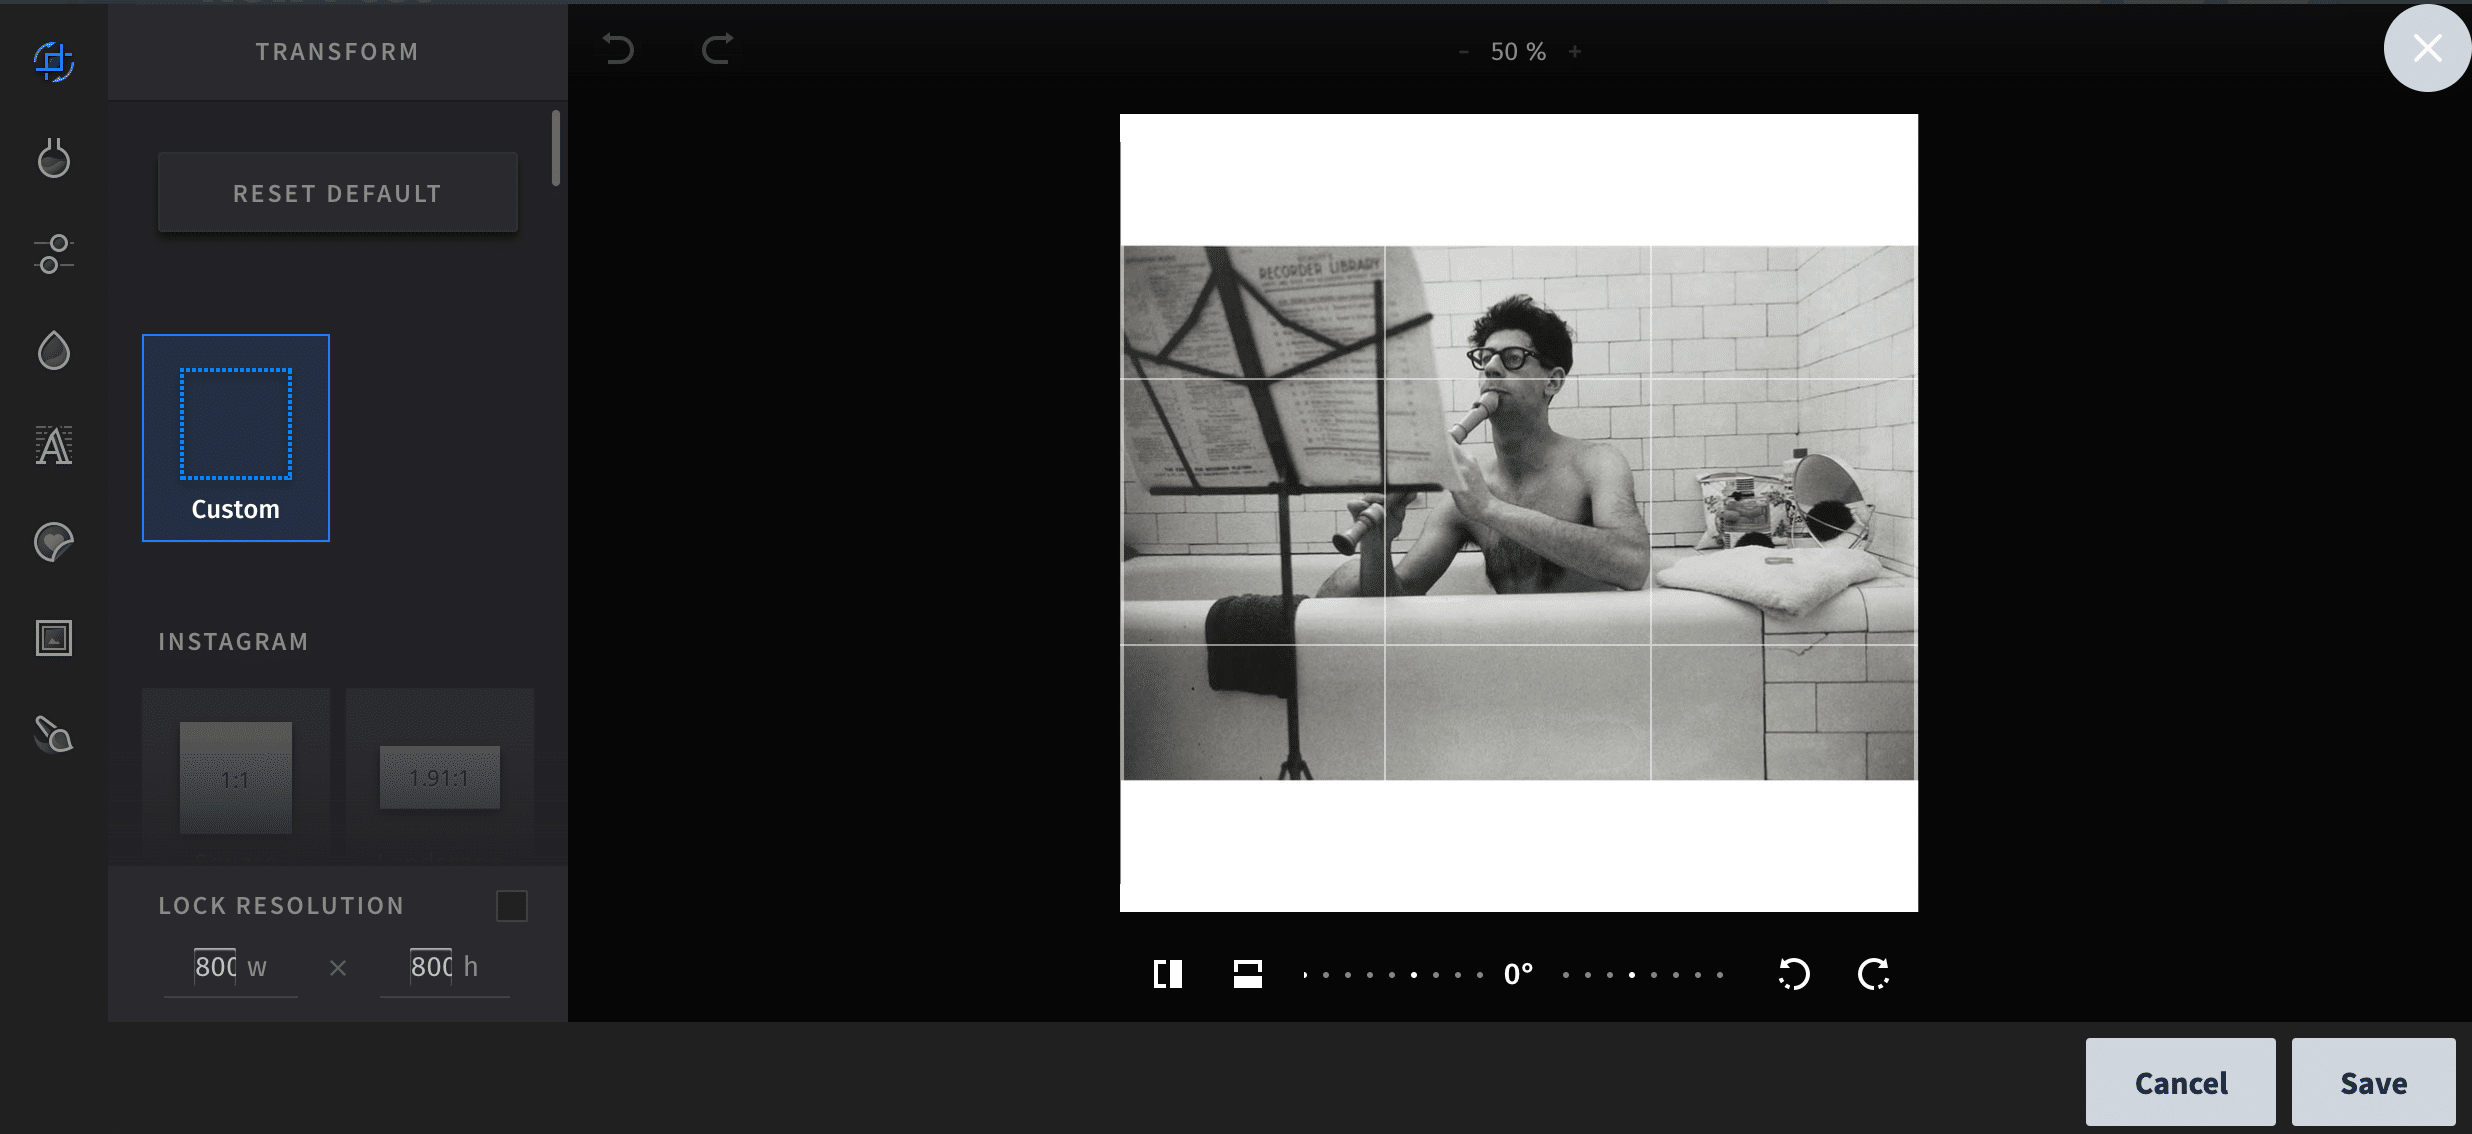
If you haven’t already prepared your image for Instagram, go ahead and click Edit Image to crop your visual to the required aspect ratios (that is: 1.91:1 or 4:5), filter it, and otherwise perfect it.
Bonus: 14 Time-Saving Hacks for Instagram Power Users. Get the list of secret shortcuts Hootsuite’s own social media team uses to create thumb-stopping content.
Even if you’re a one-person team, don’t skip this step. Instagram is an image-focused platform and nailing your Instagram aesthetic is fundamental to winning over your audience.
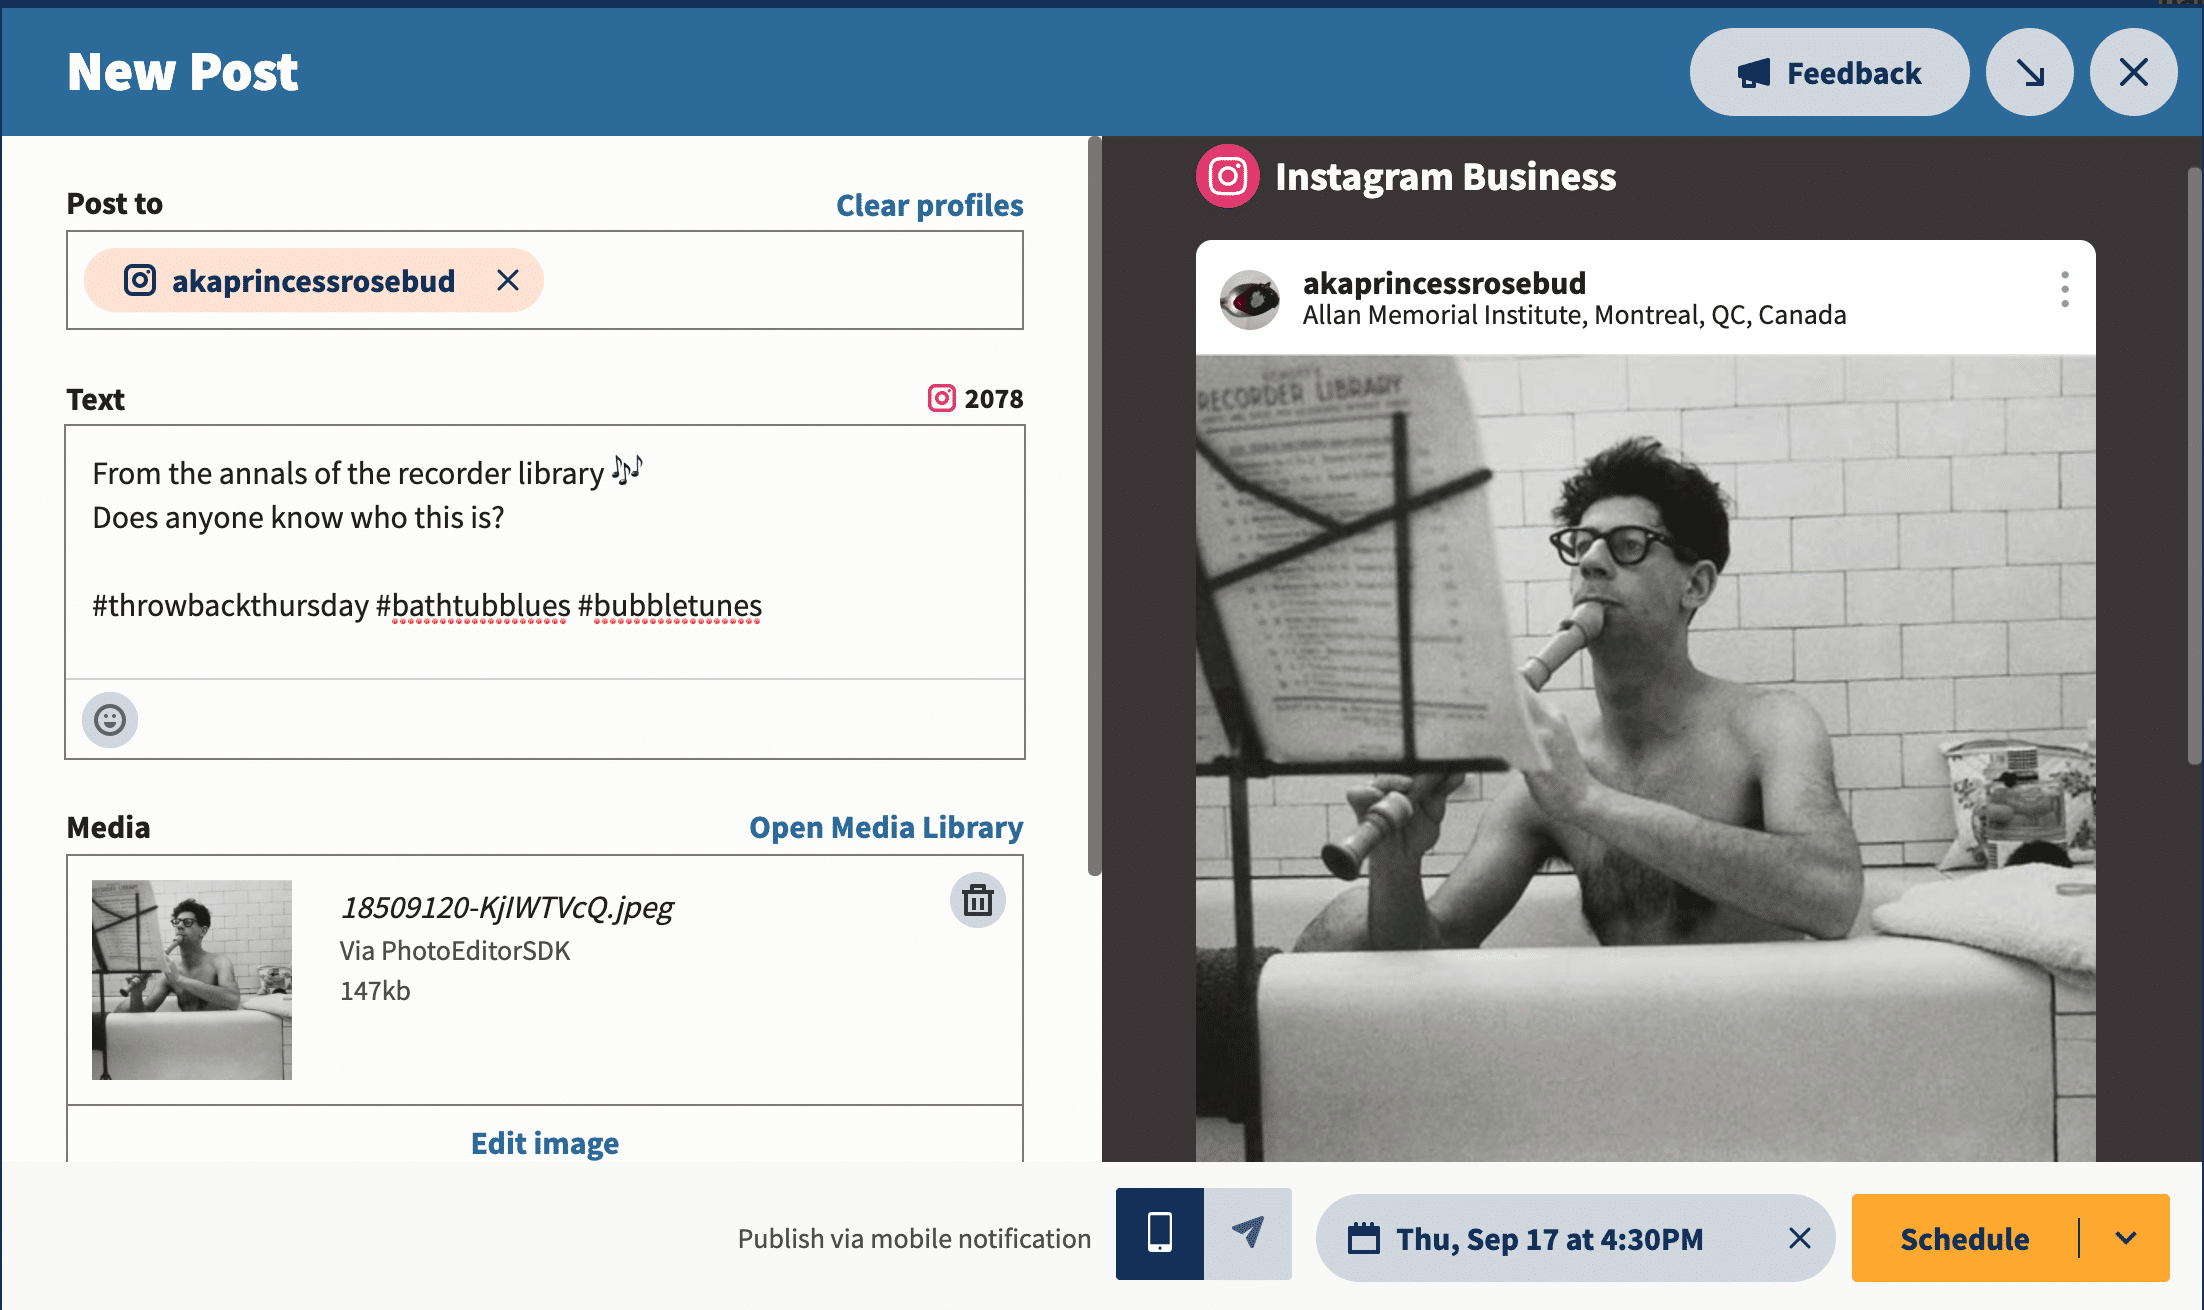
4. Schedule your post
All right, now comes the easy part. Click Schedule for Later in the bottom right, and select the date and time you’d like your post to go live.
When should you schedule it? That depends on your audience. The Instagram algorithm prioritizes recency as it decides which posts to show people. On the other hand, if you’re interested in the overall best time to post to Instagram, we have an analysis here.
Pro Tip: Hootsuite’s AutoSchedule feature will automatically select the best time to post for optimal engagement from your audience.
5. Wait for your post to be published to Instagram
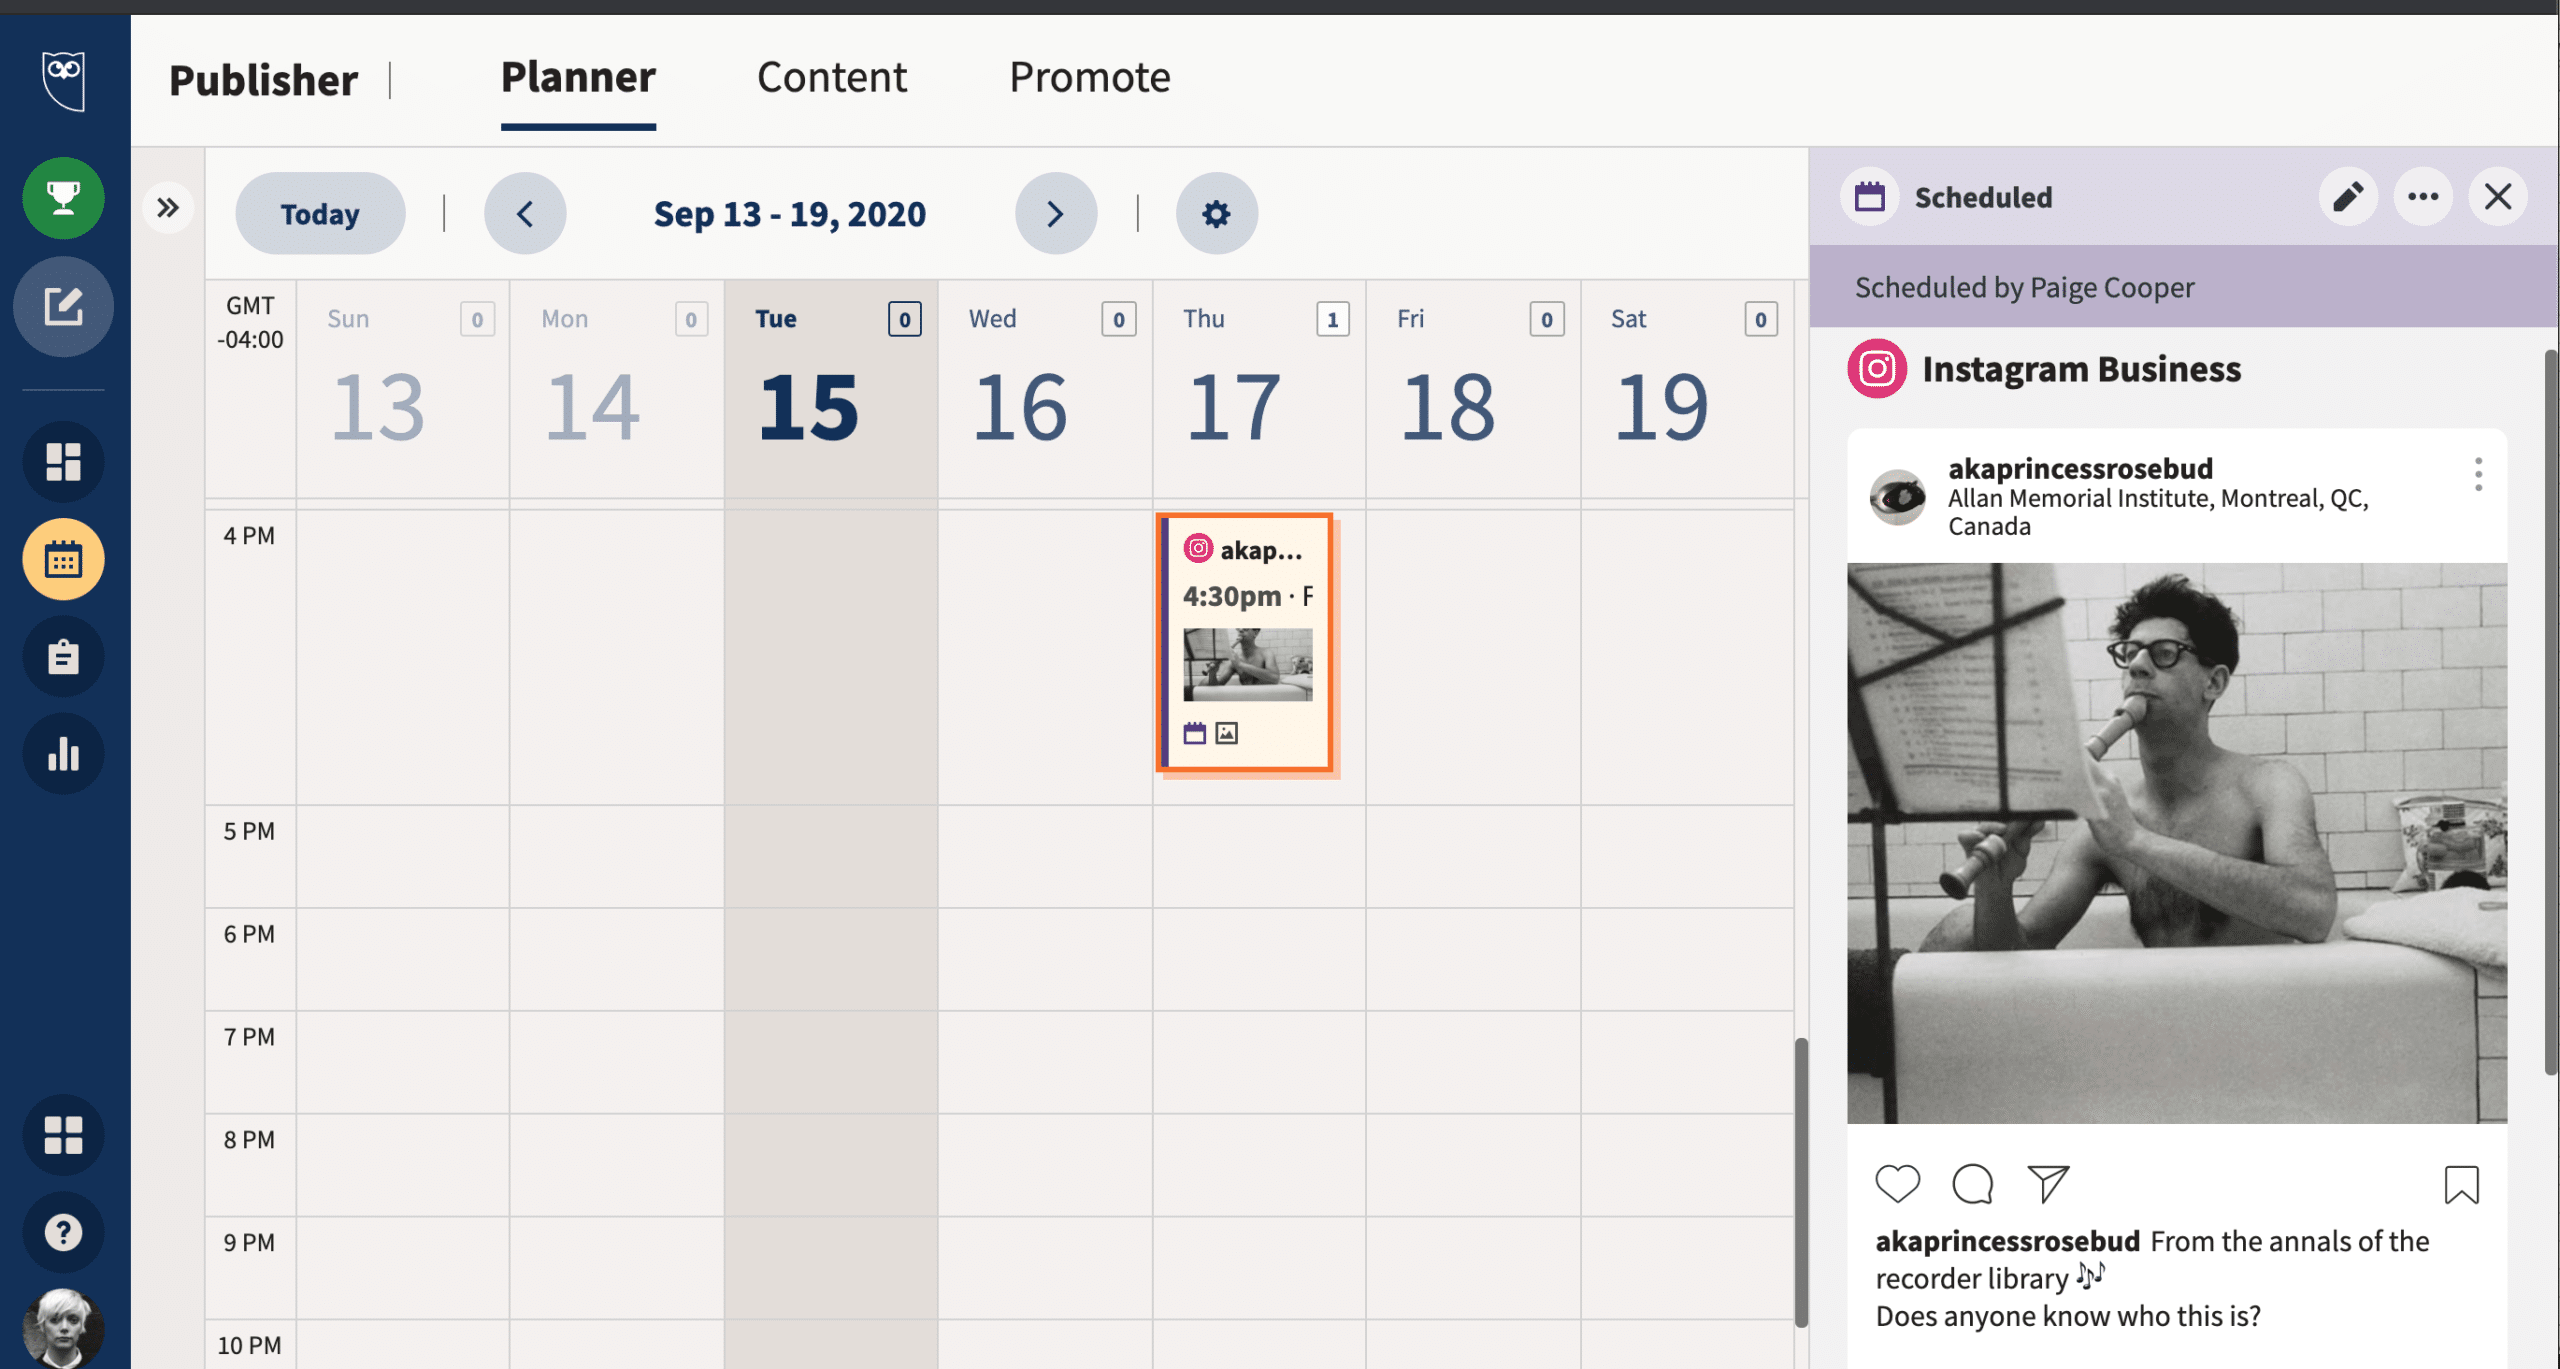
That’s it! You can review your scheduled posts in the Hootsuite Planner, and edit them there before they go live, as well.
How to schedule Instagram posts (non-business profiles)
Finally, let’s take a look at the Instagram scheduling process for those of us using personal profiles.
If your Instagram profile is neither a creator nor a business account, don’t worry. You can still schedule your posts, there are just some extra steps involved. In short: Hootsuite sends you a mobile push notification at the scheduled time, which reminds you to log in and tap publish.
1. Add your Instagram profile to your social media management platform
For self-evident reasons, we’ll pretend that your preferred management platform is Hootsuite. From the Hootsuite dashboard:
- Click your profile icon in the bottom left corner
- Click Social Networks and Teams
- Click + Private Network in the bottom-left corner
- Choose Instagram from the list of networks, and then click Connect with Instagram
- Input your account credentials to integrate the accounts.
At the same time, you’re going to want to set up the ability to use mobile push notifications. Follow these steps on your phone:
- Download the latest version of the Hootsuite mobile app onto your phone
- Open the Hootsuite app, tap your profile icon in the upper left corner, go to Settings, then Notifications
- Find your Instagram profile in the list and ensure Send me a Push Notification is on
2. Compose your post
You know the drill: write a good caption, use the right hashtags, tag relevant accounts, and add your location.
If you want to level up your posts, check out our list of Instagram marketing tips. Or else read up on the latest Instagram trends in 2020.
3. Schedule your post
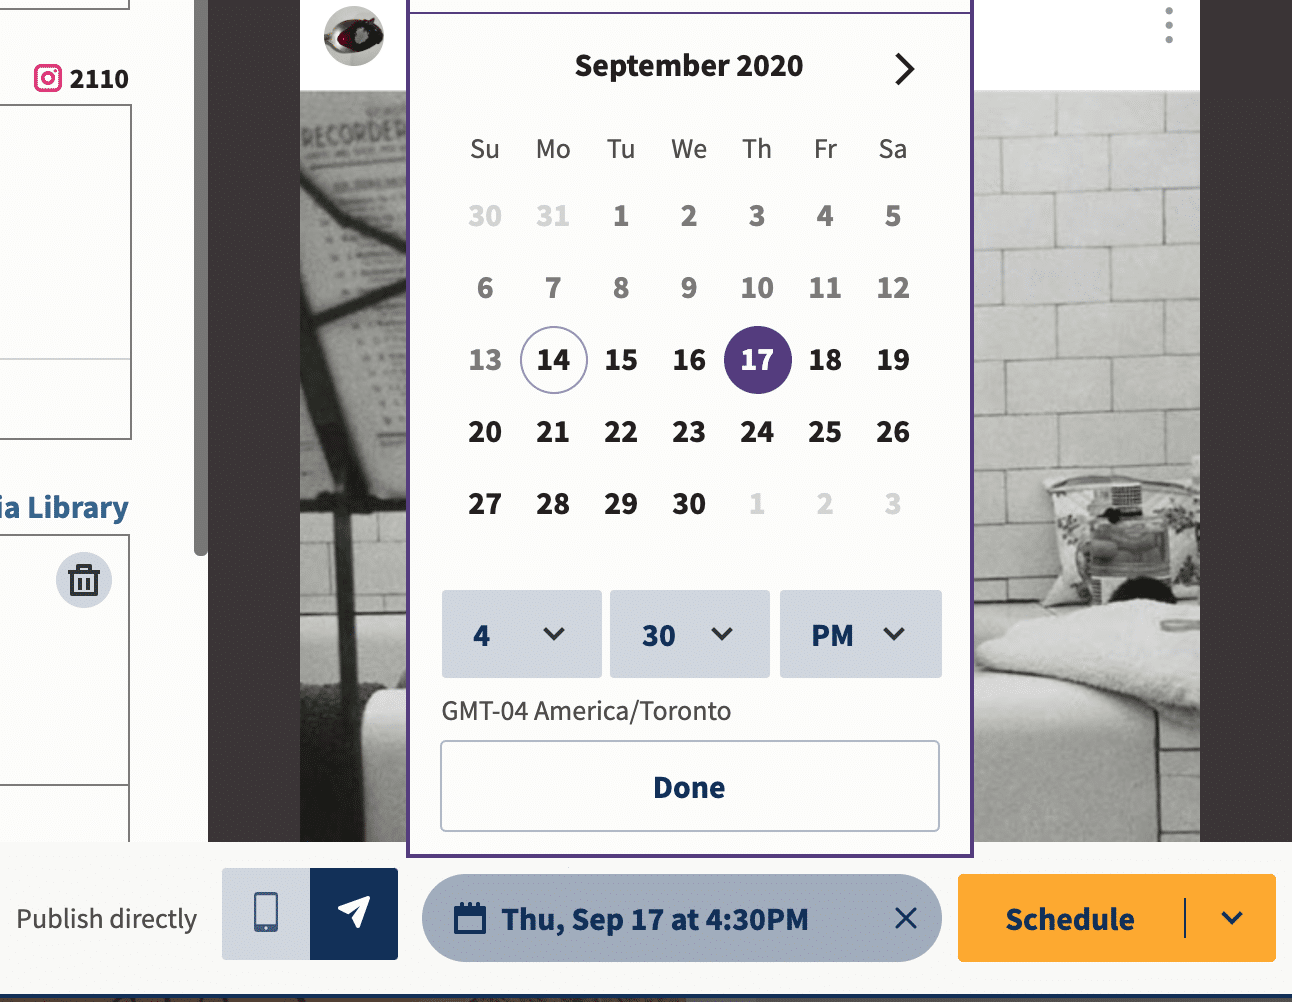
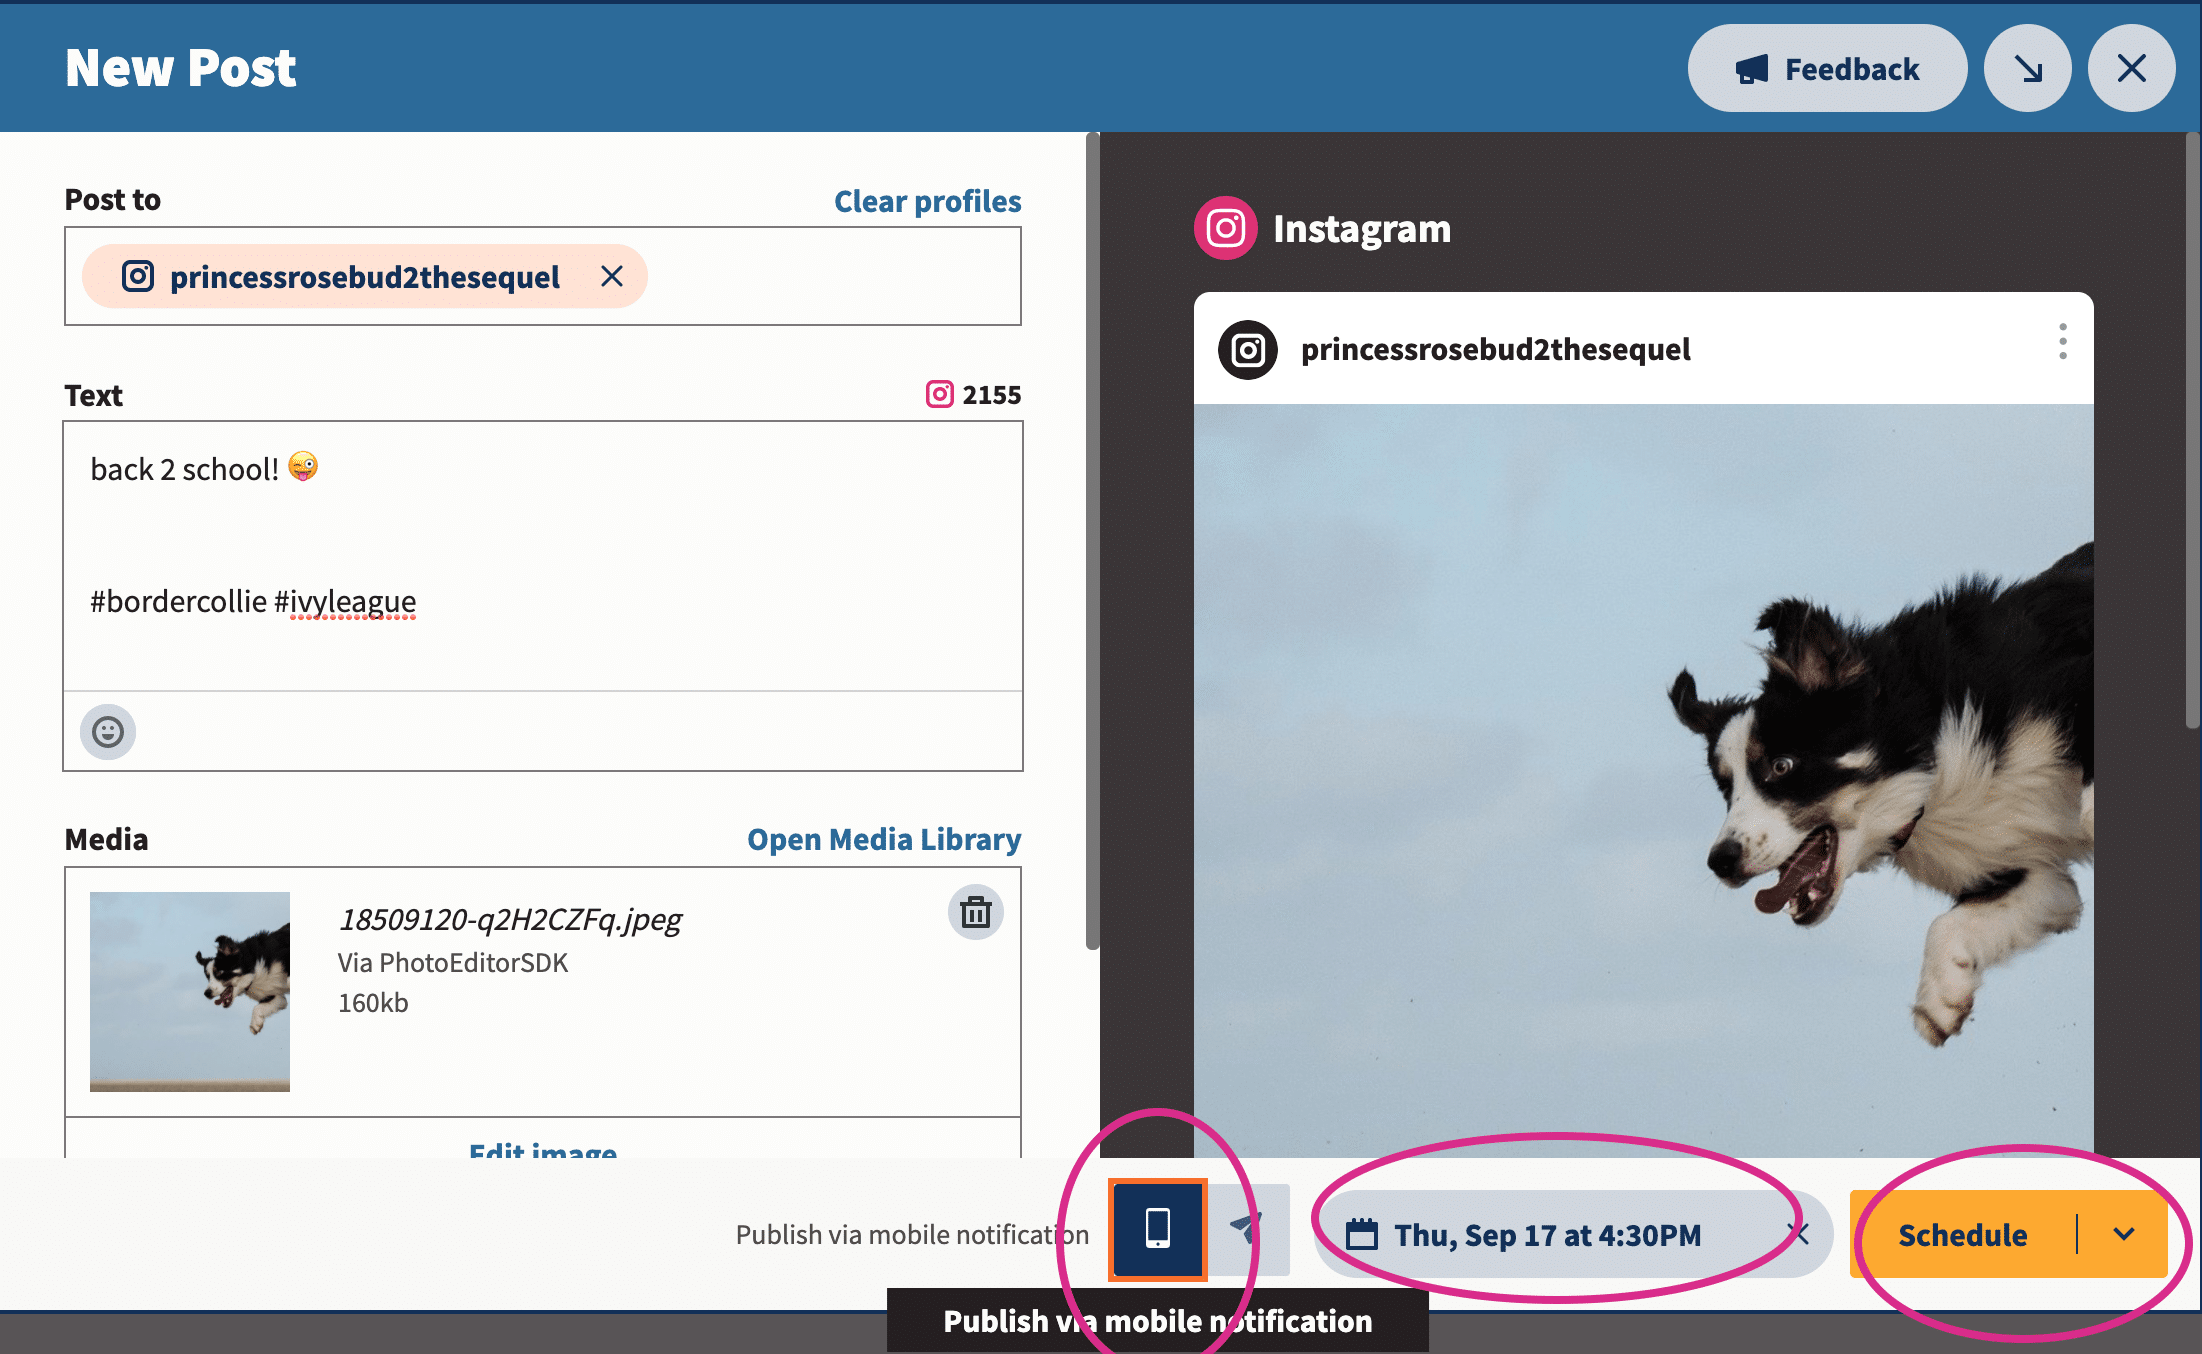
Here’s the key difference between business and personal accounts: scheduling your posts for a personal account requires publishing via mobile notification.
You’ll still want to check your Instagram analytics and make sure you select the best time to post.
Go ahead and pick your time and date, then click Schedule.
4. Publish your post
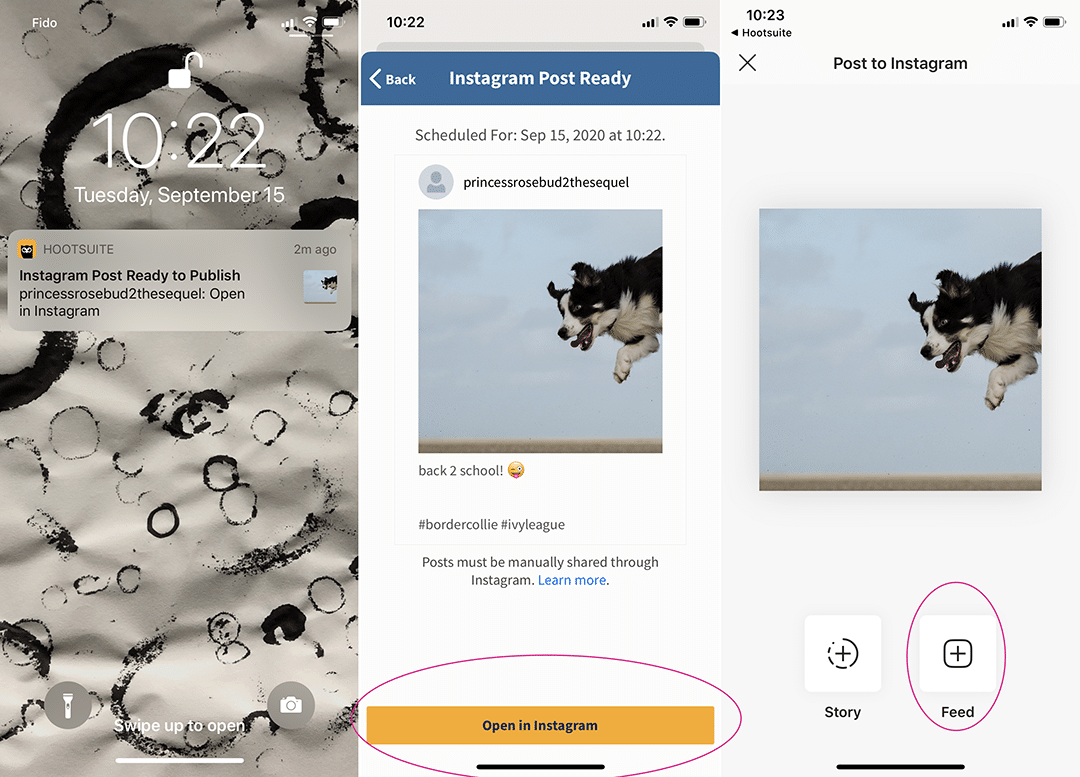
When the time comes, you’ll receive a push notification on your phone to remind you to post to Instagram. Note that this is essentially the same process for scheduling your Instagram Stories (no matter what kind of account you have).
The process for posting looks something like this. The Hootsuite app will take care of most of the work, but you need to open Instagram, paste your caption in, select your photo, et cetera. Not tough brain work, but do schedule five minutes to triple-check that everything’s right.
And voila! You’ve done it!
What’s the difference between Instagram scheduling and Instagram automation?
Instagram scheduling is a great time-saver, and most social media marketing professionals use it without a second thought. It’s when you create your posts in advance and use a piece of software to post them automatically at the time you want.
Meanwhile, Instagram automation is less great, if not outright evil. It involves paying to have bots like or comment on random strangers’ posts in order to falsely inflate your analytics. Not so surprisingly, automation doesn’t deliver on its promises. Not only is it harmful to your brand’s relationships with partners and audiences, it’s usually a scam.
Instagram has been very, very effective in its ongoing crackdown on bots, spam and scams. So, these days spending budget on shady activities is not only ineffective, it’s actually quite difficult. For instance, in our recent automation experiment, the services we tried to hire often just… didn’t work.
On the bright side, there are plenty of legitimate tools that use automation to help you get off the hamster wheel of repetitive tasks. Check out our list of white-hat social media automation tools for inspiration.
Best practices for scheduling Instagram posts
If you’re ready to take the plunge and get real efficient with your posting habits, these tips will help keep you ahead of the game.
Post at the best time
In general, posting when your followers are online is key, because the Instagram algorithm prioritizes recency. This means that, generally, a newer post will show up higher on your followers’ newsfeed than an older one.
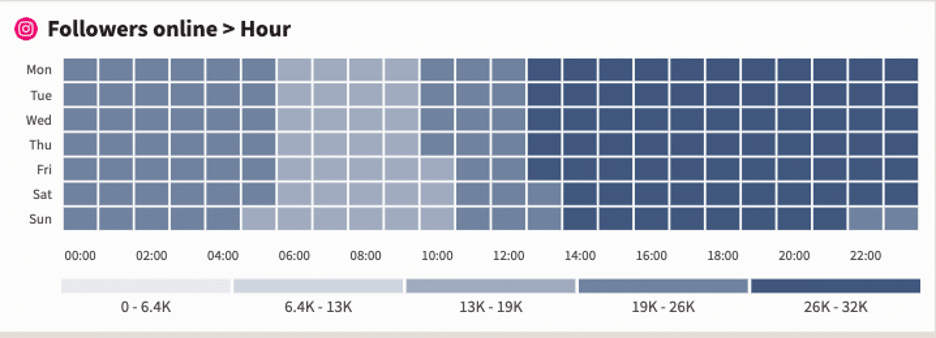
But, the right Instagram analytics tool will tell you when your audience is most likely to be online and/or engage with your post.
For the Hootsuite social media team, that time is 8AM-12PM PST, or 4-5PM PST on weekdays. For you, it might be different.
Luckily Hootsuite’s Best Time to Publish feature can show you your best time to post on Instagram based on your posts from the past 30 days. It groups them by weekday and hour, then calculates the average impressions or engagement rate to identify the time slots where your posts had the highest impact. Then it suggests the best times for you to post moving forward.
Source: Hootsuite
It will also suggest time slots that you haven’t used in the last 30 days so that you can shake up your posting habits and test new tactics.
But don’t schedule too far in advance
If we’ve learned anything in 2020, it’s that the world is changing faster and faster.
When it comes to Instagram scheduling, going much farther than a week in advance can start to increase the risk of something going sideways. You don’t want to cause a social media crisis for your brand by posting something insensitive. In fact, if something unexpected occurs you may need to pause your posting calendar entirely and use your social channels to communicate through a crisis.
Our advice: keep your finger on the pulse, and stay nimble.
Be ready to press pause
If you do schedule your posts far in advance, it’s not the end of the world. Sometimes you need a full two weeks of vacation!
Just make sure you’re using an Instagram scheduler that allows you to press pause on all upcoming content if a crisis or emergency suddenly occurs.
With Hootsuite, pausing your scheduled social media content is as simple as clicking the pause symbol on your organization’s profile and then entering a reason for the suspension. (This is actually one of our favorite Hootsuite hacks.)
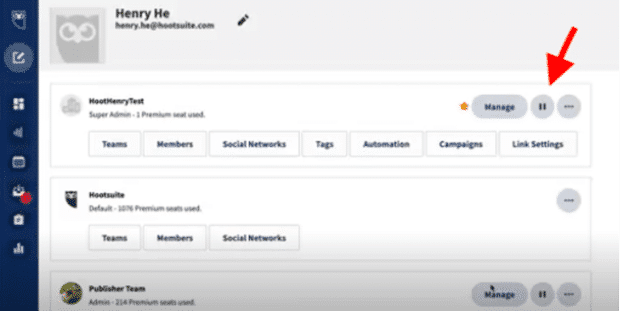
Source: Hootsuite
Don’t get spammy
Yes, the miracle of Instagram scheduling means you can now increase your quantity of posts without sacrificing quality. But should you?
The short answer is “maybe.” The long answer is “maybe, if you can maintain consistent quality at that pace over the long term.”
But great engagement rates have more to do with consistency than frequency. Remember that the Instagram algorithm prioritizes good relationships: if your followers are engaging with your content, the algorithm will show more of it to them.
Optimize and edit
No matter how busy you are, make sure you take a fresh look at that copy before it goes live.
And for big teams with a lot of moving parts, an internal multi-stage approval system is ideal for preventing a gaffe.
But though words are important to any social media post, visuals are key on Instagram. Get yourself an Instagram scheduler that allows you to edit your photos in the same dashboard you publish from. It’ll save you that much more time and ensure that your images are fully optimized before you post.
Shout out to Hootsuite’s image editor, which can crop your image to the correct size for any social network. It also has an extensive filter library (useful for those of us who would rather leave photo editing up to the professionals). Watch the video below for a preview of the tool.
Upload and organize your visuals ahead of time
Not very many people talk about this part of the Instagram scheduling process, but any social media manager will tell you that organizing your content assets saves a ton of time.
How do you organize your social media content? Dropbox, Google Drive? A few folders titled ‘misc social’ on your desktop?
Using a dedicated content library is better: there are tags, permissions, and a truck-load of metadata to help you find what you need fast.
Here’s how to use Hootsuite’s content library, in case you were wondering:
Plan your Instagram grid
The grid of photos on your Instagram profile is like the front window display of your business. And like a window display, it should be inviting, intriguing, and — most importantly — on brand.
What better use of Instagram scheduling than to make sure your Instagram grid layout is fully planned and organized to give the best possible first impression?

Source: @the.orange.home
Analyze and adjust
The best part about scheduling Instagram posts is that it frees up your time to take a look at the big picture. What’s earning likes? What’s falling flat? Maybe you could even run some A/B tests, get mathy about it. Choose your preferred Instagram analytics tool and get cracking.
Use Hootsuite to schedule Instagram posts at the best time, respond to comments, track competitors, and measure performance—all from the same dashboard you use to manage your other social networks. Start your free trial today.
Easily create, analyze, and schedule Instagram posts with Hootsuite. Save time and get results.
The post How to Schedule Instagram Posts (3 Methods + Bonus Tips) appeared first on Social Media Marketing & Management Dashboard.


Recent Comments