I‘m far from the most organized marketer you’ll ever meet — but I‘m working on it! In my quest to become a more organized person, I’ve discovered something super helpful — I can make content calendar templates in Google Sheets.
You read that right — Google Sheets. Perhaps you use spreadsheets to collect data, track campaigns, or organize weekly assignments. But have you ever thought about using a calendar template in Google Sheets to manage and track your work?
Below, we'll review how to make a calendar in Google Sheets and include tips to help you elevate the design. So, open up Google Sheets and prepare to create your calendar.
Why Create a Calendar in Google Sheets?
How to Make a Calendar in Google Sheets
How to Insert a Calendar in Google Sheets
Google Sheets Calendar Templates
How to Make a Calendar Using a Google Sheets Template
Why Create a Calendar in Google Sheets?
I know Google Sheets may not be the first tool that comes to mind when creating a calendar.
But the truth is that there are many compelling reasons to use Google Sheets as a calendar.
Here are my favorites:
1. Easy Collaboration: Google Sheets makes it exceedingly easy to collaborate with team members. By creating a calendar in Google Sheets, I can share it with my team, allowing everyone to contribute and make updates in real-time.
This ensures everyone is on the same page and can stay organized and informed.
2. Accessibility: With Google Sheets, my calendar is accessible from anywhere with an internet connection (and even offline! Here’s how to turn offline access for your documents). I can easily access and update my calendar on any device, whether at the office, working remotely, or on the go.
This flexibility ensures that I'm always up-to-date and can make necessary changes.
3. Customizability: Google Sheets offers a range of formatting and design options to make my calendar entirely my own (in comparison with a premade calendar tool, for instance).
I love that I can choose different colors, fonts, and styles to make my calendar visually appealing and easy to navigate. This level of customization ensures that my calendar aligns with my team’s branding or reflects my unique style.
4. Integration with Other Tools: Google Sheets seamlessly integrates with other Google tools, such as Google Calendar and Google Drive.
This means I can easily sync my Google Sheets calendar with my Google Calendar and link to and organize relevant files and documents within the spreadsheet, keeping everything in one centralized location.
5. Cost-Effective: My favorite reason to use Google Sheets as a calendar? It’s free. This is particularly important for small businesses or individuals who may not have the budget for a dedicated calendar tool.
If you're looking for a simple yet powerful way to stay organized and manage your schedule, try Google Sheets. Next, we will cover how to create one in your Google account.
Making a calendar in a tool commonly used for spreadsheets sounds intimidating, but don't worry; the process is pretty intuitive. And with the help of some tips, you can easily make a functional calendar that you can sync your schedule with.
At the end, your calendar will look something like this:
1. Open a new spreadsheet and choose your month.
First, open a new spreadsheet.
Then, choose your month.
I did January [YYYY] for this example and filled that into the first cell. What's great about Google Sheets is that it automatically recognizes dates, so typing in a month, followed by the year in YYYY format, will tell Google that you will be working with dates.
2. Begin to format your calendar.
Next, format your calendar. I selected the January [YYYY] text in Column A, Row 1. I highlighted seven columns (A) and clicked Merge to span that cell across the entire column. You can find this button to the right of the Fill tool.
Here, I also center-aligned my text using the tool next to Merge. Later on, I’ll increase the font size and bold the month.
3. Use a formula to fill in the days of the week.
Next, fill in the days of the week in each column (A-G). You can do this manually, but I decided to use a formula. Sheets has a function that lets you type in recipes to complete specific actions at once.
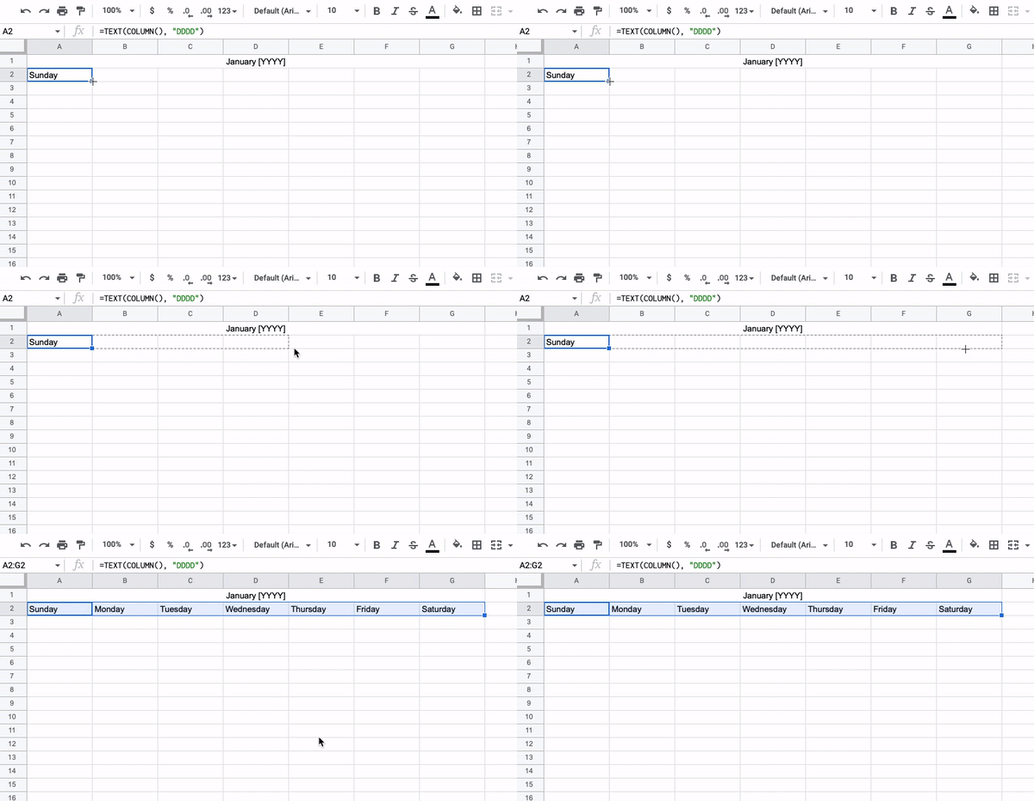
To fill in the days of the week, in the cell where you want your first weekday to be, type: =TEXT(1, “D”). This tells Google that your number will be replaced by a date or time, and the format you're using is weekdays.
Highlight the number 1 in the formula and replace it with COLUMN(). Then, press enter and select your first day. You will copy the formula in Sunday's cell by dragging the selector to the end of your row (A-G) and pressing enter again.

Pressing enter should automatically fill in the rest of the week. Remember, if this doesn't work for you, you can always fill in the days manually.
4. Fill in the numbers.
Excellent! You have your days of the week. Now, we‘re going to fill in the numerical values. Before this step, I added color to the days’ row and changed the font to one I liked a little more.
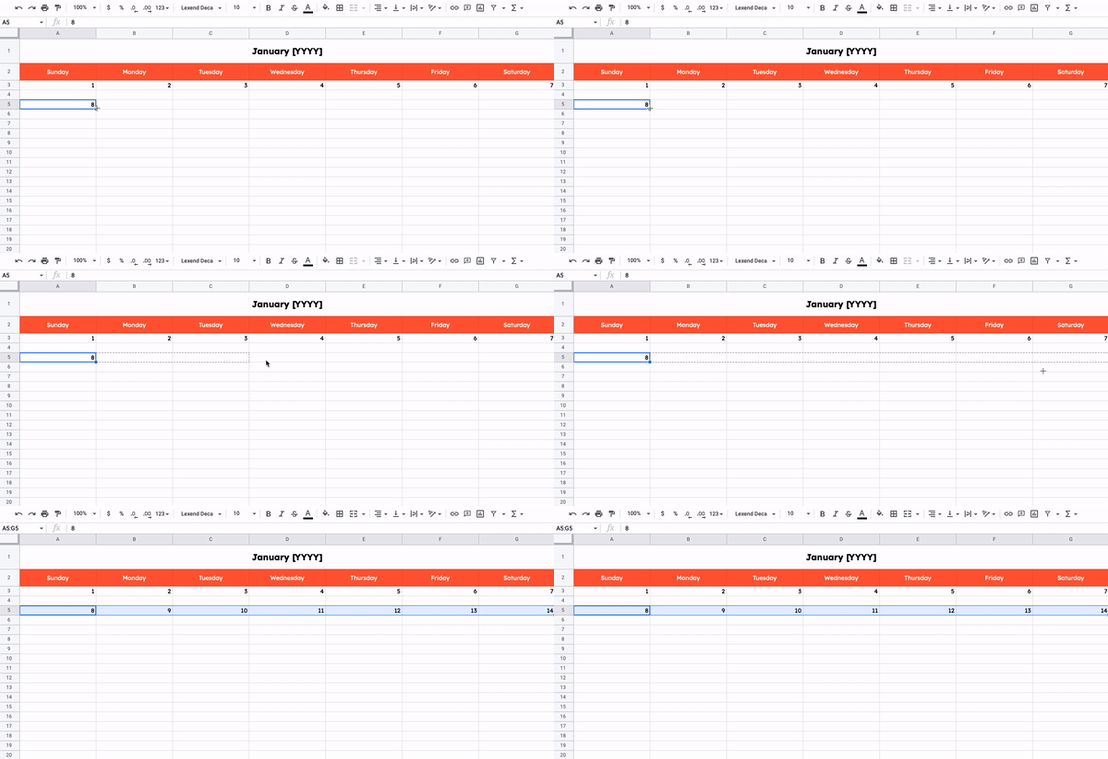
For the numerical values, we’ll simply identify the first day of the month and click and drag to fill in the rest.
How?
Place the number 1 on the box right underneath the first day of the month, then click and drag horizontally. Depending on the day of the week, you may need to follow this process using the second day of the month so you can click and drag horizontally.
For this example, we’ll use Sunday as the first day of the month, but remember that the first day will vary yearly.
5. Fill in the rest of the numbers.
Note: In this step, I filled in the calendar numbers in every other row to help with my formatting later.
Now that you’ve filled out your first row, it’s time to complete the rest. Manually insert the following number, then click and drag horizontally to fill in the rest.
Repeat the process for the following rows. You’ll insert the first number manually, then click and drag down the row. Here’s what that looks like for the next row in January.

Note: Make sure to end the month on the correct number! For January, that would be the 31st.
6. Reformat your calendar if necessary.
Everything is starting to look like a calendar, right? At this stage, I reformatted things to clean up the look of my calendar a little.
Remember those extra rows in between the numbered rows? I expanded those rows to create boxes underneath the numbers. To do this, I simply dragged the rows down to make those cells bigger.
Here are some additional formatting tips:
- Select the empty rows underneath your numbers and center them using the center text alignment tool.
- Select your entire calendar and vertically align all elements so they’re in the center of their cells. To do this, use the vertical alignment tool.
- Bold your day numbers.
- If desired, lightly shade your numbered rows.
- If desired, gray out the Saturday and Sunday columns so that your workdays stand out.
7. Add design elements to professionalize the look.
Finally, you can add some fun design elements to personalize the look and feel of your calendar. You‘ll want to incorporate the necessary launch days here if it’s for a client or an upcoming project.
For this step, I added a few fun images, included a few hypothetical calendar events, and played with font sizes.
8. Repeat the process from February to December.
It’s time to repeat for February to December. Simply duplicate your January calendar once you’ve designed it how you want it to look. To do this, right-click the sheet’s tab and select Duplicate from the menu.
To fill in the numbers, you’ll only need to know the beginning day, then click and drag to fill in the rest of the rows. Here are the first days for every month for the year 2024:
- January: Monday
- February: Thursday
- March: Friday
- April: Monday
- May: Wednesday
- June: Saturday
- July: Monday
- August: Thursday
- September: Sunday
- October: Tuesday
- November: Friday
- December: Sunday
Next, you’ll want to know how many days you must fill in. Here are the number of days you’ll need for each month:
- January: 31
- February: 28 or 29
- March: 31
- April: 30
- May: 31
- June: 30
- July: 31
- August: 31
- September: 30
- October: 31
- November: 30
- December: 31
And then, you're done!
It's handy to use Sheets because you can open your calendar on your browser. You can also keep track of your schedule separately from your phone.
You can either make a calendar manually, as we covered above or use a template, as we cover below. You can also insert a calendar into Google Sheets using an add-on.
Google Sheets has a built-in timeline view that could be useful for calendar-making. By itself, though, it’s not as helpful. You can insert a timeline-view calendar containing all your events with the right add-on.
We’ll use the add-on Calendar Timeline View for this simple tutorial.
1. Install Calendar Timeline View into Google Sheets.
Make sure you’re logged into your Google account. Then, install Calendar Timeline View into your Google Workspace. Simply click Install in the upper right-hand corner.
You can also go to Extensions > Add-ons > Get add-ons on a Google Sheets spreadsheet. Search for Calendar Timeline View and install it from there.
2. Open the Calendar Timeline View sidebar.
An icon will appear on the Google Sheets sidebar for the add-on we just installed. Click it to open up the sidebar.
3. Pull your Google Calendar events into Sheets.
This add-on will pull your Google Calendar events into a Google Sheets timeline view.
The best part? You can create a Google Sheets timeline for any date range, including the next month, quarter, or year. I recommend creating a different timeline for different quarters or half-years.
In the sidebar, select a specific calendar (like your calendar, the US holiday calendar, or another calendar).
Then, at the bottom, click Pull Events.
4. Clean up your calendar data.
At first, the result might look funky. The tool pulls in everything from your Google Calendar, including Zoom descriptions, which can make your timeline look cluttered.
You can clean up the data the tool pulled directly on the spreadsheet. For example, I deleted the event descriptions so that the descriptions didn’t show up on my timeline.
I also deleted the guests because I didn’t need them.
5. Enjoy your timeline Google Sheets calendar.
The add-on automatically creates a timeline after you pull your Google Calendar events. I then changed the settings in the Timeline tab to the correct start dates, end dates, and card titles.
We're all done! Here’s the final result.
If you don’t have the time or the patience to create a calendar from scratch or install an add-on, below are Google Sheets calendar templates to download for free.
Google Sheets Calendar Templates
Good news: You’re not limited to Google Sheets’ built-in templates, which we share below. If you need a more functional annual calendar, I’ve got you covered with these marketer-friendly options.
1. Free Editorial Calendar Template for Google Sheets
This editorial calendar template is designed for Google Sheets and covers all of your editorial planning needs. This template lets you strategically lay out daily and monthly editorials in one accessible, scannable sheet.
Designed for utmost usability and readability, it includes a vertical layout for the dates, and coluto can add details such as the Author, Topic, Content Details, and Keywords.
Best For: A vertical, year-long design like this one can also be used for other efforts, such as professional and personal goals. You can change the columns to fit your and your team’s objectives for the upcoming year.
2. Free Spreadsheet Social Media Content Calendar Template
This Excel-based social media calendar template is ideal for marketers who want to build a strong social strategy for the upcoming year. The best part? It comes bundled with a user guide for those new to social media strategy planning.
If you already have a social plan, you can use this calendar for any multi-channel effort, such as content marketing across multiple platforms and guest blogging on different publishers’ websites.
Simply change the titles on the tabs to fit your goals.
Pro Tip: This template can easily be converted into a Google Sheets document. To upload it into Google Drive, simply head to drive.google.com and drag the file from your file explorer into your list of Google Drive documents.
Alternatively, head to sheets.new to create a new Google Sheets spreadsheet. Then, click File > Import > Upload. You’ll be able to import the Excel file without losing quality.
3. Monthly Calendar for Google Sheets
Need a simple monthly calendar? No worries, this monthly calendar template from smartsheet is easy to use and allows you to keep track of deadlines, appointments, and important milestones.
Best For: Tracking simple deadlines associated with campaigns. However, you may want a more robust calendar to meet your needs.
4. Yellow Project Calendar
This Yellow Project Calendar template gives a vibrant approach to the project plan while promoting organization and efficiency.
What I Like: The calendar's layout makes project coordination, productive resource management, and timely delivery possible.
5. Light Daily Calendar
I love this template because it‘s a simple way to track daily tasks. Plus, the cool colors create a calming vibe, making the day’s to-do list seem less daunting.
Pro-Tip: Adjust the color palette to shades that you find calming.
How to Make a Calendar Using a Google Sheets Template
Google Sheets provides a built-in template for calendar-making. The only downside is that customization options are limited — you can only use Google Sheets’ themes. This is an excellent option if you’re in a hurry.
1. Go to sheets.google.com.
Ensure you’re logged into your Google account or log in when prompted. This will take you directly to the Sheets home page, where you can access the templates.
Alternatively, go to drive.google.com, tap New, click the right-hand arrow next to Google Sheets, and tap From a template.
2. Access the template gallery.
You won't need to take this step if you access the Google Sheets templates via Google Drive.
Otherwise, tap the Template gallery in the top banner titled Start a new spreadsheet.
3. Find the annual calendar template.
Templates are divided into “Work” and “Project management.” Scroll down until you reach the Personal section, then tap Annual Calendar.
4. Change the formatting as needed.
All done! Your calendar has been created. Next, it’s time to change the formatting using Google Sheets’ available themes. You can also change the fonts as you’d prefer.
An alternative option to using Google Sheets’ built-in template is third-party templates such as HubSpot's below, allowing you to create essential business documents such as social and editorial calendars.
Our editorial calendar helps you lay out a strong strategy daily. With a bit of customization, your editorial calendar will run smoothly, leaving you more time to focus on the quality of your content.
Featured Resource: Free Editorial Calendar Templates
Use a Google Sheets Calendar to Organize Your Tasks
If you're handy with Sheets and want to give it a shot, create a Google Sheets calendar. And if you’re not so handy, I'm confident this step-by-step guide will help you out.
Google Sheets calendars are a great option if you need to create a clean calendar to track an internal marketing campaign, organize a client's upcoming projects, or share an event calendar with critical stakeholders.
But if you don’t want to create one from scratch, I suggest checking out our editorial calendar template to jumpstart your planning and organization efforts immediately.
Editor's note: This post was originally published in May 2020 and has been updated for comprehensiveness.


